

[vc_row][vc_column][vc_column_text]In the last few months, the FPV goggle market has become quite heated. The Fat Shark HDO2 are among the newest arrivals, offering top-of-the-line image quality.[/vc_column_text][/vc_column][/vc_row][vc_row][vc_column width=”1/6″][/vc_column][vc_column width=”2/3″][vc_single_image image=”5478″ img_size=”full” alignment=”center” onclick=”link_image”][/vc_column][vc_column width=”1/6″][/vc_column][/vc_row][vc_row][vc_column][vc_column_text]
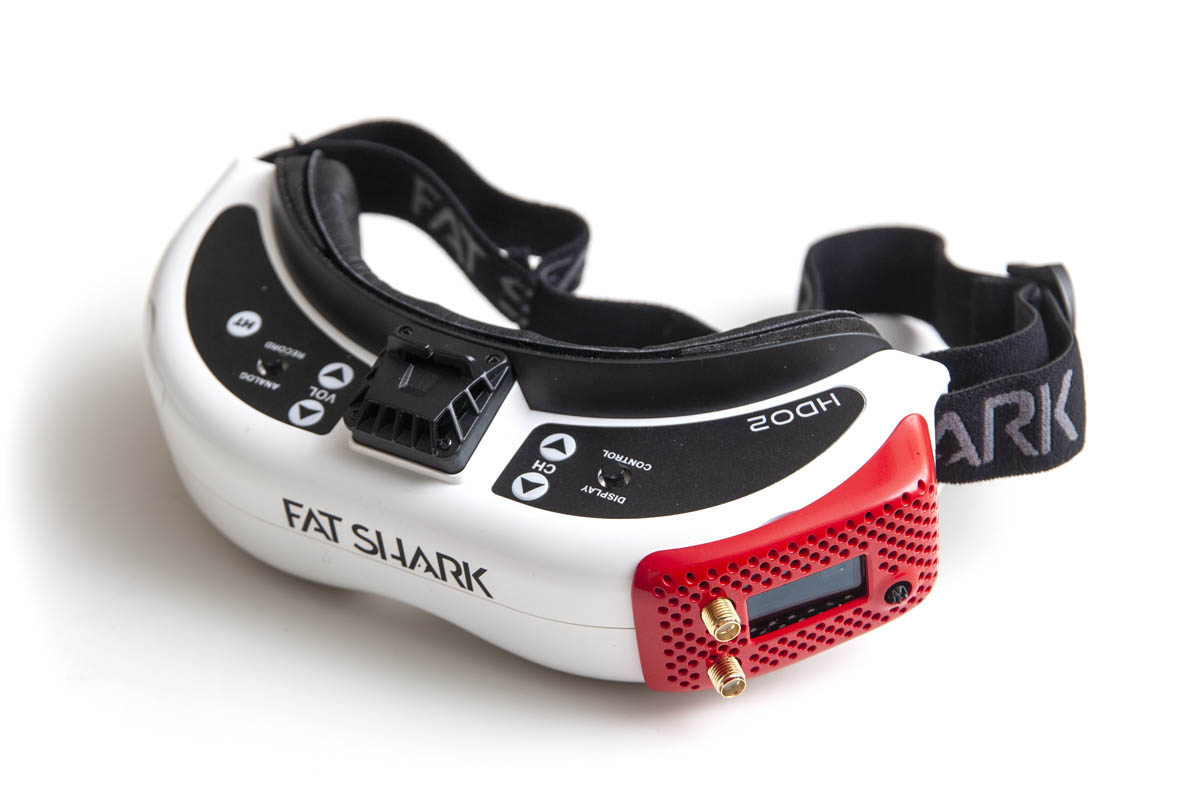
Fat Shark HDO2 Features and Specs
Here are some quick hits from the spec sheet:
- 46° FOV
- IPD range of 54–74mm
- Adjustable focus from +2 to -6
- Sony 0.5” OLED displays with 1280×960 resolution
- Standard definition 4:3 or 16:9, HDMI 16:9
- 7–13V input voltage (2–3S)
- At 7.5V input, consumes 320mA without a module (770mA with RapidFIRE module)
- Analog DVR
- Dimensions: 169 × 80 × 46mm
- Weighs 207g
Included in the box are the goggles, a battery case for two 18650 cells (but no batteries), a carrying case, and a lens cleaning cloth. And, yes, of course there are stickers.[/vc_column_text][/vc_column][/vc_row][vc_row][vc_column width=”1/6″][/vc_column][vc_column width=”2/3″][vc_single_image image=”5480″ img_size=”full” alignment=”center” onclick=”link_image”][/vc_column][vc_column width=”1/6″][/vc_column][/vc_row][vc_row][vc_column][vc_column_text]
Optics
While almost every Fat Shark goggle to date has had a very similar optical design, the Fat Shark HDO2 is a significant departure and takes a leap forward in the optical adjustments available. The interpupillary distance adjustment now ranges from 54–74mm, 5mm more on either extreme than previous models. Also new for the HDO2 is a focus adjustment. The internal diopter modules adjust from +2 to -6. Few goggles have offered this before and it’s a big help to getting the screens in focus for a wide range of people. However, those outside this range may want to avoid the HDO2 as they no longer accept custom diopter inserts.
A 46° FOV provides a large viewing area that’s very immersive. The optical quality is very good. All four corners of the image are sharp and easily visible. Barrel distortion and chromatic aberration are almost imperceptible. The Fat Shark HDO2s perform far better than almost all other goggles in this regard. The optics appear mode rounded than previous designs. As you look into the modules you can make out this circular area around the screen, but I quickly forgot about it when flying.
Fat Shark has made sure no light gets into the viewing area from within the goggles. Even if you leave the secondary module bay cover completely off, no additional light gets in from outside.[/vc_column_text][/vc_column][/vc_row][vc_row][vc_column][vc_column_text]
Fit
Pre-installed wedge inserts change the curvature of the face plate to customize it for different head shapes. To remove them, peel back the face padding and pull them out; they’re just held in place by Velcro. Fit often comes down to personal preference, but there are no obvious issues like pinching in the nose. With this design, I expect people with many face sizes and shapes to be able to find a good fit. I can see why many people opt to replace the head strap. While it’s perfectly functional, it’s the least comfortable piece of the equation.
Light leak is very dependent on face shape. I get a small amount at the bottom near the nose, but it isn’t distracting and no worse than any other goggle I have used. There’s a bit of extra foam on the edge of the lens module which prevents leaks from reflecting off the front side of the lenses. This reduces the effect that any minor light leaks in the fit have on the picture.
The optics modules sit closer to the eyes than those of previous goggles. For many including myself, this hasn’t been an issue. One person I showed them to could feel his eyelashes touching the lenses when he blinked. In another report, someone couldn’t get the screens in focus without the lenses actually touching their eyes. You can replace the face padding for a better fit—perhaps with thicker foam. However, the Fat Shark HDO2 doesn’t use the same form factor as earlier goggles so most 3rd party face pad replacements won’t fit perfectly. If you opt for thicker foam, the edges of each lens may begin to cut away at the corners of the picture.[/vc_column_text][/vc_column][/vc_row][vc_row][vc_column][vc_column_text]
Build Quality
Build quality is excellent—as it should be at this price point. Everything seems built to a high standard with quality materials that should last a long time if treated well. Everything seems to look, feel, and work the way it’s intended. Optical adjustment controls are perhaps a little stiff, but this prevents them from moving out of place unintentionally. The goggle remembers the last-used AV mode, and the fan does an excellent job of cycling fresh air into the eye areas.
The 7-13V input range is fairly limited, spanning LiPo pack sizes of only 2S or 3S. In addition, the input voltage warning is only useful if you’re using a 2S power source. If you use the included case for 18650 cells, this isn’t a problem—but if you have other batteries that you want to power from, consider a voltage regulator like the FuriousFPV Smart Cable.
The Fat Shark HDO2 will accept all external receiver modules currently available for Fat Shark goggles. (Some earlier models needed a modification to accept modules with higher power requirements.)[/vc_column_text][/vc_column][/vc_row][vc_row][vc_column width=”1/6″][/vc_column][vc_column width=”2/3″][vc_single_image image=”5588″ img_size=”full” alignment=”center” onclick=”link_image”][/vc_column][vc_column width=”1/6″][/vc_column][/vc_row][vc_row][vc_column][vc_column_text]
Operation
Basic brightness and contrast options exist for a quick fix to the camera picture. Volume buttons are also basic, but not all goggles have them. A quick press of the brightness/contract joystick switches between 4:3, 16:9 (letterboxed), and HDMI-in (16:9 only). Holding it for 2 seconds opens the display settings menu. Here, you can additionally adjust sharpness, saturation, and power. Increasing the power physically increases the light output of the OLED panels, which can improve dynamic range at the cost of battery life. I found the default to be a pleasing brightness level, but it’s great to have the option to adjust with without losing resolution in luminance levels.
The interface isn’t quite perfect. Not all of the functions you would want, such as changing bands, are immediately available. The SD card slot between the lenses is tough to get at, and the DVR recording indicator should be integrated into the OSD. The fan also comes on at “high” speed every time you power the goggles up. While you can turn the fan speed to low with a quick tap of the fan button, you can’t turn it off entirely (despite what you read in the user manual and see in other reviews). I can easily feel the airflow on my eyes with the fan on high and almost always turn it down.
The Fat Shark HDO2 also includes a much-requested feature: a power button. In what is perhaps the strangest design decision, it doesn’t function as a power button until you open up the case and change the position of an electrical jumper. This button normally changes fan speed. Switching the jumper disables automatic power-on when a battery is plugged in and enables using a long press to turn the goggles on and off.
Also present is a physical switch to turn the external receiver on or off. It’s recommended to disable the receiver when AV-in or HDMI-in is used, because the module can create some noise in the video. A stereo headphone jack provides audio output if it’s available.[/vc_column_text][/vc_column][/vc_row][vc_row][vc_column width=”1/6″][/vc_column][vc_column width=”2/3″][vc_single_image image=”5583″ img_size=”full” alignment=”center” onclick=”link_image”][/vc_column][vc_column width=”1/6″][/vc_column][/vc_row][vc_row][vc_column][vc_column_text]
Display Performance
Fat Shark doesn’t manufacture the display panels themselves, (they’re made by Sony,) but they did pick out some of the best panels available. No compromises have been made here. The picture is bright, has good contrast, and great color reproduction. These are simply the best available on the market right now, and are vastly superior to any budget goggle.
One effect of using such high-quality screens is that you’ll more readily notice imperfections in your camera. For example, faint noise in the image isn’t blurred away and a lower resolution camera can be easily identified by pixelation in diagonal lines.
By default, the picture settings add a lot of contrast to the digital image. This blows out highlights and eliminates shadow detail somewhat. You can bring the full dynamic range of the image into view and see all of the detail at both ends by reducing contrast and increasing brightness. I found brightness of 18 and contrast of 4 worked best to show all of the available detail.
HD Performance
Plugging the Fat Shark HDO2 to an HD source allows you to output a 720P HD picture at full resolution. If you like to use your goggles connected to a PC for simulators, this is great news. Lower-resolution goggles often accept a 720P signal but can’t display it, so on-screen text was impossible to read. Not an issue with the HDO2; text is clear and the picture is great. The monitor descriptor (EDID) for the HDO2 reports that it only supports 1280×720 at 60Hz. You can’t use the goggles in 4:3 mode over HDMI, which means it will always be letterboxed—you can’t make use of the whole screen.
One reason Fat Shark has gone up to this resolution is likely because Fat Shark’s own Byte Frost HD video system outputs in 720P, and future HD video systems probably will as well. This gives the Fat Shark HDO2 a degree of future-proofing so it should be a long time before they’re considered functionally obsolete.[/vc_column_text][/vc_column][/vc_row][vc_row][vc_column width=”1/6″][/vc_column][vc_column width=”2/3″][vc_single_image image=”5479″ img_size=”full” alignment=”center” onclick=”link_image”][/vc_column][vc_column width=”1/6″][/vc_column][/vc_row][vc_row][vc_column][vc_column_text]
Receiver Performance
The Fat Shark HDO2 goggles do not come with a receiver. Purchase a receiver module separately to receive signals directly from a video transmitter. There are several choices for plug-in modules ranging from the somewhat inexpensive RX5808 Pro to the maximum performance ImmersionRC RapidFIRE. You can also use an external ground station receiver and the AV-in port. This last option is much less convenient but provides performance benefits.
DVR
The DVR is a bit of a disappointment. Fat Shark goggles have never shipped with a high-quality DVR, and the Fat Shark HDO2 doesn’t offer anything new. This older DVR firmware is known for poor image quality and dropping frames. The DVR also doesn’t deal well with outside data on the SD card, and it can’t record from the HDMI-in. It does offer an automatic recording start when powered on. The DVR records at 6Mbps in 30FPS. You can also play back your recordings, but pretty much only if they were made on the HDO2 to begin with. Fat Shark states they accept MicroSD cards up to 32GB, though some users have successfully reported using larger cards.
However, buried in the HDO2’s spec sheet is a note that the DVR is “Upgradeable via SD card”. Hopefully this means Fat Shark will release improved firmware for this component in the future and provide details on how to make an upgrade.
If you primarily use your DVR for finding lost models and you don’t care about image quality, the included tech is fine. If high-quality DVR is a priority right now, you might consider using an external module connected to the AV-out. The ImmersionRC PowerPlay is built for exactly this purpose and provides an excellent recording.[/vc_column_text][/vc_column][/vc_row][vc_row][vc_column width=”1/6″][/vc_column][vc_column width=”2/3″][vc_single_image image=”5482″ img_size=”full” alignment=”center” onclick=”link_image”][/vc_column][vc_column width=”1/6″][/vc_column][/vc_row][vc_row][vc_column][vc_column_text]
Included Accessories
The Fat Shark HDO2s come with an 18650 battery case. This case is also well-made and appears very durable. You don’t get batteries included with the case, so if you want to use it you’ll need to source some 18650 cells yourself. The case also provides a voltage checker, but won’t charge the cells inside. There are cheap chargers available, but also some much more expensive chargers that will take better care of the cells over the long term.
Design Changes
If you’re an existing Fat Shark user, some design features have changed in notable ways from previous goggles:
- A separate balance plug is no longer required to run the fan.
- The fan speed can be changed with the button and no longer requires a separate power plug to run.
- A power button is available that—if configured with hardware—will turn the goggles on and off.
- Diopter inserts can no longer be used.
[/vc_column_text][/vc_column][/vc_row][vc_row][vc_column width=”1/6″][/vc_column][vc_column width=”2/3″][vc_single_image image=”5479″ img_size=”full” alignment=”center” onclick=”link_image”][/vc_column][vc_column width=”1/6″][/vc_column][/vc_row][vc_row][vc_column][vc_column_text]
Conclusion
Fat Shark isn’t ready to relinquish its position as leader in the high-end goggle market, but recent challenges by Skyzone and ORQA are making a top-end goggle purchasing decision a bit harder. Skyzone’s 03O is less expensive but has a smaller screen, built-in receiver but no external module bay, and is missing some important features like a 16:9 view mode. On the other side of things, the ORQA FPV.One has a better DVR, an optional WiFi module with live streaming, and promises software updates well into the future—but is 30% more expensive. The Fat Shark HDO2 slots in between with its excellent video display, improved fit, and a long-standing track record of quality and support from Fat Shark. Pilots who want top-of-the-line image quality but aren’t interested in (or don’t want to pay for) other fancy extras will definitely enjoy the HDO2.
Note: Photos in this article show goggles with an ImmersionRC RapidFIRE module installed. This module is sold separately.[/vc_column_text][/vc_column][/vc_row][vc_row][vc_column][ultimate_spacer height=”20″][vc_separator][ultimate_spacer height=”20″][/vc_column][/vc_row][vc_row][vc_column width=”1/2″][vc_single_image image=”5586″ img_size=”medium” alignment=”center”][dt_default_button link=”url:https%3A%2F%2Fwww.getfpv.com%2Ffat-shark-dominator-hdo-2-fpv-goggles.html||target:%20_blank|” size=”medium” button_alignment=”btn_center”]Get the Fat Shark HDO 2 FPV Goggles[/dt_default_button][/vc_column][vc_column width=”1/2″][vc_single_image image=”5587″ img_size=”medium” alignment=”center”][dt_default_button link=”url:https%3A%2F%2Fwww.getfpv.com%2Fultimate-fpv-bundle-v2.html||target:%20_blank|” size=”medium” button_alignment=”btn_center”]Get the Fat Shark HDO 2, rapidFIRE, + Lumenier AXII 2 Diversity Antenna Bundle[/dt_default_button][/vc_column][/vc_row]
I just purchased HDO2’s with RapidFire, which was supposedly an upgrade from HDO’s with True_DX. My testing was carried out on Tinyhawk 2 (Runcam Nano)
I’m very disappointed with the image quality. The screens don’t handle blacks and reds very well, they look false and unnatural compared to the HDO’s. The image is quite blown-out and grainy. I’d expected it to be a little more grainy due to the larger FOV, but not as much as it is. I’ve been through all the settings and no matter what, I can’t ‘soften’ the image. Reducing the ‘power’ option to almost 0 does somewhat soften, but at the expense of leaving it completely bland.
Strangely enough I’m getting better results on HDO2’s with True_DX, but still not as natural looking as the HDO’s.
I’ve heard Rapidfire works better with certain cameras etc, but I didn’t have any of that messing around with my HDO TrueD setup. The image is just nice straight out the box.
The optic adjustment and power button are good features, but the goggles are uncomfortable to wear. Even with TBS faceplate sponge upgrade.
Quite disappointed as I wanted them to be better. I’ll go back to my HDO’s and leave the HDO2’s in the cupboard until SharkByte becomes available. Even then, I’m not sure as I think the problem is the actual screens.