

[vc_row][vc_column][vc_column_text]”Vaporware” they said! Well, that’s not the case, as quite a few FPV pilots now hold in their hands (and hopefully mounted on their face) the new ORQA FPV.One goggles. These goggles have been highly anticipated and hotly debated over the last several months. Now they are released, what’s the story, and how do they perform?[/vc_column_text][/vc_column][/vc_row][vc_row][vc_column][vc_single_image image=”5551″ img_size=”full” alignment=”center” onclick=”link_image”][/vc_column][/vc_row][vc_row][vc_column][vc_column_text]
ORQA FPV.One Specs
- Viewing Angle: 44° or 30°
- Screen Resolution: 1280 x 960
- Aspect Ratio: 4:3 Native, 16:9 (720p)
- Power Supply: 6-10VDC (2S LiPo Battery)
- Power Consumption: 4.2W Max
- Integrated Head Tracker Output: 3.5mm Jack
- Headphones Audio Out: 3.5mm Jack
- Composite Video Input: 3.5mm Jack
- HDMI Video Input: Micro HDMI
- Battery Connector: 2.1 x 5.5mm Barrel Connector
- IPD Range: 56 – 74mm
- Integrated Defogging Fan: Yes
- Integrated DVR: 1280 x 960 @ 25-60fps, H.264, 18mbps, MP4 Format
- Head Strap: 35mm Wide Band
- Standard Receiver Bay: High Power
- Secondary Bay for Additional Modules: 5V, SPI, I2C
- Weight (Without Battery): 210 Grams
- Dimensions: 177 x 99 x 72mm
[/vc_column_text][/vc_column][/vc_row][vc_row][vc_column width=”1/6″][/vc_column][vc_column width=”2/3″][vc_single_image image=”5559″ img_size=”full” alignment=”center” onclick=”link_image”][/vc_column][vc_column width=”1/6″][/vc_column][/vc_row][vc_row][vc_column][vc_column_text]
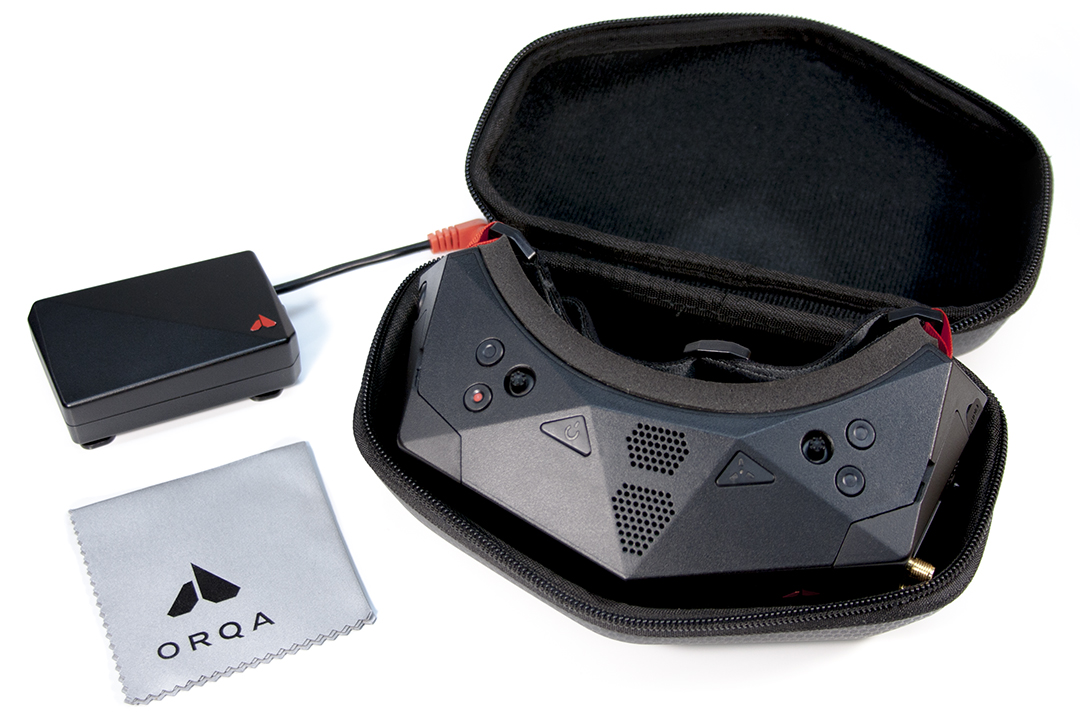
What’s Included?
The ORQA FPV.One comes in a very nice hard sided travel case with a metallic badge on it. Inside are the goggles, a cleaning cloth, and a battery case. The battery case is a 2S, 2000mAH battery. While somewhat bulky, the way the battery fits onto the band of the goggles makes it extremely comfortable. The ORQA FPV.One also comes with a wide band goggles strap. While these have been around for a while, I never felt the need to try one. Now I may need to get one for my Fat Shark Dominator HD2’s.
As a pre-order bonus, GetFPV is including additional items, to include the FPV.Pro antenna setsand the FPV.Connect, making this a very attractive offer.[/vc_column_text][/vc_column][/vc_row][vc_row][vc_column width=”1/6″][/vc_column][vc_column width=”2/3″][vc_single_image image=”5549″ img_size=”full” alignment=”center” onclick=”link_image”][/vc_column][vc_column width=”1/6″][/vc_column][/vc_row][vc_row][vc_column][vc_column_text]
Initial Impressions
After looking at pictures of the ORQA FPV.One goggles over the last several months, finally getting a pair in my hands has been an experience. It’s not very often that something that started out on Facebook in October of 2018 makes it full circle to production in the FPV community. These goggles could have very easily been vaporware. It’s a testament to the tenacity of the ORQA team that they stuck by their product and made it through to production and shipping.
Internal Computer
The ORQA FPV.One goggles have a powerful internal computer that drives the whole system. Currently, that system isn’t overly taxed with the job that it performs, giving the system headroom. The team at ORQA plan on using that headroom to add additional modules to expand the capability and function of the system as new technology comes out. The first in that expansion plan is the FPV.Connect, a module that will link up your goggles to your mobile phone. This will allow you to access your DVR recordings, play and share them. It will also allow you to update the firmware of your goggles wirelessly. You can even go live on social media, broadcasting your goggle feed directly to platforms like YouTube and Facebook. Being able to add functionality to your goggles instead of having to upgrade them gives them a MUCH longer life cycle.
Design and Ergonomics
The design of the ORQA FPV.One goggles is definitely unique. They have gone well away from the rounded nature of most brands of FPV goggle, and instead opted for the straight line and angular look of stealth airplanes. When I first saw them, they reminded me very specifically of the F-117 Nighthawk.
The foam is very thick and sits against the face nicely, sealing out most light. I did have a very small amount of light leak around the nose area, but nothing that I noticed under flying conditions. They are extremely comfortable, with no pinch points or areas of pressure when on. One thing I would like to see here though is a Velcro type system for changing out pads. Currently they are adhered only with double sided tape. According to the r/OrqaFPV thread over at reddit, these are currently in the works at ORQA HQ.
On the left temple beneath the cover are the ports for headphones and the built in head tracker. On the right temple is the power connector. Also, underneath the cover is the AV-in port if you prefer to use a ground station, as well as a micro-HDMI port.
On the inside of the goggles, above the left optic, is where the microSD memory card slot is found. If you’re looking to take advantage of the ORQA’s excellent DVR, toss a card in here! Above the right optic is a light sensor that can see when the goggles are up against your face. With the correct setting within the menu, this will automatically put the goggles in standby mode when the goggles are removed from your face.
Interpupillary Distance (IPD)
Interpupillary distance is the measurement between the center of the pupils in each eye. This distance differs from person to person. When using something like FPV goggles, getting this wrong means the optics are not centered on the pupils, creating distortion in the image. To correct this, FPV googles have incorporated IPD adjustments. The ORQA FPV.One has wheels on the underside that adjust the IPD from 56 – 74mm. With the exception of the new Fatshark HDO2 FPV googles, this is the largest range available, which has quite a few people excited about them.
Furthermore, the ORQA’s allow for diopters to be installed. This allows the pilot to modify the goggles to their specific prescription.[/vc_column_text][/vc_column][/vc_row][vc_row][vc_column width=”1/6″][/vc_column][vc_column width=”2/3″][vc_single_image image=”5556″ img_size=”full” alignment=”center” onclick=”link_image”][/vc_column][vc_column width=”1/6″][/vc_column][/vc_row][vc_row][vc_column][vc_column_text]
Controlling the ORQA FPV.One
Along the top are all the buttons needed to operate the goggles, save for the module. On the right side (when wearing them) are two buttons and a 5-way joystick. One button checks the battery percentage and displays it on the OSD of the goggles. The red button is the DVR record, which instantly starts/stops recording once pressed. The joystick controls the DVR menu, pressing down enters the menu, and the joystick navigates the options.
On the left side, are again two buttons and a 5-way joystick. The two buttons are quick controls for changing your channel or band. A short press changes the channel, while a long press changes the band. A press of the joystick brings up the goggle system menu, where you can adjust all the settings. If you use move the joystick up/down or left/right without pressing the joystick down, you can quick control the brightness and contrast.
In the center, there are two other buttons, one is the power button, and the other turns on the defogging fan. There are actually two fans in the ORQA FPV.One, the defogging one, and the internal component fan. While the defogging fan can be turned on and off, the other phone is driven by the internal temperature of the goggles in order to keep the components from overheating. While a good thing, that fan can be a little loud, but you start to get used to it ask you use them more.[/vc_column_text][/vc_column][/vc_row][vc_row][vc_column width=”1/6″][/vc_column][vc_column width=”2/3″][vc_single_image image=”5539″ img_size=”full” alignment=”center” onclick=”link_image”][/vc_column][vc_column width=”1/6″][/vc_column][/vc_row][vc_row][vc_column][vc_column_text]
Settings Menu
Adjustments to the goggles are all done within the settings menu. There are a few options here not previously available in other FPV goggles, so lets take a quick look:
Receiver Settings
Here you can select the type of receiver that you have installed in the goggles. I would assume that there is programming within the goggles that helps them interface more completely. Currently there are only two options: rapidFIRE and Other. You can also select the “Channel Table” which will bring up a full band / channel to view on the OSD. It’s great to have this reference built in, and you can also use it to select a channel.
Input Source
Under this menu, you can select the source of your signal, whether from the module bay, the AV-in, or the HDMI-in. You can also set this to automatic, so that the goggles will select the input where the signal is coming from.
Image Settings
Allows adjustment to brightness, contrast, color saturation luminescence, and switch the aspect ratio between 4:3 and 16:9. There is also another option here called “Super Size”, however throughout testing, I could not see any discernible difference with it on or off. Perhaps this is something for a future update?
Stand-by
Adjusts the previously discussed stand-by feature that can help preserve your battery between packs. You can turn it on or off, as well as set the time that the goggles will wait before activating. It starts at 20 seconds and can be increased in 10 second increments all the way up to 240 seconds.
Features
Controls several of the additional functions present in the ORQA FPV.One goggles, including the head tracker, head tilt alarm, and power button function, and sound. Paired with the head tilt alarm, you can set your head zero point as well as the angle at which the alarm will activate. The power button can be set to one of three different settings: Always on, which turns them on as soon as the battery is plugged in. Mode 1 requires only a short press of the button to turn them off and on. Mode 2 requires a short press followed by a long press, similar to DJI’s power buttons.
Battery
Settings for adjusting battery information including showing voltage vs. percentage, OSD position for displaying that information when the battery button is pressed, and the low voltage alarm.
About
Displays firmware and hardware versions, how long the goggles have been in use, and the date / time. The user can also factory reset the goggles from this menu.[/vc_column_text][/vc_column][/vc_row][vc_row][vc_column width=”1/6″][/vc_column][vc_column width=”2/3″][vc_single_image image=”5555″ img_size=”full” alignment=”center” onclick=”link_image”][/vc_column][vc_column width=”1/6″][/vc_column][/vc_row][vc_row][vc_column][vc_column_text]
Optics
Optics make or break any FPV goggle, but the ORQA does not skimp. There are two 0.5″ Sony OLED screens that power the ORQA FPV.One. Creating the focus on the screens are four glass lenses in each optic assembly. One drawback here is the pincushion distortion that these lenses create. The effect creates a curve that bends in toward the center on each of the four edges of the screen. The effect is not overly distracting, however it is there.
There’s no light leak that reaches the optics assembly, creating an immersive feel. The Fat Shark Dominator HD V2’s that I regularly use have square optics, whereas the ORQA FPV.One utilize circular optics. This can create an effect of looking down a barrel at a square screen. Again, not a major issue, with enough time and use, it moves into the background.
Overall the displays are excellent, with excellent color reproduction. Combined with a good camera and good settings, these goggles speak for themselves. You may find that some of your older, lower resolution cameras in your quads might need to be swapped out to fully maximize the potential of these goggles![/vc_column_text][/vc_column][/vc_row][vc_row][vc_column width=”1/2″][vc_single_image image=”5566″ img_size=”full” alignment=”center” onclick=”link_image”][/vc_column][vc_column width=”1/2″][vc_single_image image=”5567″ img_size=”full” alignment=”center” onclick=”link_image”][/vc_column][/vc_row][vc_row][vc_column][vc_column_text]
Receiver Module Compatability
The module bays are located on the sides of the ORQA FPV.One goggles. Traditionally, when using a patch antenna, attaching it via a 45° degree SMA adapter has been effective; however, a 90° adapter might make a little more sense if you want to keep the patch facing forward instead of slightly off to the side.
While they don’t come with a receiver module normally (I’m sure there will be bundles that include them), the ORQA FPV.One goggles are designed around the latest generation of receiver modules, being the ImmersionRC rapidFIRE and the TBS Fusion. These modules require a larger power supply than modules of previous generations, and the ORQA team has delivered that. Older module systems such as the LaForge that make use of both a main unit and a diversity unit will not work without mounting the diversity module on the outside of the goggle or creating a 3D printed or modified bay cover for the secondary bay.
The secondary module bay is classified as an upgrade bay, where you can add functionality such as the upcoming FPV.Connect module. The existence of this bay, along with the hardware within the ORQA FPV.One creates a “future proof” element that could make these goggles outlast the current development cycles that the FPV usually sees. I really look forward to what both the ORQA team and 3rd Party developers create to expand the functionality.[/vc_column_text][/vc_column][/vc_row][vc_row][vc_column width=”1/2″][vc_single_image image=”5554″ img_size=”full” alignment=”center” onclick=”link_image”][/vc_column][vc_column width=”1/2″][vc_single_image image=”5544″ img_size=”full” alignment=”center” onclick=”link_image”][/vc_column][/vc_row][vc_row][vc_column][vc_column_text]
DVR
The ORQA team has listened to the FPV community and provided a DVR that makes sense for pilots. Whether you’re using HD video or not, in a community fixated on video quality, providing that in your FPV goggles is the next evolution. As of the 1.1.1 firmware update, The ORQA FPV.One records DVR footage at 1280 x 960 at 60fps. This goes above and beyond just lost model location. This, combined with a quality signal will provide the next level in raw video footage.
I did get a little bit of glitching, as you can see in the video below, however overall, it’s got a pretty solid DVR system![/vc_column_text][/vc_column][/vc_row][vc_row][vc_column][vc_video link=”https://youtu.be/FR_2euBSiiU”][ultimate_spacer height=”20″][/vc_column][/vc_row][vc_row][vc_column][vc_column_text]
Are These Goggles Future Proof?
Currently, the cycle of FPV goggle innovation (and sales!) is to create a small enough upgrade to make it financially feasible, yet big enough that pilots want to upgrade. Then in a year or two roll out the next update. If you’re like me, that makes it hard to upgrade, especially when these things cost several hundred dollars. As I mentioned earlier, I’m still flying Fat Shark Dominator HD2’s! (I love them, don’t get me wrong, but they’re starting to show their age).
ORQA seems to be breaking that mold, creating the very best goggle they can right now, while carving a path for being able to upgrade them as new technology comes out. With the expansion bay and the computer system inside, ORQA can release newer and more developed expansion modules to add functionality. All without having to buy a new set of goggles.
As someone who strives to find the one thing they like, research it, buy it and hang on to it until all the value has been squeezed out of it, this makes a whole lot of sense to me. To me, this is akin to throwing a TBS Crossfire in the module bay of my FrSky Taranis X9D+ to change what it can do. I think we have partially been doing this with receiver modules for a long time, maybe ORQA has brought the circle around to completion?
That’s not to say that we shouldn’t upgrade at all. I think a more appropriate cycle would be a goggle upgrade every 5 years as technology makes that upgrade fully worth it. In between, module upgrades and expansion cards would be fine. Just my personal ten cents…. take it, or leave it![/vc_column_text][/vc_column][/vc_row][vc_row][vc_column width=”1/6″][/vc_column][vc_column width=”2/3″][vc_single_image image=”5545″ img_size=”full” alignment=”center” onclick=”link_image”][/vc_column][vc_column width=”1/6″][/vc_column][/vc_row][vc_row][vc_column][vc_column_text]
The Good and the Bad
[/vc_column_text][/vc_column][/vc_row][vc_row][vc_column width=”1/2″][vc_column_text]
Pros
- Powerful internal computer that has plenty of room for growth
- DVR that records at 1280 x 960 @ 60fps
- Expansion bay for increased functionality
- Comfortable foam and headband
- Power button with multiple functions
- No light leaks
- Future proof design overall
- Power system capable of handling the newest generation of modules
- Wide IPD Adjustment
- Built in Head Tracker
[/vc_column_text][/vc_column][vc_column width=”1/2″][vc_column_text]
Cons
- Fan for internal computer cooling can be a little loud
- Face plate foam needs a Velcro system
- Optics create a Pincushion effect on the screen
[/vc_column_text][/vc_column][/vc_row][vc_row][vc_column][vc_column_text]
Should you go ORQA?
The team over at ORQA have done great work with the FPV.One goggles, there’s no doubting that. What still remains to be seen is the longevity and innovation that they can bring to the FPV community. Further, the question remains for what type of support they will back the FPV.One with. There’s is often some doubt any time a newcomer comes into the scene, but with the tenacity that the ORQA team has gone through to bring their FPV goggles to market, I have high hopes!
I like where their ideas and innovations have brought the ORQA FPV.One. I also love the prospect of a future proof, expandable goggle system, especially if the minds over at ORQA can keep the updates and expansions coming for all the new technology on the horizon![/vc_column_text][/vc_column][/vc_row][vc_row][vc_column][ultimate_spacer height=”20″][vc_separator][ultimate_spacer height=”20″][/vc_column][/vc_row][vc_row][vc_column][vc_single_image image=”5564″ img_size=”medium” alignment=”center”][dt_default_button link=”url:https%3A%2F%2Fwww.getfpv.com%2Forqa-fpv-one-oled-fpv-goggles.html||target:%20_blank|” size=”medium” button_alignment=”btn_center”]Get the ORQA FPV.One OLED Goggles[/dt_default_button][/vc_column][/vc_row]