

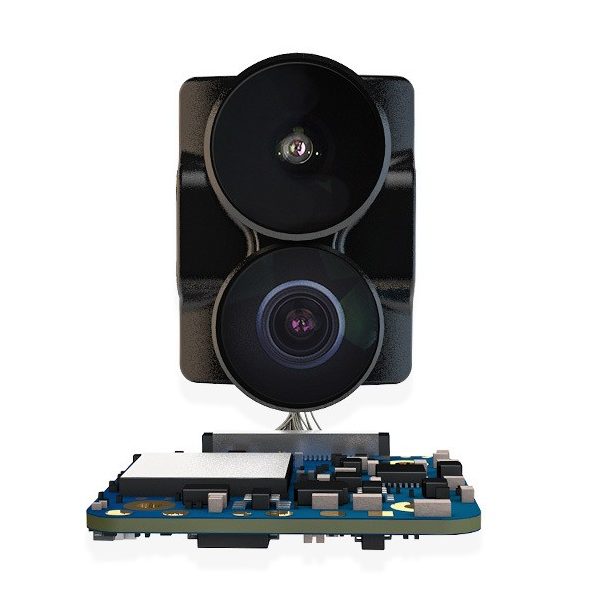
I’m relatively new to FPV and wanted to build a really light-weight 3” sub-250g freestyle drone without getting a separate HD action camera. The RunCam Hybrid seems like a pretty good compromise between function, cost, and weight for a 4k camera (with 1080/120fps for those slo-mo crash videos). Coupled with the Ummagawd! Acrobrat Duo and the remains of an HGLRC XJB 145, it turned out to be a solid performer that suits my needs really well. Watch Bardwell’s series on this build that I discovered well after I was elbows deep in it.
This article was submitted through the GetFPV Community Program by Karl.
Disclaimer: This article was written solely by a member of the FPV Community. Views and advice in this article are that of the author and does not necessarily reflect the opinion or views of GetFPV.
However, HD video file sizes get enormous and I wanted to just record when I’m already up in the air or ready to do fun tricks, so I decided to play with UART camera control. Note: I am using BetaFlight 4.1 so your mileage may vary.
RunCam Camera Control has been built-in to BetaFlight since 3.2.0. Oscar Liang has a good general article detailing how to get it setup. The protocol has gone through an evolution of hardware support and requirements, with resistors, and different protocols, and converter modules. Currently it mostly works directly wired to a UART and the rest is done in Betaflight configuration.
The Hybrid does things a little differently and actually has two independent controls built-in to the one board, which give you two different functions. I found this extremely confusing at first so I’ve tried to sort it out and document trying to get control setup via UART.
What can I control?
The hybrid has both a FPV and an HD configuration that are handled by two separate UART connections and are responsible for different parts of the controls. Below is the missing diagram I created from their documentation that fully explains the pins:
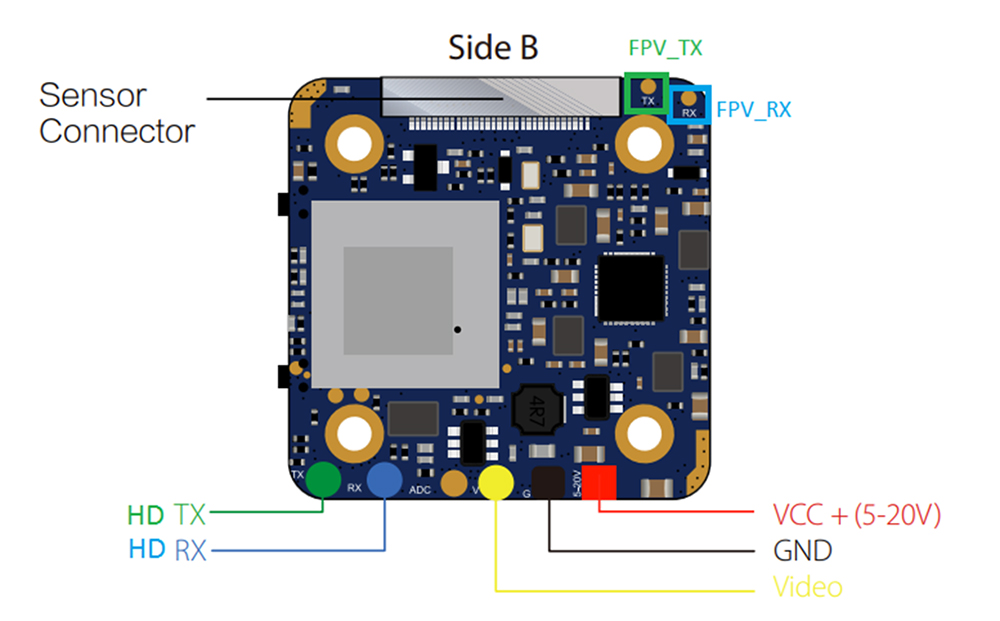
As you see there are two different UART RX/TX pairs that handle different functions:
- HD TX/RX pins next to the power connection: HD camera control via UART
- Start/stop the HD recording
- Switch the HD camera into QR mode (then use the app to create a QR code which you show the camera and the settings change)
- FPV TX/RX pins next to the camera connection: FPV camera control joystick and firmware updates via UART
- Change the FPV camera settings using a joystick and OSD
- Update the board firmware via UART and USB connection to a smartphone
Note: These pins can be used either with a UART or a wired joystick board. If you use the joystick board you can’t use the firmware update
These two sets of pins are separate and different and cannot be connected to the same UART on the flight controller. You have to either select which one you want to use or wire-up both (using a total of 2 UARTs). Also if you wire up both, you *cannot* have both active in Betaflight at the same time. I have not gotten this to work.
I’ve focused on the HD camera control, but the principle is the same with the FPV control.
HD Camera Start / Stop
My first goal was to map a switch on my radio to start/stop the camera. This requires:
- An available UART on the flight controller
- Solder between the camera board and the flight controller
- Configuring the Betaflight peripheral corresponding to the UART
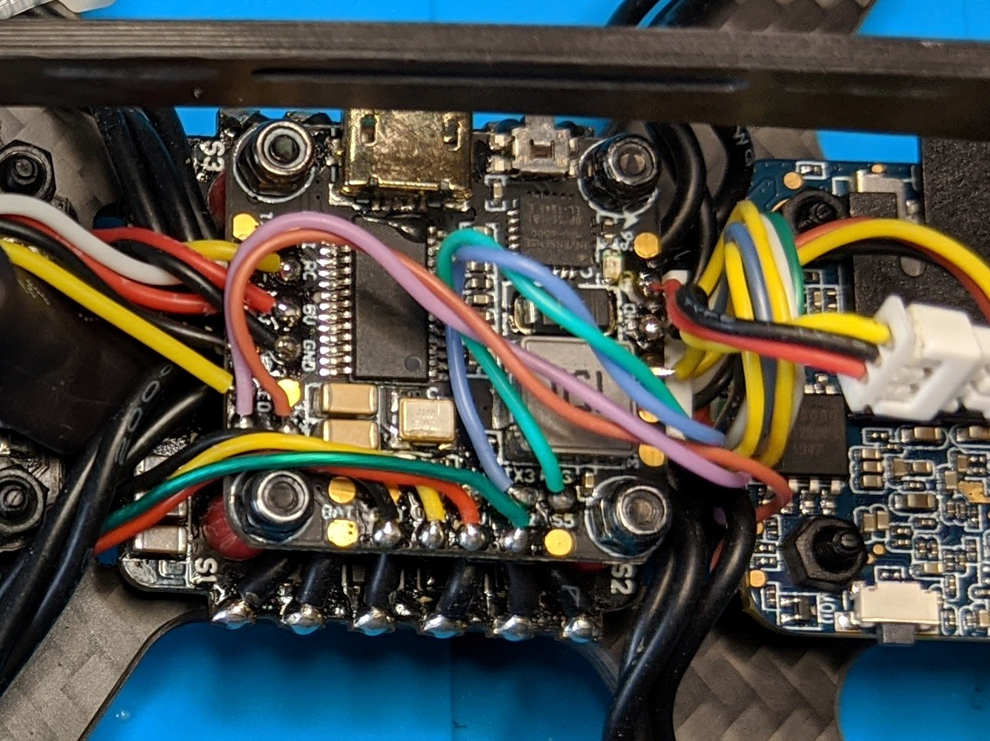
Connect the UART and Solder
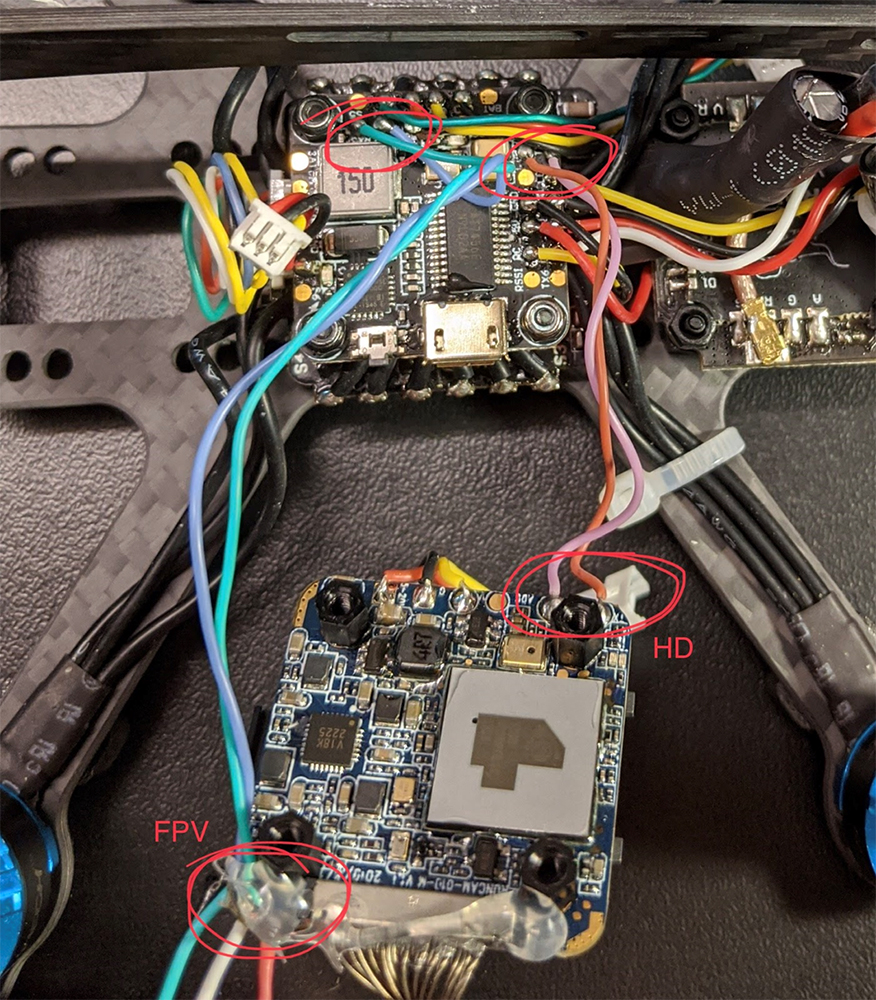
You can see the two sets of wires soldered from the HD and FPV pins on the camera board to the flight controller UARTs (I’d already covered them with hot glue for strain relief)
Here’s the view of it installed in the frame
I have an HGLRC F4 Mini, but just lookup the diagram for your flight controller and find where your available UART TX and RX pads are located. Don’t forget that the TX and RX are reversed when connecting between components, so the TX of the camera board goes to the RX of the flight controller, and vice-versa.
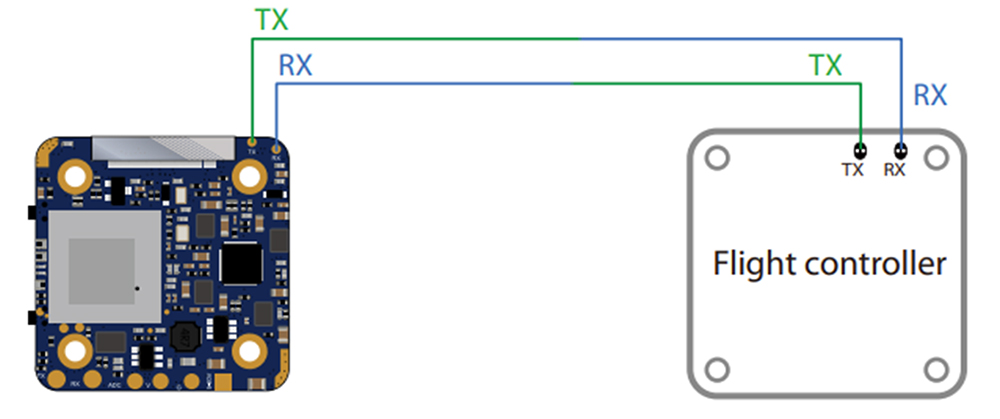
FPV UART Wiring
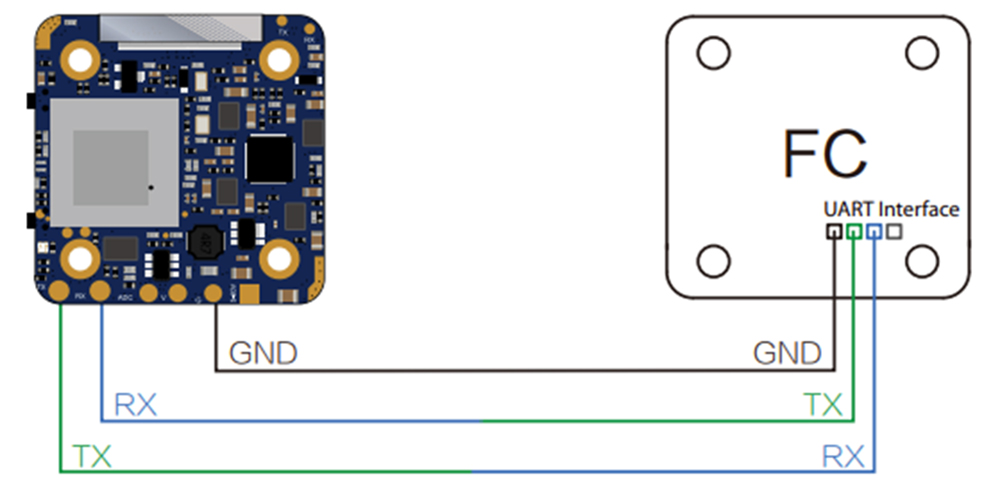
HD UART Wiring
I don’t know why it shows Ground on this diagram in RunCam’s doc, because you can’t power it on without it being grounded. Maybe they think it’s important that it’s grounded to the FC and not an ESC? Does the FPV UART not need ground? Maybe it is a relic of when they used single wire to control the camera? Who knows!
Configure Betaflight for HD Camera Start / Stop
In the Ports tab of Betaflight, find the UART you connected the HD TX and RX pads to and clear any configuration except for Camera (RunCam Protocol). Save and Reboot. This will expose the camera modes in the Modes tab.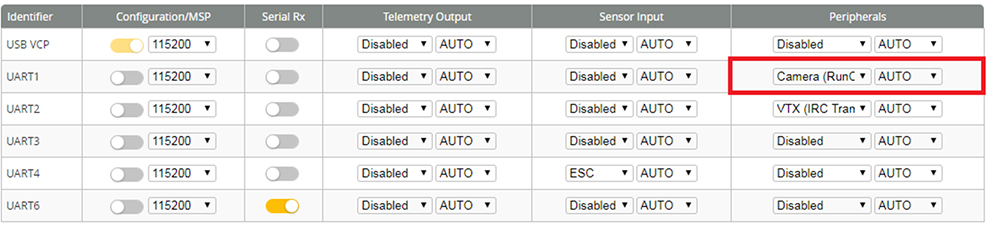
Configure Switch on the Radio
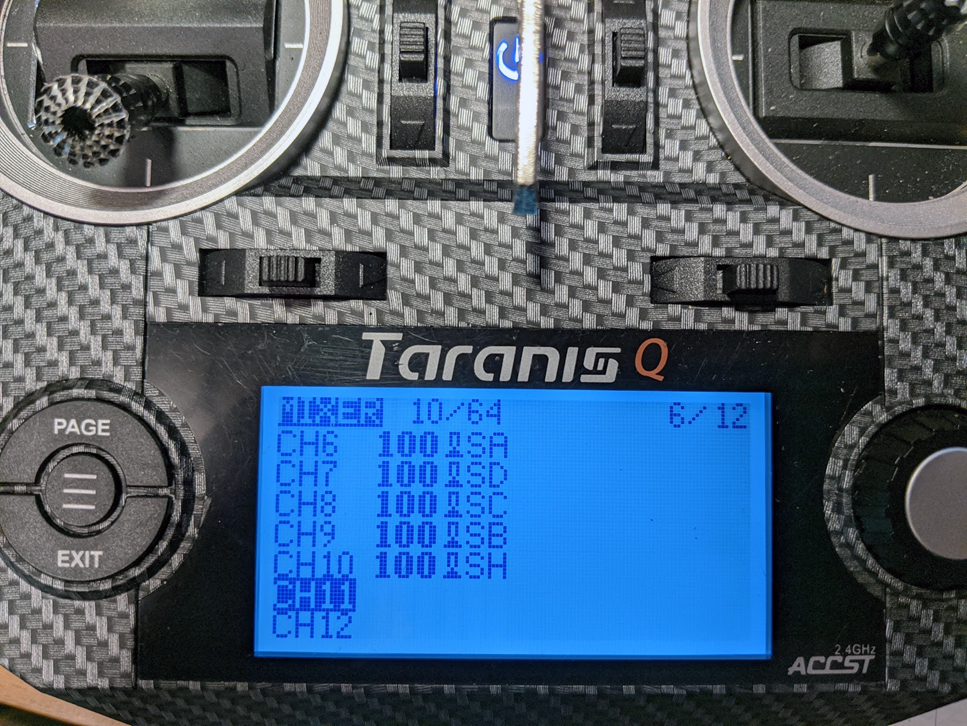
I use a Taranis QX7, but the process is roughly the same for most other radios. The switch ‘button’ in this case is a momentary switch, meaning the HD board just needs to see a state change of the switch going from up to down or vice-versa, and the switch does not need to stay activated.
In your model settings, go to the mixer tab and select an available channel not mapped to anything else and add your switch. Here I used switch H on channel 10 which is the long spring-loaded one on the right.
Go back into Betaflight and verify the switch shows up as an AUX port on the receiver tab (remember you might need to power up the quad with a battery for your receiver to power up). Hit the switch a few times to make sure it shows up properly and note which AUX it is.
[vc_row][vc_column][vc_video link=”https://youtu.be/W2EjgtBzcMI”][ultimate_spacer height=”20″][/vc_column][/vc_row]
Finally in the Modes tab in BetaFlight you should see the camera control modes, add a range for Camera Power Button and set the range higher than 1500.
Remember the state change to toggle the recording occurs when the switch briefly goes into or out of the activation range of the Mode. By default the switch starts in the ‘middle’ position of 1500 when the flight controller powers up. Once the receiver connects it gets set down to the ‘down’ position of 900.

Here’s a demo of the working toggle. You can see the camera is not recording because it says “HD PREVIEW” in the FPV on screen display and the LED is solid blue on the camera board. Toggling the switch causes the camera to start recording (flashing blue LED and flashing red light in the FPV view).
Note: for some reason I had some issues activating the switch when the flight controller was connected via USB, so make sure you’re just on battery when testing.
[vc_row][vc_column][vc_video link=”https://youtu.be/fRJVb_wsf9w”][ultimate_spacer height=”20″][/vc_column][/vc_row]
Yay! Now you can start/stop recording in mid-flight!
Change HD Settings
To change HD recording settings, you use the RunCam app and QR code, same as most of the other recent RunCams. Download the app to your mobile, open it and select the Hybrid then QR Code configuration. Select the options you want and hit Apply, it should generate a QR code.
Before this QR code can be read by the camera, it has to be in QR mode. You can either push the button on the camera board (boring) or map a different switch in Betaflight to the Camera Mode function (cool and fun!). Follow the directions above to map a different switch on your radio and configure the range “Camera Change Mode” in Betaflight corresponding to the AUX port of the switch. This is also a toggle mode, so if you use a normal 3-way switch, just set the range high and go in and out of it by moving the switch high and then low (see the video below)
The LED turns green and the OSD shows “QR Mode”. When the QR is read the OSD goes back to HD PREVIEW and the light turns blue. I didn’t have to restart the camera for the changes to take effect, they were effective immediately.
[vc_row][vc_column][vc_video link=”https://youtu.be/5w_BKJLNg58″][ultimate_spacer height=”20″][/vc_column][/vc_row]
FPV Camera Control
The FPV camera is controlled via a joystick interface and OSD. If you’ve got the FPV UART setup correctly and Betaflight is set to Camera control for that UART, this is very straightforward. This only controls the setup of the FPV on screen display which is not very interesting to me. The RunCam documentation is OK here.
Update Firmware via UART
Here’s where things get more interesting. You will need the following:
- iOS or Android device with the SpeedyBee app from RunCam
- A USB cable to your flight controller
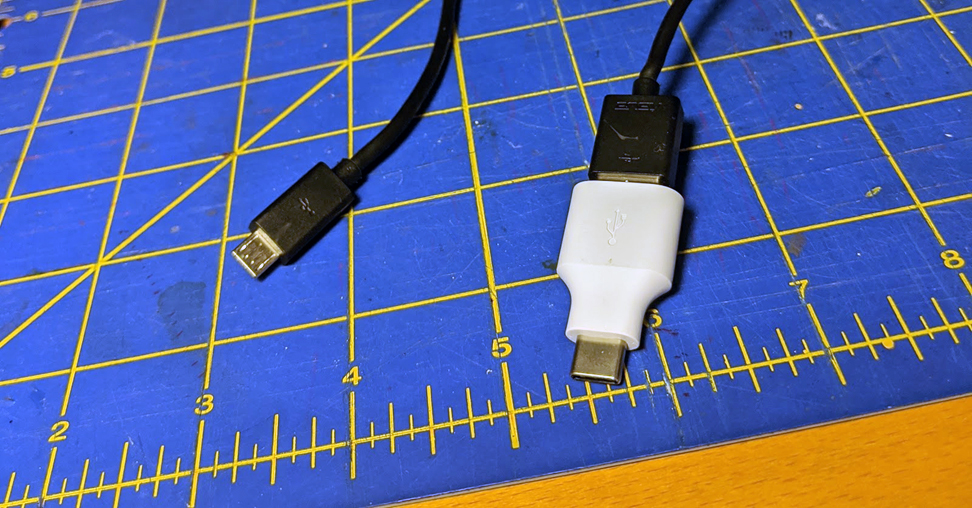
- A USB “On The Go” (OTG) adapter (basically something to create a USB port to your device). My pixel came with one: a USB-C male to USB-A female:
You DO need to remember which UART the FPV pins are wired to on your FC, so check before you start this process. Speedybee does not autodetect, nor does it read the ports configuration in Betaflight to tell which UART is setup with the Camera control.
Warning! Flashing the firmware (at least as of 1.2) resets your camera board configuration (including the Joystick/UART control for the FPV)
- First power-up the quad with a battery (otherwise the camera does not power up).
- Run the speedybee app, ignore the ad for RunCam stuff
- connect the USB from your phone to the FC, tap on the menu then Camera Firmware Update, select the Hybrid
- Tap Scan USB, then follow the prompts to connect to your FC
- You get a selection of different firmwares and configurations for the FPV.
- Tap download the firmware. Then update firmware
Android looks like this:

You should probably carefully select here. Make sure you select the UART you have soldered the FPV pins to, not the HD control pins, I have no idea what happens if you try to flash your GPS or something with RunCam code, but it probably isn’t good
Select the firmware you want to flash with, expand Advanced to see the options.
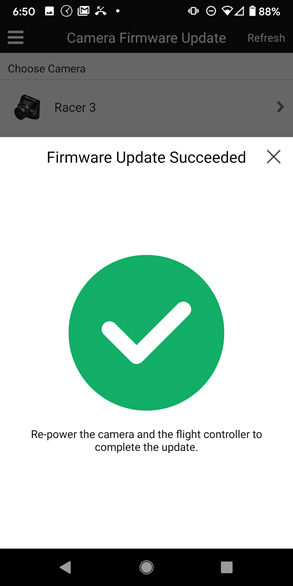
Hooray! Reboot the quad and experience the new firmware.
Conclusion
Hopefully this helps clear-up some confusion about the Hybrid setup with respect to the UARTs and remote controls. If I messed it up or confused you further, leave a comment or practice breathing slowly until the answer comes to you.
Colophon
I think RunCam named the Hybrid and Split backwards. Hybrid implies a combination with qualities of both (like cross-breeding a white and red flower gets you pink) where Split means they are individually split-out to their own quality, like when you have 2 separate lenses for different functions. Seriously though, RunCam and the Betaflight project have been really innovative and I respect that! I love having all these different affordable options for FPV.
Thanks! This was helpful. I was going crazy trying to test the UART HD control but was connected to Betaflight. Works fine once I unplugged USB.
I found this a real help thank you. I did not realise the two TX/RX pads were for HD and FPV. I happened to wire the FPV pads and that’s what I wanted so I was lucky. I’m getting the green haze in my FPV feed though as I can see you do in your clips above. Did you bottom this out and find a good FPV preset that seemed to offer the clearest picture? I also can’t seem to access the menu which allows you to change FPV mode from NTSC to PAL when in UART CTRL via OSD. Is this only accessible via joystick?