

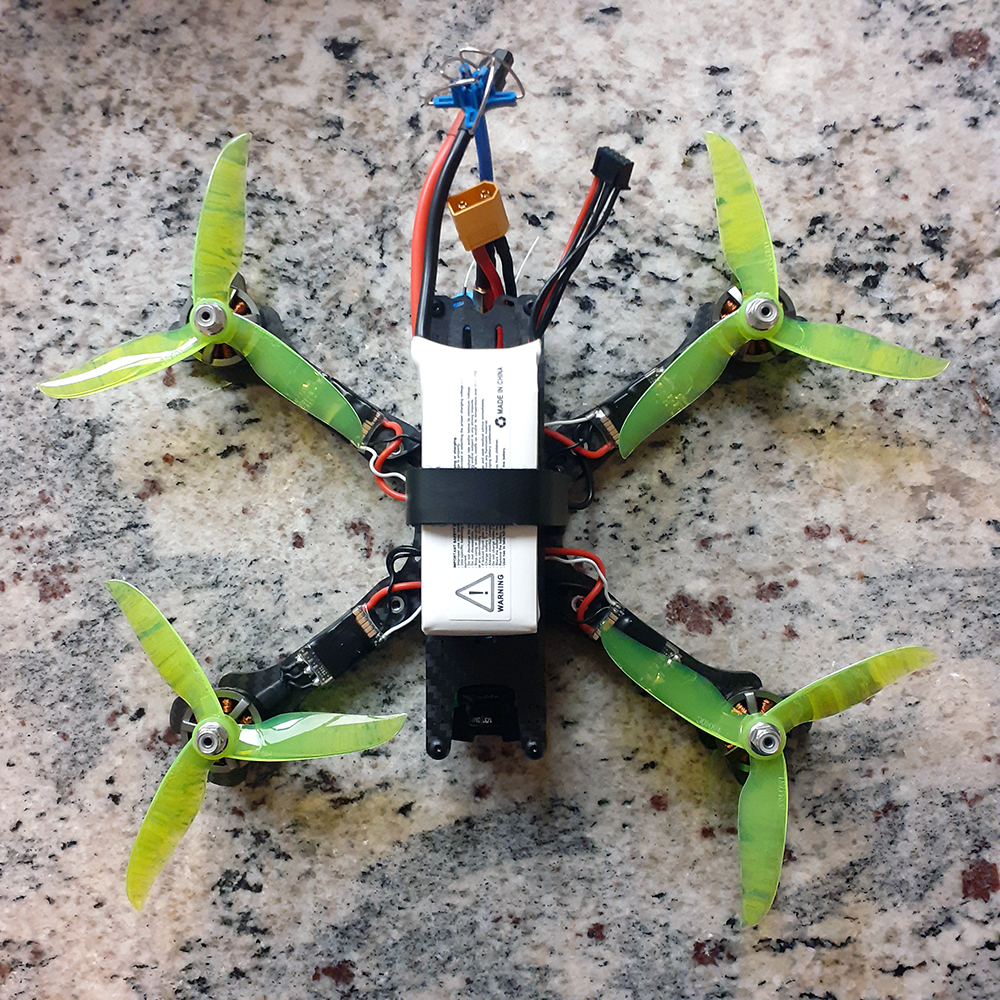
[vc_row][vc_column][vc_column_text]A 5-inch build?! In the middle of winter?! Why not? Those whoops can get boring after a while and it’s great to get some fresh air! Today, we will be building a budget freestyle quadcopter. The goal of this build is to provide a cheap, reliable platform for beginners to get up in the air and fly hard (and crash). Also, advanced pilots will enjoy the robust nature and cost-effectiveness of this build, which will hopefully enable pilots out there to push themselves further. The components used will be loosely following Joshua Bardwell’s parts list from his website: https://www.fpvknowitall.com/.[/vc_column_text][/vc_column][/vc_row][vc_row][vc_column][vc_single_image image=”5973″ img_size=”full” alignment=”center” onclick=”link_image”][vc_column_text]
This article was submitted through the GetFPV Community Program by Lawrence Ro.
Disclaimer: This article was written solely by a member of the FPV Community. Views and advice in this article are that of the author and does not necessarily reflect the opinion or views of GetFPV.
[/vc_column_text][/vc_column][/vc_row][vc_row][vc_column][vc_column_text]
Component List
[/vc_column_text][/vc_column][/vc_row][vc_row][vc_column][vc_column_text]Although this is deemed a “budget” build, we are by no means skimping out on quality. As you will see in the pats list below, this high-quality freestyle quad may be built for around $250.
Disclaimer: Some parts used in this build have been replaced with newer components to both maintain the budget aspect of this build, but with newer/better parts.[/vc_column_text][/vc_column][/vc_row][vc_row][vc_column][vc_column_text]
TBS Source One Frame
[/vc_column_text][/vc_column][/vc_row][vc_row][vc_column width=”1/3″][vc_single_image image=”5975″ img_size=”full” alignment=”center”][/vc_column][vc_column width=”2/3″][vc_column_text]The SOURCE ONE is a wide-stance X configuration frame, popular for freestyle or free-range acrobatic flying. It is built to withstand harsh crashes and abuse. It fits and protects all the classic FPV components and is optimized for light weight. The SOURCE ONE is a perfect everyday workhorse for casual FPV flying and competitive freestyle.[/vc_column_text][dt_default_button link=”url:https%3A%2F%2Fwww.getfpv.com%2Ftbs-source-one-5-frame-v3.html||target:%20_blank|” size=”medium” button_alignment=”btn_center”]Get the TBS Source One Frame[/dt_default_button][/vc_column][/vc_row][vc_row][vc_column][vc_separator][/vc_column][/vc_row][vc_row][vc_column][vc_column_text]
Matek F722-SE AIO Flight Controller
[/vc_column_text][/vc_column][/vc_row][vc_row][vc_column width=”1/3″][vc_single_image image=”6031″ img_size=”full” alignment=”center”][/vc_column][vc_column width=”2/3″][vc_column_text]Matek’s line of F7 flight controllers brings a host of new possibilities to your fixed wing or multirotor. Loaded with an array of features and tons of room for peripherals, this board lets you choose how you want to fly.[/vc_column_text][dt_default_button link=”url:https%3A%2F%2Fwww.getfpv.com%2Fmatek-f722-se-aio-flight-controller.html||target:%20_blank|” size=”medium” button_alignment=”btn_center”]Get the Matek F722-SE AIO Flight Controller[/dt_default_button][/vc_column][/vc_row][vc_row][vc_column][vc_separator][/vc_column][/vc_row][vc_row][vc_column][vc_column_text]
XILO 40A BLHeli-S 2-4S ESC
[/vc_column_text][/vc_column][/vc_row][vc_row][vc_column width=”1/3″][vc_single_image image=”6032″ img_size=”full” alignment=”center”][/vc_column][vc_column width=”2/3″][vc_column_text]The XILO BLHeli_S 40A ESC is a low cost, affordable ESC that features BLHeli_S firmware capable of running up to DSHOT 600. This ESC is low profile and compact in size, saving weight and making builds easy with the extended solder pads. This ESC includes a 330uf capacitor pre-soldered onto the ESC to give consistent clean power output.[/vc_column_text][dt_default_button link=”url:https%3A%2F%2Fwww.getfpv.com%2Fxilo-40a-blheli-s-2-4s-esc.html||target:%20_blank|” size=”medium” button_alignment=”btn_center”]Get the XILO 40A BLHeli_S ESC[/dt_default_button][/vc_column][/vc_row][vc_row][vc_column][vc_separator][/vc_column][/vc_row][vc_row][vc_column][vc_column_text]
iFlight XING 2208 2450Kv Motors
[/vc_column_text][/vc_column][/vc_row][vc_row][vc_column width=”1/3″][vc_single_image image=”6037″ img_size=”full” alignment=”center”][/vc_column][vc_column width=”2/3″][vc_column_text]XING-E series are very strong and powerful FPV motors for FPV racing, great value choice with well known XING performance.focuses on quality, the XING-E series affordable motors that are strong and durable. This 2207 sized motor features a high-strength 4mm steel hollow shaft, Single strand windings for performance, M3 shaft screw, and larger 9x4x4mm NSK bearings.[/vc_column_text][dt_default_button link=”url:https%3A%2F%2Fwww.getfpv.com%2Fiflight-xing-e-2208-2-6s-fpv-motor.html||target:%20_blank|” size=”medium” button_alignment=”btn_center”]Get the iFlight XING 2208 2450Kv Motors[/dt_default_button][/vc_column][/vc_row][vc_row][vc_column][vc_separator][/vc_column][/vc_row][vc_row][vc_column][vc_column_text]
Rush Tank 5.8GHz VTX
[/vc_column_text][/vc_column][/vc_row][vc_row][vc_column width=”1/3″][vc_single_image image=”5985″ img_size=”full” alignment=”center”][/vc_column][vc_column width=”2/3″][vc_column_text]he RUSH Tank is a high-quality 5.8GHz VTX with strong anti-interference ability and stable transmission. The TANK has four adjustable levels of transmitting power. This VTX has built-in SmartAudio protocol authorized by TBS. This can be set with RGB LEDs by conventional double buttons, which can then access SmartAudio ti set up and view the VTX information via the OSD menu.[/vc_column_text][dt_default_button link=”url:https%3A%2F%2Fwww.getfpv.com%2Frush-tank-5-8ghz-vtx-w-smartaudio.html||target:%20_blank|” size=”medium” button_alignment=”btn_center”]Get the Rush Tank 5.8GHz VTX[/dt_default_button][/vc_column][/vc_row][vc_row][vc_column][vc_separator][/vc_column][/vc_row][vc_row][vc_column][vc_column_text]
Caddx Turbo Micro F2 FPV Camera
[/vc_column_text][/vc_column][/vc_row][vc_row][vc_column width=”1/3″][vc_single_image image=”5983″ img_size=”full” alignment=”center”][/vc_column][vc_column width=”2/3″][vc_column_text]Caddx has released the new Turbo Micro F2 with ultra-low latency, superior light handling, a wide voltage range, built-in microphone, and now with an even lower minimum illumination limit. It features a 1/3″ CMOS sensor, 1200 TVL resolution, and a wide 4.5 – 40V power input.[/vc_column_text][dt_default_button link=”url:https%3A%2F%2Fwww.getfpv.com%2Fcaddx-turbo-micro-f2-fpv-camera.html||target:%20_blank|” size=”medium” button_alignment=”btn_center”]Get the Caddx Turbo Micro F2 FPV Camera[/dt_default_button][/vc_column][/vc_row][vc_row][vc_column][vc_separator][/vc_column][/vc_row][vc_row][vc_column][vc_column_text]
FrSky R-XSR 2.4GHz Micro Receiver
[/vc_column_text][/vc_column][/vc_row][vc_row][vc_column width=”1/3″][vc_single_image image=”5993″ img_size=”full” alignment=”center”][/vc_column][vc_column width=”2/3″][vc_column_text]The FrSky ultra mini receiver R-XSR is the evolution of the popular full range XSR receiver. The R-XSR is a standalone receiver with all the functionality of the full size XSR (including telemetry), but at 1/3 size and weight of XSR receiver. The R-XSR also has an integrated diversity with 2x antennas for a solid RC link, and the IPEX connector makes it convenient to replace antennas.[/vc_column_text][dt_default_button link=”url:https%3A%2F%2Fwww.getfpv.com%2Ffrsky-r-xsr-2-4ghz-16ch-accst-micro-receiver-w-s-bus-cppm.html||target:%20_blank|” size=”medium” button_alignment=”btn_center”]Get the FrSky R-XSR 2.4GHz Micro Receiver[/dt_default_button][/vc_column][/vc_row][vc_row][vc_column][vc_separator][/vc_column][/vc_row][vc_row][vc_column][vc_column_text]
Lumenier AXII MMCX 5.8GHz Antenna
[/vc_column_text][/vc_column][/vc_row][vc_row][vc_column width=”1/3″][vc_single_image image=”5991″ img_size=”full” alignment=”center”][/vc_column][vc_column width=”2/3″][vc_column_text]The Lumenier AXII is known to be the most versatile and highest performing antenna line for FPV today. Lumenier has been able to improve on the best and make it even better! While almost every aspect of the AXII 2 was improved upon, the size and weight managed to stay the same. The AXII 2 is still one of the smallest and lightest circular polarized antennas on the market, perfect for both lightweight racing builds or freestyle quads.[/vc_column_text][dt_default_button link=”url:https%3A%2F%2Fwww.getfpv.com%2Flumenier-axii-mmcx-5-8ghz-antenna-lhcp-1.html||target:%20_blank|” size=”medium” button_alignment=”btn_center”]Get the Lumenier AXII MMCX 5.8GHz Antenna[/dt_default_button][/vc_column][/vc_row][vc_row][vc_column][vc_separator][/vc_column][/vc_row][vc_row][vc_column][vc_column_text]
DAL Cyclone T5040C Pro Propellers
[/vc_column_text][/vc_column][/vc_row][vc_row][vc_column width=”1/3″][vc_single_image image=”6034″ img_size=”full” alignment=”center”][/vc_column][vc_column width=”2/3″][vc_column_text]The Cyclone T5040C Pro Tri-Blade 5″ Props by DAL are an upgraded version of the Cyclone T5040C Series. These propellers feature faster cornering, less noise, and excellent aerodynamic design! DALProps has been a mainstay in the prop industry for a long time, and their Cyclone series is well known as some of the most dependable props on the market.[/vc_column_text][dt_default_button link=”url:https%3A%2F%2Fwww.getfpv.com%2Fdal-cyclone-t5040c-pro-propellers-set-of-4.html||target:%20_blank|” size=”medium” button_alignment=”btn_center”]Get the DAL Cyclone T5040C Pro Propellers[/dt_default_button][/vc_column][/vc_row][vc_row][vc_column][vc_separator][/vc_column][/vc_row][vc_row][vc_column][vc_column_text]
CNHL G+Plus 1500mAh 4S Battery
[/vc_column_text][/vc_column][/vc_row][vc_row][vc_column width=”1/3″][vc_single_image image=”5992″ img_size=”full” alignment=”center”][/vc_column][vc_column width=”2/3″][vc_column_text]The CNHL G+Plus 1500mah 4s 100c Lipo battery is designed for multirotor FPV Drone Racing. This battery is extremely popular for its affordability and outstanding performance.[/vc_column_text][dt_default_button link=”url:https%3A%2F%2Fwww.getfpv.com%2Fcnhl-1500mah-4s-100c.html||target:%20_blank|” size=”medium” button_alignment=”btn_center”]Get the CNHL G+Plus 1500mAh 4S Battery[/dt_default_button][/vc_column][/vc_row][vc_row][vc_column][vc_separator][/vc_column][/vc_row][vc_row][vc_column][vc_column_text]
Optional Extras
[/vc_column_text][/vc_column][/vc_row][vc_row][vc_column][vc_column_text]
FXT Viper V2 5.8GHz Diversity FPV Goggles
[/vc_column_text][/vc_column][/vc_row][vc_row][vc_column width=”1/3″][vc_single_image image=”6039″ img_size=”full” alignment=”center”][/vc_column][vc_column width=”2/3″][vc_column_text]FXT has designed a unique set of FPV goggles that carry many unique features to go with it! First off, it uses an integrated refractor to reflect the screen instead of your eyes staring at the screen itself, relieving some of the eye strain typically associated with looking at monitors. Another feature that many will be refreshed to hear is that these goggles work great with glasses, even with the sunshade attached![/vc_column_text][dt_default_button link=”url:https%3A%2F%2Fwww.getfpv.com%2Ffxt-viper-v2-5-8ghz-diversity-fpv-goggles-w-dvr.html||target:%20_blank|” size=”medium” button_alignment=”btn_center”]Get the FXT Viper V2 5.8 GHz Diversity FPV Goggles[/dt_default_button][/vc_column][/vc_row][vc_row][vc_column][vc_separator][/vc_column][/vc_row][vc_row][vc_column][vc_column_text]
FrSky Taranis X9 Lite ACCESS 2.4GHz Transmitter
[/vc_column_text][/vc_column][/vc_row][vc_row][vc_column width=”1/3″][vc_single_image image=”6040″ img_size=”full” alignment=”center”][/vc_column][vc_column width=”2/3″][vc_column_text]The X9 Lite is the latest 2.4G radio from FrSky. Reminiscent of the legendary X9D, the X9 Lite keeps the same form factor and stick layout that so many pilots have come to love, but for a fraction of the price. Additionally, a side-scrolling wheel has been added for easy navigation of the menus on the X9 Lite.[/vc_column_text][dt_default_button link=”url:https%3A%2F%2Fwww.getfpv.com%2Ffrsky-taranis-x9-lite-2-4g-24ch-radio-transmitter.html||target:%20_blank|” size=”medium” button_alignment=”btn_center”]Get the FrSky Taranis X9 Lite ACCESS 2.4GHz Transmitter[/dt_default_button][/vc_column][/vc_row][vc_row][vc_column][vc_column_text]
Tools
Before building, it’s worth noting that there are a few essential tools and materials to have for a successful build. You can pick up many of these things directly from GetFPV, or from your local hardware store. The main supplies used in this build are as follows:
- Soldering iron
- Solder
- Solder wick
- Solder mask + safety glasses
- M3 screwdriver
- Loctite (blue)
- Electrical tape/double-sided foam tape
- Electronics tweezers
- Wire cutter/stripper
- Pliers
- M3 standoffs
- Computer /w Internet (for Betaflight)
[/vc_column_text][/vc_column][/vc_row][vc_row][vc_column][vc_single_image image=”5996″ img_size=”full” alignment=”center” onclick=”link_image”][/vc_column][/vc_row][vc_row][vc_column][vc_column_text]
Overview
There are a few things that should be pointed out about the components used. The TBS Source One is an open source frame, made by a collaboration of many users in the multirotor community and initially launched by Team Blacksheep. You can find all the files, including 3D printed parts, model files, and accessories from the official GitHub page here: https://github.com/tbs-trappy/source_one
Next up, the voltage selection. We are using 4S (14.8V) in this build for a few main reasons: cost, reliability, accessibility, and ease of use.
Currently, 4S batteries are much cheaper than 6S batteries, which makes it easier for beginners who don’t want to invest a lot of money into a mini quad setup. 4S setups tend to be a little bit more reliable than 6S since there is a lower voltage involved. Also, 4S parts have been in circulation for quite a while now compared to 6S compatible electronics.
4S setups are more widely available at the time of this writing. Although many electronics these days are compatible with 6S, all electronics are compatible with 4S. If you’re looking for a part replacement, you will be guaranteed to find a 4S compatible part anywhere. The same can’t be said with 6S . . . yet.
Ease of use is also an important factor here. With 4S, everything is simpler and easier, such as charging, parts selection, safety, weight, and adding extra capacitors. In general, 4S is perfectly fine for most users. I know, 6S is better in almost every single way, but for beginners and casual pilots, 4S is adequate.
The individual ESCs used here will provide a greater level or reliability than 4 in 1 ESCs. When, not if, when an ESC burns out or fails, it will be much easier on the wallet and the time spent repairing to swap out one ESC as opposed to a whole new 4 in 1 ESC.
The Rush Tank was selected over cheaper alternatives because the video transmitter is, arguably, the single most important component on your whole quadcopter. You can have a top of the line FPV system, but if your cheap video transmitter burns out, the whole setup will fail inevitably.
Therefore, it is so important to have a high-quality video transmitter that outputs plenty of power, is reliable, and is easy to install. The Rush Tank checks all those requirements and more. You can save a bit of cash getting a cheaper alternative, and that is absolutely fine, but the Rush Tank is a top of the line Vtx that won’t break the bank.
The choice of the iFlight Xing-E 2208 2450Kv motor is because we want a cheap, durable motor that still has enough power for our build. 2450kV is a good value for 4S. If you were going the 6S route, then 1700-1900kV would be a more suitable kV rating. Since motors get bent, scratched, and broken, it is important to have a motor that is cheap and available in many places. iFlight Xing motors are the perfect choice here.[/vc_column_text][/vc_column][/vc_row][vc_row][vc_column][vc_column_text]
Building the Frame
Without further ado, lets dive right into building the frame. First off, the arms. It’s worth noting that there are two different lengths of M3 screws provided. Use the shorter ones for this step. Assemble only the frame with one shorter screw per arm on the outer part of the center plate.[/vc_column_text][/vc_column][/vc_row][vc_row][vc_column width=”1/2″][vc_single_image image=”6003″ img_size=”full” alignment=”center” onclick=”link_image”][/vc_column][vc_column width=”1/2″][vc_single_image image=”6000″ img_size=”full” alignment=”center” onclick=”link_image”][/vc_column][/vc_row][vc_row][vc_column][vc_column_text]After that, go ahead and use the longer screws for the inner part of the center arm mount. The reason for the longer screws is to allow for a flight controller or stack to be mounted on the frame.[/vc_column_text][/vc_column][/vc_row][vc_row][vc_column width=”1/2″][vc_single_image image=”6001″ img_size=”full” alignment=”center” onclick=”link_image”][/vc_column][vc_column width=”1/2″][vc_single_image image=”6005″ img_size=”full” alignment=”center” onclick=”link_image”][/vc_column][/vc_row][vc_row][vc_column][vc_column_text]Next, mount only four standoffs on each corner of the frame. If we mount all eight of them right now, the ESC installation and electronics assembly becomes much more difficult since the standoffs get in the way of installation.
Overall, frame assembly is relatively straightforward, and by simply looking at the provided picture, most users can figure their way through the assembly.[/vc_column_text][/vc_column][/vc_row][vc_row][vc_column width=”1/6″][/vc_column][vc_column width=”2/3″][vc_single_image image=”6006″ img_size=”full” alignment=”center” onclick=”link_image”][/vc_column][vc_column width=”1/6″][/vc_column][/vc_row][vc_row][vc_column][vc_column_text]
Preparing the Electronics
Now, let’s prepare the electronics for installation. Start out by inserting the rubber grommets on the Matek F722-SE flight controller. Next up, tin the following solder pads for our setup:
- BAT + (Directly from LiPo)
- BAT – (Directly from LiPo)
- +5V output selection (FrSky receiver voltage)
- ESC + (All 4)
- ESC – (All 4)
- S1 through S4 (ESC signal)
- VIDEO (OSD video out)
- 9V (VTX)
- GND (VTX)
- S (SBUS pad)
- 3/5 (5V for FrSky)
- G (Receiver)
- CAM_S (OSD video in)
- 9V (Camera)
- G (Camera)
These are all the necessary pads needed for this build. However, if you are following along and would like to add more features such as GPS, SmartAudio, and LEDs, then tin each pad accordingly.[/vc_column_text][/vc_column][/vc_row][vc_row][vc_column width=”1/2″][vc_single_image image=”6008″ img_size=”full” alignment=”center” onclick=”link_image”][/vc_column][vc_column width=”1/2″][vc_single_image image=”6009″ img_size=”full” alignment=”center” onclick=”link_image”][/vc_column][/vc_row][vc_row][vc_column][vc_column_text]Next, on to the ESCs. The Xilo 40A ESC comes with signal wires and power wires pre-soldered, so only the motor pads need tinning. Tin both sides, as depending on your setup, the ESCs can be installed facing up or down. Also, cut the power wires and signal wires to around 4 cm.[/vc_column_text][/vc_column][/vc_row][vc_row][vc_column width=”1/2″][vc_single_image image=”6010″ img_size=”full” alignment=”center” onclick=”link_image”][/vc_column][vc_column width=”1/2″][vc_single_image image=”6011″ img_size=”full” alignment=”center” onclick=”link_image”][/vc_column][/vc_row][vc_row][vc_column][vc_column_text]The Caddx camera’s wires need to be cut and tinned, as we will be soldering these to the flight controller. The same goes for the Rush Tank video transmitter. You may choose whether to use the included connector, or direct solder the wires on the VTX. I chose to do the direct solder method, because it is more reliable, and the connector won’t fall out during a crash. However, if you are doing a lot of maintenance with your build, then the connector should be easier to install, and the video transmitter is much easier to remove when something goes awry.[/vc_column_text][/vc_column][/vc_row][vc_row][vc_column width=”1/6″][/vc_column][vc_column width=”2/3″][vc_single_image image=”6012″ img_size=”full” alignment=”center” onclick=”link_image”][/vc_column][vc_column width=”1/6″][/vc_column][/vc_row][vc_row][vc_column][vc_column_text]The R-XSR may be tinned and soldered to the flight controller at this point. Some prefer to take off the connector and direct solder the wires, since this makes the receiver less susceptible to disconnection during crashes.
The last main parts to tin are the motor wires. Cut each motor wire to about 1 cm length, and then strip and tin each wire carefully. Now is also a good time to screw on the prop nuts if you would like.
The tip here is to only use just enough solder. Don’t use too much solder here, as the potential to bridge pads is high, especially since the solder pads are close to each other. I found that 300°C worked out well for simply tinning. For larger wires, use 350-400°C.[/vc_column_text][/vc_column][/vc_row][vc_row][vc_column width=”1/6″][/vc_column][vc_column width=”2/3″][vc_single_image image=”6013″ img_size=”full” alignment=”center” onclick=”link_image”][/vc_column][vc_column width=”1/6″][/vc_column][/vc_row][vc_row][vc_column][vc_column_text]
Mount Power System
Now, the motors, ESCs, and flight controller may be mounted on the frame. I started off by soldering the motor wires to the ESCs, then mounting the ESCs on the arms. In this build, I opted to install the ESCs face down, since the metal heat sink on the ESC will have greater contact with the cooler carbon fiber arm, helping to cool the ESC. Then, the side without the heat sink can be further cooled via the downward thrust of the props. Electrical tape or double-sided foam tape works great here.[/vc_column_text][/vc_column][/vc_row][vc_row][vc_column width=”1/6″][/vc_column][vc_column width=”2/3″][vc_single_image image=”6014″ img_size=”full” alignment=”center” onclick=”link_image”][/vc_column][vc_column width=”1/6″][/vc_column][/vc_row][vc_row][vc_column][vc_column_text]Once the ESCs are secured, the motors may be attached to the arm. Use the screws labeled “for 4mm arms”, since the TBS Source one 5-inch frame has 4mm thick carbon fiber arms. Make sure to use Loctite on the motor screws, since these screws will be exposed to the most vibration. To reduce vibrations, I put four layers of electrical tape between each carbon arm and its corresponding motor.
Using M3 standoffs, mount the flight controller in the center of the frame, with the little white arrow facing towards the front of the quad. The front of the Source One should have some cutouts for the camera plates, so be sure to orient the flight controller accordingly.[/vc_column_text][/vc_column][/vc_row][vc_row][vc_column width=”1/6″][/vc_column][vc_column width=”2/3″][vc_single_image image=”6015″ img_size=”full” alignment=”center” onclick=”link_image”][/vc_column][vc_column width=”1/6″][/vc_column][/vc_row][vc_row][vc_column][vc_column_text]
FPV System
The Rush Tank has a 30.5 x 30.5mm mounting pattern, which makes it perfect for stacking on top of our flight controller. Using some more M3 spacers, you can simply stack the video transmitter, with the antenna connector facing towards the back of the frame.
Solder the GND, PWR, and Video wires to the flight controller, and the SmartAudio wire if you are using SmartAudio. The Caddx Micro F2’s GND, PWR, and Video wires are soldered to the flight controller instead of the video transmitter. This allows us to utilize the Betaflight OSD to show valuable information during flight.[/vc_column_text][/vc_column][/vc_row][vc_row][vc_column width=”1/2″][vc_single_image image=”6017″ img_size=”full” alignment=”center” onclick=”link_image”][/vc_column][vc_column width=”1/2″][vc_single_image image=”6018″ img_size=”full” alignment=”center” onclick=”link_image”][/vc_column][/vc_row][vc_row][vc_column][vc_column_text]You can go ahead and mount the FPV camera, video transmitter, and FPV antenna on the frame now. When you download the source files from GitHub, some 3D printed mounts are included in one of the folders. I printed out the antenna holder with holes for the receiver antenna in TPU and placed it in the back of the frame.[/vc_column_text][/vc_column][/vc_row][vc_row][vc_column][vc_column_text]
Clean Up
No, not work space cleanup! Messiness is a sign of genius! We’re talking about wiring cleanup. This means double checking all parts of the build, shortening wires, tidying up bits and pieces, and ensuring that wires aren’t in the way of moving parts. Some main points that we want to check are the ESCs, FPV system, and motors.
Make sure that the ESCs are snugly fit on the arms of the frame. The solder joints should be nice and shiny, with no cracks or “dry” joints. The ESC power and signal wires should not be too long, since wires that are too long can get damaged by the spinning props. However, wires that are too short may cause excess tension in the system and can increase vibration going to the gyroscope in the flight controller. The goal here is to get a good middle ground such that the wires are comfortably routed in a relatively clean manner, but not causing tension.[/vc_column_text][/vc_column][/vc_row][vc_row][vc_column width=”1/6″][/vc_column][vc_column width=”2/3″][vc_single_image image=”6019″ img_size=”full” alignment=”center” onclick=”link_image”][/vc_column][vc_column width=”1/6″][/vc_column][/vc_row][vc_row][vc_column][vc_column_text]The FPV system is the most important part of the whole build. It is imperative that all solder joints are triple checked, and parts are well protected. For beginners, micro sized FPV cameras may be mounted via a TPU adapter, found here: https://www.thingiverse.com/thing:3029860.[/vc_column_text][/vc_column][/vc_row][vc_row][vc_column width=”1/2″][vc_single_image image=”6022″ img_size=”full” alignment=”center” onclick=”link_image”][/vc_column][vc_column width=”1/2″][vc_single_image image=”6020″ img_size=”full” alignment=”center” onclick=”link_image”][/vc_column][/vc_row][vc_row][vc_column][vc_column_text]Motors should be firmly mounted on the arms, with Loctite on the screws. Just a drop or two on each screw thread should do the trick here. It’s not fun having a motor come loose during flight, spinning to the ground, and finding that your motor and ESC wires have been chopped up, and your ESC is emitting the “magic smoke”. It’s the small things which make all the difference in durability.[/vc_column_text][/vc_column][/vc_row][vc_row][vc_column width=”1/6″][/vc_column][vc_column width=”2/3″][vc_single_image image=”6021″ img_size=”full” alignment=”center” onclick=”link_image”][/vc_column][vc_column width=”1/6″][/vc_column][/vc_row][vc_row][vc_column][vc_column_text]
Extras
If you want to make the TBS Source One just that much better, here are a few ideas to bring your build to the next level:
- Landing pads on the bottom arms
- Full 3D printed accessories in TPU: https://www.thingiverse.com/thing:3064253
- Waterproof electronics using silicone conformal coating
- Add a capacitor for extra filtering
- Swap the individual ESCs for a 4 in 1 and add in LED Racewire
[/vc_column_text][/vc_column][/vc_row][vc_row][vc_column width=”1/6″][/vc_column][vc_column width=”2/3″][vc_single_image image=”6024″ img_size=”full” alignment=”center” onclick=”link_image”][/vc_column][vc_column width=”1/6″][/vc_column][/vc_row][vc_row][vc_column][vc_column_text]
Betaflight
Betaflight configuration should be relatively straightforward. We could have full steps posted here on how to set up your quad, but a man named Joshua Bardwell has done that already and if you are using the JBardwell F4, the full color manual with pin-outs, firmware targets, explanations, and setup recommendations may be found here: https://www.copterfarm.de/media/pdf/3d/bb/f7/RDQ-Bardwell-F4-FC-Manual-v2-1.pdf.[/vc_column_text][/vc_column][/vc_row][vc_row][vc_column width=”1/6″][/vc_column][vc_column width=”2/3″][vc_single_image image=”6025″ img_size=”full” alignment=”center” onclick=”link_image”][/vc_column][vc_column width=”1/6″][/vc_column][/vc_row][vc_row][vc_column][vc_column_text]If you are curious, the rates I use are relatively simple: change “Super Rate” to 0.6 on all axes and call it good. I feel like this gives me good control on the pitch and roll axes, while still being fast enough to do freestyle maneuvers at full stick deflection. The equal rate on yaw may be debated, but many freestyle pilots who perform fast yaw spins, whether normal or inverted, tend to have high yaw rates. For racing however, lower rates result in smoother lines. Smoother lines = faster times.[/vc_column_text][/vc_column][/vc_row][vc_row][vc_column width=”1/6″][/vc_column][vc_column width=”2/3″][vc_single_image image=”6026″ img_size=”full” alignment=”center” onclick=”link_image”][/vc_column][vc_column width=”1/6″][/vc_column][/vc_row][vc_row][vc_column][vc_column_text]
Conclusion:
Overall, the TBS Source One is a rock-solid FPV platform that’s built like a tank. Although on the heavy side, this build is by no means slow, and many beginners can get into the air, race and be competitive at locals as well as get some insane freestyle footage.
I hope you had fun following along with this build. These types of freestyle quad builds are the most enjoyable because you have so much space in the frame for everything and parts fit together so nicely. Having been flying exclusively in the “toothpick” class for a while now, it’s nice to have large, easy to access solder pads, use something other than a linear FPV antenna, and not worry about the unpredictable nature of micros.
All in all, stay safe, stay warm, and fly responsibly. Happy FPV!
Lawrence, KJ7JVM[/vc_column_text][/vc_column][/vc_row]
I was curious what you had chosen to put in the build since I recently did a similar one. I did notice that the motors and ESCs you used were different than the ones listed. You used the motors I choose or similar since I can’t see the rating on them. I love the way mine flies and for the price you can’t beat this frame. The EMAX motors are nice, too. Especially considering the price. Here’s my build for comparison. https://rotorbuilds.com/build/21521
Hello Mike,
I originally did used the Emax Eco 2400Kv motors. I absolutely love them. Cheap, reliable, and very durable. Seriously, I’ve crashed on concrete many times, often directly on the motor, and no damage has been done to them.
However, the recommended Iflight XING-E motors are a bit newer and more powerful than the Emax Ecos. They are almost identical in build to the original XING motors, aside for a bit softer metal used in the bell. Performance should be on par with the XING (non E) motors. Although amp draw is increased (less efficiency), the power gained by using the XING motors is well worth it, and more than justifies their extra cost.
As for the ESC selction, I think it’s best for beginners to get the cheaper XILO 40A escs. By saving $12, the extra cash could then be used to purchase a better camera, like the Caddx Ratel, or invested somewhere else. Also, pretty much all Blheli-S ESCs perform the exact same these days, so the only real reason to pay extra money for an ESC is for bullet-proof reliability. For beginners though, the XILO escs are perfectly acceptable. For more experienced pilots , I think that the extra cost of the Speedix ESCs would be justifiable, especially if the setup was using more expensive components.
Wow love the build and for that price it’s a good way to start.
great
I want to try some FPV acro flying but would like to get footage of the flights. I was wondering if a GoPro could safely be added to this build or if there is a capture device so that you could use the footage from the camera used for the googles. I am brand new to this and also very old!
Could This easilly fly a gopro hero7 black