

[vc_row][vc_column][vc_column_text]Today, we will be taking a good look at the ToolkitRC M6 battery charger. This little device has loads of features absent from other high-end chargers. And it’s only $30! It may not have loads of power, but this charger’s feature set rivals those of $100 or more.[/vc_column_text][/vc_column][/vc_row][vc_row][vc_column width=”1/6″][/vc_column][vc_column width=”2/3″][vc_single_image image=”5946″ img_size=”full” alignment=”center” onclick=”link_image”][/vc_column][vc_column width=”1/6″][/vc_column][/vc_row][vc_row][vc_column][vc_column_text]
This article was submitted through the GetFPV Community Program by Lawrence Ro.
Disclaimer: This article was written solely by a member of the FPV Community. Views and advice in this article are that of the author and does not necessarily reflect the opinion or views of GetFPV.
[/vc_column_text][/vc_column][/vc_row][vc_row][vc_column][vc_column_text]
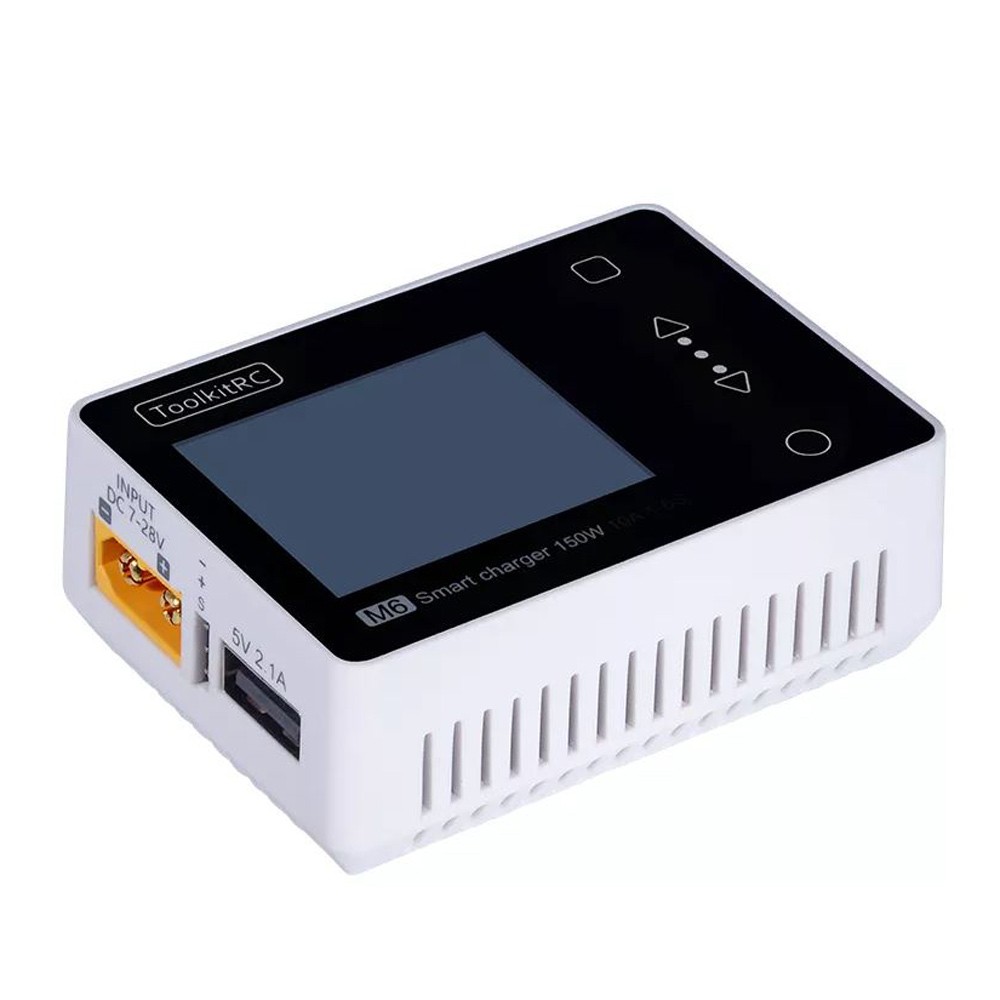
ToolkitRC M6 Specs
[/vc_column_text][/vc_column][/vc_row][vc_row][vc_column width=”1/2″][vc_column_text]Features:
- Battery charger
- Cell checker
- Servo tester
- Variable DC power supply
- RC receiver input/output/rx tester
- Supports PWM, PPM, and SBUS protocols
Input Voltage: 7-28V
Supported Batteries: Lipo, LiHV, LiFe, Lion (1-6S), NiMh (1-16S), Pb (1-10S)
Power: 150W 10A
USB: 5V, 2.1A for mobile charging and firmware update
Dimensions: 68*49*26mm
Weight: 80g
LCD: 1.8” TFT LCD (160*128)[/vc_column_text][/vc_column][vc_column width=”1/2″][vc_column_text]Measurement:
- Voltage: 1-5V, 1-6S
- IR (Internal Resistance): 10-99mR, 1-6S
- PWM: 880-2200us, 20-400Hz
- PPM: 880-2200us, 8 CH, 20-50Hz
- SBUS: 880-2200us, 16 CH, 20-100Hz
Output:
- Power: 1-28V, 1-10A
- PWM: 500-2500us, 20-1000Hz
- PPM: 880-2200us, 8 CH, 50Hz
- SBUS: 880-2200us, 16 CH, 74 Hz
Additional Features:
- Adjustable battery cutoff voltage
- Measure battery cells, internal resistance
- Balance cells before charging
- Full control over voltage output
- Multilingual support
- Firmware upgradeable via USB
- 3 battery profiles available
[/vc_column_text][/vc_column][/vc_row][vc_row][vc_column width=”1/6″][/vc_column][vc_column width=”2/3″][vc_single_image image=”5947″ img_size=”full” alignment=”center” onclick=”link_image”][/vc_column][vc_column width=”1/6″][/vc_column][/vc_row][vc_row][vc_column][vc_column_text]
Initial Thoughts
The only reason why I initially got this charger was because of its ability to output a variable voltage and current. This would help so much in diagnosing and troubleshooting FPV equipment and electronic in general. Also, I needed a charger that could charge LiHV batteries safely. The M6 checked all those boxes and more!
I never thought that I would need an SBUS checker, or a mobile USB charger, or the ability to output a PWM signal. Well, it turns out that those features are very nice to have in an all-in-one package that you can just throw in your flight bag.
On first inspection, I noticed that a screen protector was provided. This was a bit unusual, but I soon found out that the screen scratches easily, so the screen protector is a must. Also, two clips on the bottom may be popped out to provide an easier viewing experience. This was a nice touch that ToolkitRC made, and it’s one of those things which may not seem like much, but just go to tell how much the thought the company had put into this product. Overall, I had a great initial experience with this versatile charger.[/vc_column_text][/vc_column][/vc_row][vc_row][vc_column][vc_column_text]
Under the Hood
Of course, before we get into the review, we must take apart everything and inspect the hardware.
ToolkitRC did a very smart technique here, as they cleverly concealed the screws holding the whole charger together underneath the LCD. By gently prying the LCD by its sides, we can get a view of the LCD and four screws. Unplug the cable connecting the capacitive button sensors and unscrew the four screws on the side.[/vc_column_text][/vc_column][/vc_row][vc_row][vc_column width=”1/2″][vc_single_image image=”5949″ img_size=”full” alignment=”center” onclick=”link_image”][/vc_column][vc_column width=”1/2″][vc_single_image image=”5948″ img_size=”full” alignment=”center” onclick=”link_image”][/vc_column][/vc_row][vc_row][vc_column][vc_column_text]Inspecting the circuit board, the solder joints look adequate, but some SMD components look a bit off angle. This should not affect the usability, but it’s worth noting. Overall, things look relatively solid, and I’m not really worried about the build quality.[/vc_column_text][/vc_column][/vc_row][vc_row][vc_column width=”1/2″][vc_single_image image=”5951″ img_size=”full” alignment=”center” onclick=”link_image”][/vc_column][vc_column width=”1/2″][vc_single_image image=”5952″ img_size=”full” alignment=”center” onclick=”link_image”][/vc_column][/vc_row][vc_row][vc_column][vc_column_text]Flipping the board over, we can see the XT60 ports, the USB port, balance header pins, and a big fat heat sink. Also, there are two 330uF 35V capacitors, which should be able to smooth out the voltages and handle the max rated voltage of 28V just perfectly.
The big thing to note here is what we see in the upper left-hand corner. Lo and behold, an STM32 F103C8T6 processor resides in this little device! In case you didn’t know, us mini-quad pilots have been using STM32 processors for quite a while now. If you are running an “F4” flight controller, then your board uses an STM32 F4xx processor (common ones are F405 and F411). The same thing goes for F7, F3, F1, etc.
Some new Blheli_32 ESCs these days now have “F3” processors, which are supposed to have much better noise filtration and faster processing speed than before. These ESCs also utilize the STM32 line of processors.[/vc_column_text][/vc_column][/vc_row][vc_row][vc_column width=”1/3″][vc_single_image image=”5953″ img_size=”full” alignment=”center” onclick=”link_image”][/vc_column][vc_column width=”1/3″][vc_single_image image=”5954″ img_size=”full” alignment=”center” onclick=”link_image”][/vc_column][vc_column width=”1/3″][vc_single_image image=”5955″ img_size=”full” alignment=”center” onclick=”link_image”][/vc_column][/vc_row][vc_row][vc_column][vc_column_text]However, it may be more notable to remember that both the CC3D and the legendary Naze32 flight controllers both used the exact same processor as the M6 charger.
Now, the CC3D was an old flight controller used a few years back and ran on a software called OpenPilot-not even Betaflight! We had to hand-tune our PIDs and there was no such thing as “Air Mode” available. I still remember the first time I used “Air Mode” in Betaflight; I almost cried in my goggles because the quad just flew so well and locked in compared to OpenPilot. It was like I was flying on rails, and I never went back to anything other than Betaflight ever again![/vc_column_text][/vc_column][/vc_row][vc_row][vc_column width=”1/6″][/vc_column][vc_column width=”2/3″][vc_single_image image=”5956″ img_size=”full” alignment=”center” onclick=”link_image”][/vc_column][vc_column width=”1/6″][/vc_column][/vc_row][vc_row][vc_column][vc_column_text]The Naze32 used to often run a software called Cleanflight. Cleanflight was basically a fork of an older project called Baseflight. Betaflight was a fork of Cleanflight, and aimed at testing new and cutting-edge features, one of which was Air Mode. In fact, many of the great features that we take for granted these days were just experimental snippets added into the “Beta”-flight code and were tweaked and optimized until they were usable to the masses
Anyway, many people used the Naze32 with Cleanflight for a long time, until people realized the Betaflight was simply “better”, as in that it had more features that people were willing to try out. There is some controversy surrounding Baseflight, Cleanflight, and Betaflight, but I won’t get into them here. You can easily find those things out if you wanted to, but the point is that the M6 charger is using a processor capable of computing much more than the M6 was designed for, which is most definitely a good thing.
What we have here isn’t a charger. What we have is a small computer that is merely doing the simple task of charging.
This opens up a whole new world of possibilities. We may see people modifying and hacking their chargers to do things we never even dreamed of! Imaging hooking up more inputs/outputs to interface to other devices. Or making an FPV equipment diagnostic software to run. We could even play games on the LCD via the menu buttons! The possibilities are endless!
As you can see, ToolkitRC made absolutely sure that their little M6 charger is future proof for years to come as they release new firmware and new features.[/vc_column_text][/vc_column][/vc_row][vc_row][vc_column width=”1/6″][/vc_column][vc_column width=”2/3″][vc_single_image image=”5958″ img_size=”full” alignment=”center” onclick=”link_image”][/vc_column][vc_column width=”1/6″][/vc_column][/vc_row][vc_row][vc_column][vc_column_text]
Usability
Of course, the first thing you would do with a charger is charge a battery, right? Simply plug the main lead in, along with the balance port, and then charge it up. Well, the process was not as simple with the M6. The balance port on the M6 is rather poorly designed, as the way that ground wire and the cell wires pins are located make it impossible to properly plug in most batter leads.
The solution to this problem is to either take out the pins on the lipo balance plug and swap them to match the pinout of the charger, or to use an external cable to connect the balance plug. In this case, I used some female to female jumper wires, which was hooked up to a parallel charging balance board. This way, I could plug in multiple lipos and balance them all at the same time.
There are five ways of interfacing to the LCD: four buttons, and one slider. A square button resides at the top right part of the charger, and a circle one at the bottom. In the middle, there is an up button and a down button, with a slider between them. Simply slide your finger up or down to make a selection in the menu and tap the circle “select” button to make the selection. The square “cancel” button backs up the menu by one step. Alternatively, you may just tap the arrows in the desired direction, which I found a lot more consistent.
There are many settings in the menu, which are explained in-depth in the manual, but the most important one I found to change was to mute the “Buzzer” option. This charger emits an annoying beep whenever an input is detected on the LCD, and continuously beeps when the battery is fully charged. Unlike other chargers, like the iMax B6 charger, which beeps only 10 times and then stops, the M6 will not stop after charging.[/vc_column_text][dt_default_button link=”url:https%3A%2F%2Fwww.toolkitrc.com%2Ffiledownload%2F106227||target:%20_blank|” size=”medium” button_alignment=”btn_center”]ToolkitRC M6 User Manual[/dt_default_button][ultimate_spacer height=”20″][/vc_column][/vc_row][vc_row][vc_column width=”1/6″][/vc_column][vc_column width=”2/3″][vc_single_image image=”5957″ img_size=”full” alignment=”center” onclick=”link_image”][/vc_column][vc_column width=”1/6″][/vc_column][/vc_row][vc_row][vc_column][vc_column_text]
Features
The ToolkitRC M6 has a plethora of features, but the main ones which stand out above the rest are the SBUS input/output, variable voltage output, and USB port.
Now, the SBUS input/output is a very, very useful tool to have. For example, many people often connect their receiver to Betaflight and don’t see any channels responding in the receiver tab. With the M6, you can simply plug in your receiver to the servo port on the side, and check to see if the receiver is actually receiving signal from the transmitter. This provides valuable information while troubleshooting and may help many pilots get in the air faster.
The variable voltage output is absolutely amazing. Need to test out an old FPV camera? Worried that your flight controller isn’t proving enough power for your 5V powered video transmitter? Or do you just want to output exactly 3.7V for extended periods of time to test some equipment. The M6 does all this and more. In fact, the “PWR” section of the output menu provides a “Through” option, a “Custom” option, “Mavic2”, “Mavic S”, “Phantom”, and “Inspire” presets.
The “Through” option does exactly what is says. It takes the input voltage and makes that the output. However, you can limit the current going through, which is an additional safety feature that was implemented. The “Custom” option is where the M6 shines. You may select any voltage in increments of 0.1V from 1.0V to 28.0V, with a max current of anywhere from 0.5A all the way up to 10.0A. Furthermore, the “Mavic2”, “MavicS”, “Phantom”, and “Inspire” options are all preconfigured to the compatible voltages corresponding with each DJI quadcopter.
In fact, the variable voltage setting can act as a bench power supply for many people, and this feature alone may make this charger worth it instead of purchasing a much more expensive bench power supply for hobby purposes.
It’s also worth mentioning that this charger can test the internal resistance of your battery cells. Although this may not be necessary, it is still a nice addition to have just in case you need to compare battery brands or would like to test the health of your batteries.
These features are just scraping the surface of what the M6 is capable of. It is truly a versatile little charger.[/vc_column_text][/vc_column][/vc_row][vc_row][vc_column][vc_column_text]
Durability
Being only $30, one may question the durability of the M6 charger. However, this charger breaks the norm…in a good way. The plastic exterior feels quite solid. I can’t flex or bend any part of the charger except for its little plastic legs on the bottom.
I have dropped this charger many times on hard wood, granite, and other surfaces and am glad to say that this machine still works just as good as it did when I first got it. Sure, there may be some scratches on it, but the overall construction is more than satisfactory and should suit the majority of users.
I felt like the plastic LCD felt very cheap. Many users have reported that the LCD scratches easily, and although it may be nice to have a glass screen, remember that we are looking at a $30 computer that charges batteries, so I feel like the cheap LCD is outweighed by the M6’s feature set.
Firmware Upgrade
I think that the ability to upgrade the firmware on this device adds a tremendous amount of value to it, especially since it has a lot of processing power. The provided USB cable plugs into your computer from the USB charging port on the M6. The M6 should show up as a mass storage device.
Now, simply take the firmware file downloaded from here, and copy and paste it to the charger’s directory. That’s all there is to it!
Additionally, instructions are provided when downloading the firmware from ToolkitRC’s website.[/vc_column_text][dt_default_button link=”url:https%3A%2F%2Fwww.swvv.com%2Fm6||target:%20_blank|” size=”medium” button_alignment=”btn_center”]ToolkitRC M6 Product Page[/dt_default_button][/vc_column][/vc_row][vc_row][vc_column][vc_column_text]
Conclusion
In conclusion, the ToolkitRC M6 charger is a must have for anyone who wants a cheap, all-in-one tool that not only charges batteries, but can diagnose equipment, output SBUS, and more. I highly recommend this product, as it has served me well, and will serve you well regardless of what you fly![/vc_column_text][/vc_column][/vc_row][vc_row][vc_column][ultimate_spacer height=”20″][vc_separator][ultimate_spacer height=”20″][/vc_column][/vc_row][vc_row][vc_column][vc_single_image image=”5947″ img_size=”medium” alignment=”center”][dt_default_button link=”url:https%3A%2F%2Fwww.getfpv.com%2Ftoolkitrc-m6-150w-10a-charger-cell-checker-servo-tester.html||target:%20_blank|” size=”medium” button_alignment=”btn_center”]Check out the ToolkitRC M6[/dt_default_button][/vc_column][/vc_row]
Do you have a power source for this?