

The drone design cycle is the process of planning, iterating, designing and producing a drone product. Product design cycles are a tried and true way of developing a product in a well-documented manner. In this guide, I will outline a version of the design cycle I use when creating products. All industries follow their own product design cycles however this guide will outline the basic process. To demonstrate a basic version of the drone design cycle, I will design a TBS crossfire mounting bracket for a Spektrum DX9 radio.[vc_column_text]
Drone Design Cycle
The drone design cycle I will follow only iterates once. For more complex products or product evolutions, designers will repeat design cycles multiple times. It is also commonplace for designers to repeat the testing to evaluation stages multiple times to help create a refined product.[/vc_column_text][vc_row_inner][vc_column_inner width=”1/6″][/vc_column_inner][vc_column_inner width=”2/3″][vc_single_image image=”3953″ img_size=”full” alignment=”center” onclick=”link_image”][/vc_column_inner][vc_column_inner width=”1/6″][/vc_column_inner][/vc_row_inner][vc_column_text]
Stage 1: Need Identification
Why do I or as a matter of fact, does anyone need a crossfire DX9 bracket? This stage outlines the purpose of the product and why somebody would want to purchase it. It is of high importance to establish the purpose of a product at this stage in the drone design cycle. Imagine deciding that you wanted to create and market a drone with streamers and a disco ball attached to it. There is little need for this which would usually translate to low sales (unless it becomes the next hype train).
For the crossfire bracket, the need of it is to securely attach the crossfire to my radio. There is significant need for such a product as all pilots who have completed a TBS crossfire DX9 radio installation will require one.
[/vc_column_text][vc_column_text]
Stage 2: Design Brief Development
The design brief is the drone design cycle stage where you or the client outlines the specifics of the product they require. The purpose of a design brief is to create a list of specifics that the product should conform to. When later evaluating the product, it is also useful to refer to the design brief to determine the extent to which it was met.
When creating a design brief, I like to split the brief into functional outcomes, aesthetic considerations and constraints. I also like to label each constraint to simplify later research and evaluation stages.
Functional Outcomes
Functional outcomes are related to the purpose of the product or more simply ‘what I want it to do’. For this design brief, I’ve defined my functional outcomes below:
F1. Adequately supports a full-sized TBS crossfire.
F2. Securely attaches to the radio.
F3. Can be installed without modification to the radio e.g. without the use of holes or permanent glue.
F4. Props up the transmitter in the vertical position.
F5. Compact design.
Aesthetic Considerations
Aesthetic considerations are related to the appearance of the product or ‘what should it look like’. My considerations are:
A1. Black/dark grey bracket to match the radio and crossfire colour scheme.
A2. Smooth surface finish.
Constraints
Constraints are a set of limitations placed onto the design brief. These can be related to budget, time, resources, regulations, etc. My constraints are:
C1. Time: Individually set two-day time allocation.
C2. Available resources: 3D printers, laser cutters, CNC machines, hand tools.
C3. Software limitations: Limitations of Fusion 360 3D modelling software.[/vc_column_text][vc_column_text]
Stage 3: Research
After establishing what you will design, the next step of the drone design cycle is to research it. Research is an excellent way of learning more about your design brief and helps with idea formation.
For the bracket, I will research existing products, materials and manufacturing processes. For more difficult briefs, research into electronics, programming, aerodynamics, control or other areas may need to be conducted.
Existing Products
To compare existing products, I like to use a comparison table to determine how well existing products fit the design brief. You should ideally compare and research many existing products but for the sake of demonstration, I elected to compare two products. Bracket 1 by cyclenut can be found here and bracket 2 by Brain3D can be found here.[/vc_column_text][vc_row_inner][vc_column_inner width=”1/6″][/vc_column_inner][vc_column_inner width=”2/3″][vc_single_image image=”3946″ img_size=”full” alignment=”center” onclick=”link_image”][/vc_column_inner][vc_column_inner width=”1/6″][/vc_column_inner][/vc_row_inner][vc_column_text]As seen in the table, neither of these two currently available solutions meets the design brief entirely. To add compliance to F4 however, both existing solutions could be coupled with Mdav801’s ‘Spektrum DX9 upright stand’ The comparison demonstrates that there is a need to create the product as no existing ones meet the brief. If an existing solution did entirely meet the brief, you should then consider how your product will be better.[/vc_column_text][vc_column_text]
Manufacturing Processes
Investigation into the various manufacturing procedures available helps in determining what drone design cycle solutions are possible. This is useful as it prevents a design from being finalised only to realise its inability to be manufactured and needing to re-iterate through the drone design cycle. I already know that 3D printing will be my manufacturing method however it is also wise to create another table comparing the available manufacturing resources.
Materials
Material investigation helps to form a decision regarding the ideal production material. As with the previous two stages, I would also encourage creating a material comparison table. Pictured below is a material comparison from one of my earlier design briefs. Highlighting the ideal material properties is a great way of determining which material properties are ideal.[/vc_column_text][vc_row_inner][vc_column_inner width=”1/6″][/vc_column_inner][vc_column_inner width=”2/3″][vc_single_image image=”3947″ img_size=”full” alignment=”center” onclick=”link_image”][/vc_column_inner][vc_column_inner width=”1/6″][/vc_column_inner][/vc_row_inner][vc_column_text]
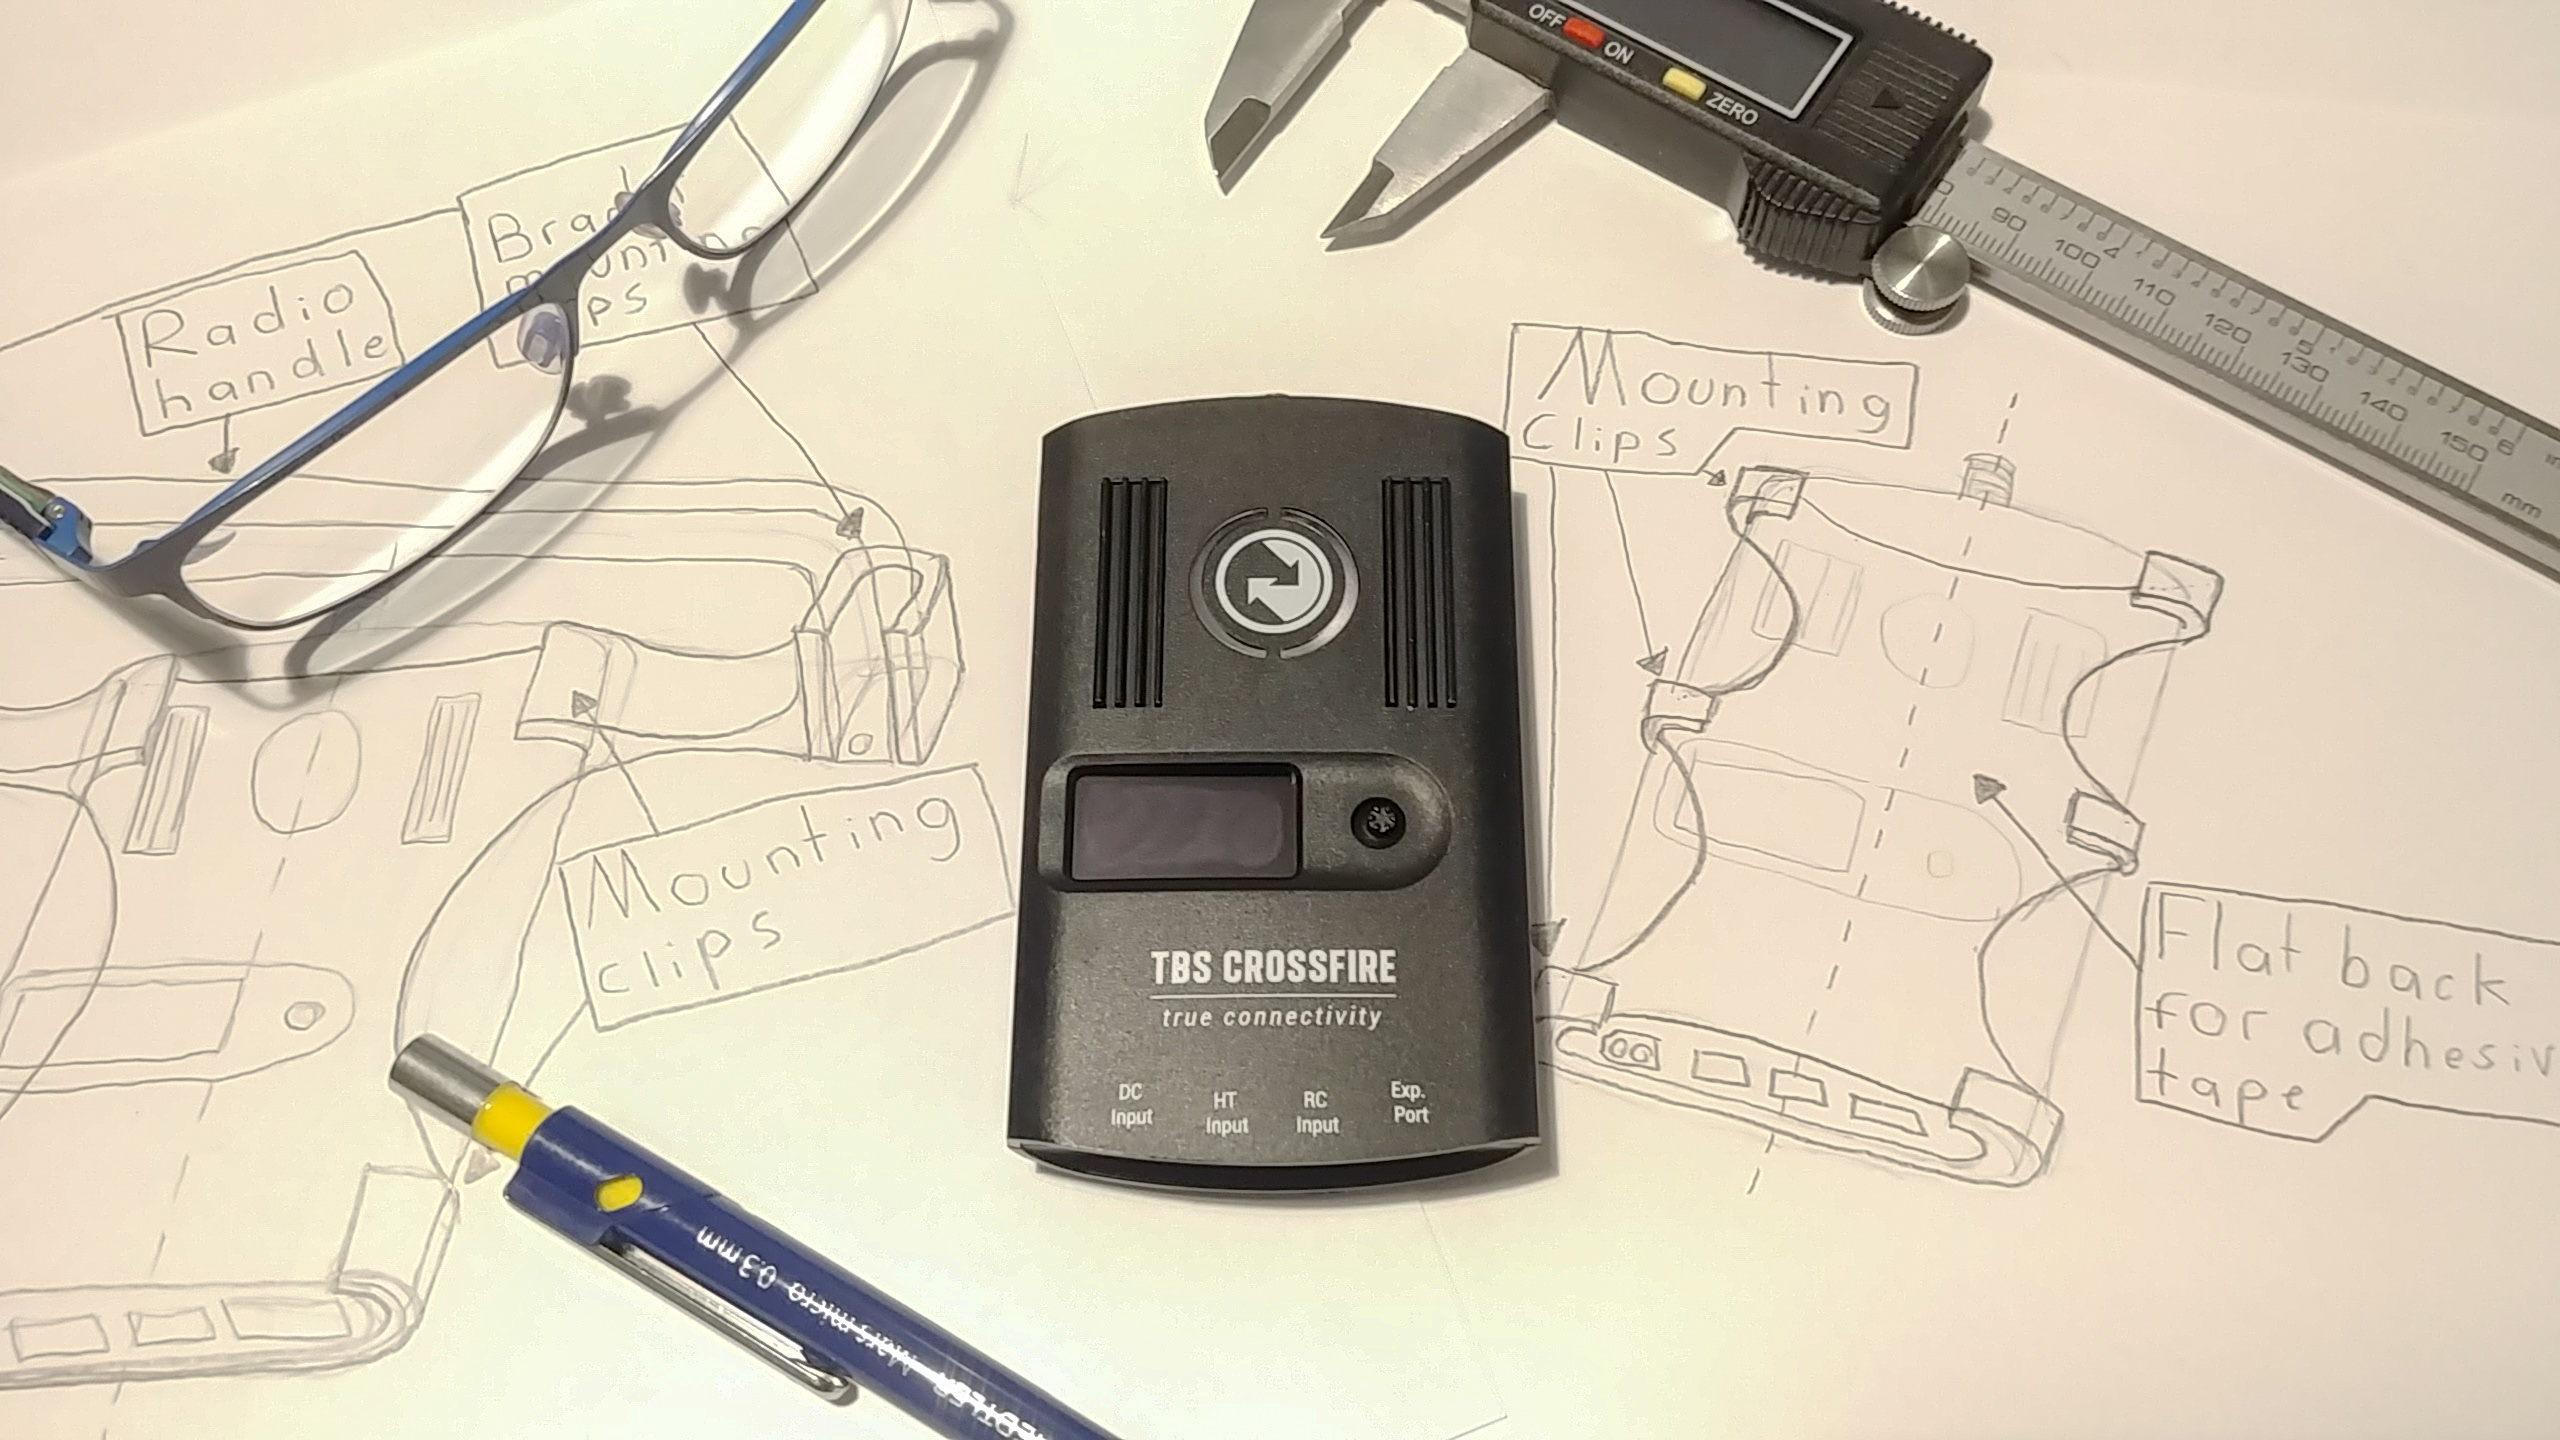
Stage 4: Initial Sketches
This is perhaps my favourite stage in the drone design cycle, putting pen(cil) to paper and drawing some rough sketches. Many people elect to skip all steps up until this point in the drone design cycle however this can lead to later issues due to design considerations previously not addressed. When sketching, I recommend starting light and progressively using darker lines as the design develops. Below are some of my rough sketches for the crossfire bracket:[/vc_column_text][vc_row_inner][vc_column_inner width=”1/2″][vc_column_text]
Sketch 1
[/vc_column_text][vc_single_image image=”3949″ img_size=”full” alignment=”center” onclick=”link_image”][/vc_column_inner][vc_column_inner width=”1/2″][vc_column_text]
Sketch 2
[/vc_column_text][vc_single_image image=”3948″ img_size=”full” alignment=”center” onclick=”link_image”][/vc_column_inner][/vc_row_inner][vc_column_text]
Stage 5: Proposed Solution
The proposed solution is the stage of the drone design cycle where you decide which aspects of your designs you will include in the final solution and how you intend to meet the specifications of the design brief. I like to link my proposed solution directly with the sections of the design brief it will meet. This way, I can ensure that the solution will be ideal to meet the design brief.
For the bracket, I will base the final design on sketch 2 which is moderately compact (F5). The design can quite easily support a full-sized crossfire (F1). It will be 3D printed (C1) in black PLA plastic (A1) and sanded smooth (A2). The bracket mounting clips will attach to the DX9’s handle to secure the bracket (F2) without radio modification (F3) To make the final solution comply with F4, it will be coupled with Mdav801’s ‘Spektrum DX9 upright stand’.[/vc_column_text][vc_column_text]
Stage 6: Refined Sketches
Now that the idea for the solution has been established, the next drone design cycle stage is to draw a series of refined sketches. These are more accurate than the initial sketches and usually include basic dimensions. As this drone design cycle product is relatively simple, I only elected to do one refined sketch. In the past, one product required ten refined sketches![/vc_column_text][vc_row_inner][vc_column_inner width=”1/6″][/vc_column_inner][vc_column_inner width=”2/3″][vc_single_image image=”3951″ img_size=”full” alignment=”center” onclick=”link_image”][/vc_column_inner][vc_column_inner width=”1/6″][/vc_column_inner][/vc_row_inner][vc_column_text]
Stage 7: Idea Testing
Before moving onto the final design drone design cycle stage, it is important to first test out your ideas or any uncertain design aspects. Tests can include material property testing, durability testing, electrical testing etc.
For the bracket, I decided to test a series of 3D printed clips to ensure that the crossfire would snugly fit into the final product. I like to report on my testing data using a table as it is a neat way of presenting the information.[/vc_column_text][vc_row_inner][vc_column_inner width=”1/6″][/vc_column_inner][vc_column_inner width=”2/3″][vc_single_image image=”3961″ img_size=”full” alignment=”center” onclick=”link_image”][/vc_column_inner][vc_column_inner width=”1/6″][/vc_column_inner][/vc_row_inner][vc_column_text]
Stage 8: Final Design
The final design is the really fun part of the drone design cycle. In this stage, you take your sketches into 3D modelling software and create the final design. Prior to the final design stage of the drone design cycle, final sketches would be drawn. I elected to omit this stage from this design as it a relatively simple product. Fusion 360 is my modelling software of choice as it is free and quite powerful. The final design is best presented as a series of drawings and renders as shown below with the bracket.[/vc_column_text][vc_row_inner][vc_column_inner width=”1/6″][/vc_column_inner][vc_column_inner width=”2/3″][vc_single_image image=”3955″ img_size=”full” alignment=”center” onclick=”link_image”][vc_single_image image=”3954″ img_size=”full” alignment=”center” onclick=”link_image”][/vc_column_inner][vc_column_inner width=”1/6″][/vc_column_inner][/vc_row_inner][vc_column_text]
Stage 9: Production
Now for my absolute favourite part of the drone design cycle, taking all your hard work and putting it into production. For most briefs, the production stage involves taking your 3D designs and turning them into a physical piece. 3D printing was utilised in my case to produce the bracket. The final physical prototype is pictured below and can be downloaded here from Thingiverse.[/vc_column_text][vc_row_inner][vc_column_inner width=”1/6″][/vc_column_inner][vc_column_inner width=”2/3″][vc_single_image image=”3956″ img_size=”full” alignment=”center” onclick=”link_image”][/vc_column_inner][vc_column_inner width=”1/6″][/vc_column_inner][/vc_row_inner][vc_column_text]
Stage 10: Evaluation
And now, the final drone design cycle stage, the evaluation. The purpose of the evaluation is to compare and rate your product against the design brief. You should evaluate how & why the product does/doesn’t fully meet the brief, what design processes/stages you could have improved on, and any general information on how the outcome could be improved. My evaluation of the crossfire bracket after completion of the drone design cycle is shown below.[/vc_column_text][vc_row_inner][vc_column_inner width=”1/6″][/vc_column_inner][vc_column_inner width=”2/3″][vc_single_image image=”3963″ img_size=”full” alignment=”center” onclick=”link_image”][/vc_column_inner][vc_column_inner width=”1/6″][/vc_column_inner][/vc_row_inner][vc_column_text]All design brief criteria were met with the exception of C2 in order to comply with time restrictions. This could have been remedied with the use of a spray putty however none was available at the time of production. The implemented design cycles effectively allowed for successful part creation without any unforeseen delays.[/vc_column_text][vc_column_text]
Final Word
I hope this article has provided a useful insight into the basic drone design cycle which many drone products go through. I highly encourage you to try out the drone design cycle next time you want to design a bracket or drone part. You will be amazed with the results! If you would like to print out the bracket which I designed in this article, you can download it here.[/vc_column_text][vc_row_inner][vc_column_inner width=”1/6″][/vc_column_inner][vc_column_inner width=”2/3″][vc_single_image image=”3959″ img_size=”full” alignment=”center” onclick=”link_image”][/vc_column_inner][vc_column_inner width=”1/6″][/vc_column_inner][/vc_row_inner][vc_separator][vc_column_inner width=”1/6″][/vc_column_inner][vc_column_inner width=”2/3″][/vc_column_inner][vc_column_inner width=”1/6″]