
The new ImmersionRC RapidFire FPV Goggle Module is here, and it’s a game changer. As a member of the next generation of FatShark FPV goggle modules, it has some big features, and utility not matched by others. With several years in the making, there has been a lot of thought put into the rapidFIRE, and it definitely shows. Should this be the next upgrade for your FatSharks? Is the rapidFIRE for the first time FPV pilot? Lets walk through it together![vc_row][vc_column][vc_column_text][/vc_column_text][/vc_column][/vc_row][vc_row][vc_column width=”1/6″][/vc_column][vc_column width=”2/3″][vc_single_image image=”2677″ img_size=”full” alignment=”center” onclick=”link_image”][/vc_column][vc_column width=”1/6″][/vc_column][/vc_row][vc_row][vc_column][vc_column_text]
Specifications
- Frequency Range: 5.3-6.0GHz
- Sensitivity: Best In Class (stable image at close to -100dBm)
- Bands: IRC/FatShark, RaceBand, LowRace, Band A, B, E, Favorites
- Channels: All of the standard ones, plus favorites (custom frequencies)
- Antenna Connectors: 2x Standard SMA (not RP-SMA)
- Weight: 80g
- Voltage: 5.0V nominal
- Consumption: 350mA @ 5V with both modules enabled, less than 300mA in low-power mode
- Cabling: Plug and Play for Attitude, Dom HDO. Included Aux Power cable for others
- Display: 96” Monochrome OLED
- Input: 5-way Joystick + Integration with FatShark Channel Buttons
- Sound: Audible Beeper to indicate marginal reception
- Modes: rapidFIRE, classic Diversity, power-saving single module modes
- Compatible Headsets: Dominator V1, V2, V3, SE, HD1, HD2, HD3, HDO, Attitude V3, V4
- Updates: Integrated USB port, Windows application for updates
- Module Doors: Dominator and Attitude module doors (Gloss Ferrari™ Red)
- Aux Power: Auxiliary (HT) power board + self-adhesive flat-flex cable
- Sticker Set: Sticker set to cover the flat-flex cable[/vc_column_text][/vc_column][/vc_row][vc_row][vc_column width=”1/2″][vc_single_image image=”2679″ img_size=”full” alignment=”center” onclick=”link_image”][/vc_column][vc_column width=”1/2″][vc_single_image image=”2680″ img_size=”full” alignment=”center” onclick=”link_image”][/vc_column][/vc_row][vc_row][vc_column][vc_column_text]
Initial Impressions
Upon opening the box for the ImmersionRC rapidFIRE, I was impressed by the compact and clean build of the electronics. The unit has dual SMA connectors for the antennas, an OLED readout screen, and a 5 position joystick to navigate the menu. The video receivers are sandwiched in between the twin PCB’s, along with the micro USB port for firmware updates. The rear of the rapidFIRE hosts an additional PCB that I would imagine hosts the brain of the signal processing, as well as the OSD element. The ribbon cable connector is also present here for using the additional power adaptor. Overall the unit feels solid and durable, and honestly you can tell that there was a lot of engineering that went into the development of the rapidFIRE.
Installing the ImmersionRC rapidFIRE
There are a few different methods to installing the ImmersionRC rapidFIRE into the FPV goggles. If you own the new FatShark HDO’s or the Attitude v3 or v4, installation is a simple process of plugging the module directly into the module bay. These series of FPV goggles have power systems capable of handling the ImmersionRC rapidFIRE. The module is compatible with every line of the FatShark Dominator, however, the power systems as built are not capable of supporting the rapidFIRE alone. When the module does not receive the right amount of power, the rapidFIRE module will go into low power mode. This will shut down the upper antenna while in rapidFIRE mode. With the Dominator line of goggles, you have a few different options to get the appropriate amount of power to the module.[/vc_column_text][/vc_column][/vc_row][vc_row][vc_column width=”1/6″][/vc_column][vc_column width=”2/3″][vc_single_image image=”2675″ img_size=”full” alignment=”center” onclick=”link_image”][/vc_column][vc_column width=”1/6″][/vc_column][/vc_row][vc_row][vc_column][vc_column_text]
Using the Auxiliary Power Board
Option one is to use the supplied auxiliary power board and ribbon cable to get the power to the module. This involves attaching the ribbon cable to the ImmersionRC rapidFIRE module, located on the back of the unit. Pull out the black retention clip slightly on the module to allow the cable to slip in. When attaching the cable, note that there is black insulation on one side and exposed connectors on the other. The insulated side goes down, facing the module. Once inserted, close the retention clip to lock in the ribbon cable. Do the same with the auxiliary power board before inserting it into the head tracker bay. Make sure to align both sets of pins with the connectors. The ribbon cable will run across the front of the goggles, the supplied stickers will cover the ribbon and add some stylish flair to your goggles![/vc_column_text][/vc_column][/vc_row][vc_row][vc_column width=”1/6″][/vc_column][vc_column width=”2/3″][vc_single_image image=”2676″ img_size=”full” alignment=”center” onclick=”link_image”][/vc_column][vc_column width=”1/6″][/vc_column][/vc_row][vc_row][vc_column][vc_column_text]
Modifying your Goggles
Option two is to modify your goggles to supply the appropriate power to the ImmersionRC rapidFIRE. This involves opening up your goggles to desolder an inductor from the HDMI goggles. Keep in mind that this will void the warranty on your goggles if it’s still active. The modification is relatively simple to perform if you have experience with soldering. To begin, remove the faceplate. Press at the edges on each side, leaving the center for last. It may take some pressure the release the clips, but the faceplate is pretty durable. Back out the three screws on the bottom of the goggles, being careful not to lose them. Separate the seams of the goggle halves by pulling them apart at the ends of the goggle, near the strap. To release the center, press firmly on the nose piece near the seam to release the clip.
Be careful when separating the halves, there are several wires and ribbon cables that connect components on both halves. Once open, slide out the HDMI board from its retention slot. Depending on the version of the board in your goggles, the component, labeled “L1” may be on the top, or the bottom of the board. When located, carefully desolder the inductor from the board and set aside. Lastly, bridge the two pads with a piece of wire, making sure the wire is secure. This inductor was added as part of the power filter system, but was never really needed and can be safely removed. This component is not present in the HDO’s or the Attitudes, and is part of what makes them inherently compatible with next gen modules such as the ImmersionRC rapidFIRE.[/vc_column_text][/vc_column][/vc_row][vc_row][vc_column width=”1/6″][/vc_column][vc_column width=”2/3″][vc_single_image image=”2678″ img_size=”full” alignment=”center” onclick=”link_image”][/vc_column][vc_column width=”1/6″][/vc_column][/vc_row][vc_row][vc_column][vc_column_text]
Features
Bands and Channels
The ImmerisonRC rapidFIRE offers a few features that can be found in other modules, but the way the rapidFIRE implements them is what’s unique. At the main screen, you can change both the band and the channel simply by using the joystick. Push the joystick right or left, and you page through the bands, while up and down page through the channels. The channel buttons on the goggles will also page through the channels but will not cycle through the bands. There are six total bands available with eight channels each, with an additional “X-Band” that can be user defined, but more on that later.
By pressing down on the joystick you enter the menu system. The first two options are band and channel, and by navigating these, you can select your frequency here as well. Select the band or channel by navigating to it and pressing the joystick. In the top right of the menu, you can see the numerical equivalent of your frequency as you change it. As a note, there is no way to exit the menu; it will automatically time out back to the home screen in about eight seconds.[/vc_column_text][/vc_column][/vc_row][vc_row][vc_column width=”1/6″][/vc_column][vc_column width=”2/3″][vc_single_image image=”2684″ img_size=”full” alignment=”center” onclick=”link_image”][/vc_column][vc_column width=”1/6″][/vc_column][/vc_row][vc_row][vc_column][vc_column_text]
Tools Menu
The first option in the tools menu is the spectrum analyzer. This option allows you to scan for frequencies a band at a time. This is useful to scan for the base frequency noise level. In its basic mode the spectrum analyzer on the ImmersionRC rapidFIRE continuously updates, however, by pushing right on the joystick you can set it to peak mode, which freezes any detected signals in the spectrum. It will update over time; while it runs, it will show any signals as peaks on the screen. Pressing left will exit the analyzer and put you back into the menu.
Next up is the favorites menu, which is a unique feature of the ImmersionRC rapidFIRE. This menu gives you the option use an entire band, the “X-Band” to set up your favorite channels. You get eight channels to set up different frequencies of your choice. This is especially useful for race events, where the event channels can be set to the favorites. When a channel is selected by pressing the joystick a spectrum analyzer opens, and you can select the frequency of your choice. Here, there are no restrictions of the unit to the standard channels of each band; instead, frequencies can adjust one hertz at a time. This allows for “tuning” to your specific transmitter, since not all VTX’s transmit on the exact channel frequency.
Last is the calibration tool, which is useful for calibrating the receivers for RSSI. Simply set the ImmersionRC rapidFIRE to 4800 and run the calibration tool, following the on screen prompts. This is to be done with no antennas on the module. First step is to run the tool with no transmitters active, and second step is to turn on a transmitter that is on 4800.[/vc_column_text][/vc_column][/vc_row][vc_row][vc_column width=”1/6″][/vc_column][vc_column width=”2/3″][vc_single_image image=”2682″ img_size=”full” alignment=”center” onclick=”link_image”][/vc_column][vc_column width=”1/6″][/vc_column][/vc_row][vc_row][vc_column][vc_column_text]
RF Modes
The ImmersionRC rapidFIRE hosts two different receiving modes, both of which are extremely useful. First up is the mode for which the module gets its namesake, rapidFIRE. This mode takes the signals from both antennas on the module and anytime a disruption occurs, the module uses the signal from the other antenna to “rebuild” the image, resulting in less static in the display. This effectively nullifies any multipathing issues, as well as giving pilots more confidence when flying in areas with sketchy signal situations. This also has the benefit of extending the range of the signal, by rebuilding the signal as it starts to degrade.
The choice of receiving antennas is up to you, the rapidFIRE mode will work with whatever you give it. A pilot can choose an omni and a directional antenna as is common with normal diversity setups, giving you signal both behind and for a distance in front. However, pairing together omnis or directional antennas gives the ImmersionRC rapidFIRE more to work with depending on the flight plan.
Legacy mode shuts down the fusing of signals from both antennas and seems to operate similar to a standard diversity module, such as the LaForge or the True-D. This mode also increases the modules compatibility with cameras of lesser quality and standards.
Antennas
This menu option is pretty self-explanatory. The pilot can choose what antennas are active. Options allow for both antennas or only the upper or lower antenna. This allows for power saving when conducting flights in close range, or long range by shutting down one of the receiver modules in the rapidFIRE.
OSD
The ImmersionRC rapidFIRE has a built in OSD for displaying information on the goggles screens. The first option is “OFF”, which shuts down the OSD completely. Second is the lock option, which displays a padlock icon in the upper left corner of the screen, indicating that the unit has a lock on the selected frequency and is receiving good signal. The last option displays RSSI bars across the top of the screen for both antennas, which can be a good indicator of whether the unit is receiving good signal. This can also inform the pilot when they begin approaching the maximum range of the signal.
Status
The last option is the status screen, which displays information for the unit, such as firmware versions and power levels. This will also indicate whether the unit is in low power mode, which as discussed above, will shut off the upper antenna. Another indicator of low power mode is in the main menu, the voltage will show up in the bottom left corner.[/vc_column_text][/vc_column][/vc_row][vc_row][vc_column width=”1/6″][/vc_column][vc_column width=”2/3″][vc_single_image image=”2674″ img_size=”full” alignment=”center” onclick=”link_image”][/vc_column][vc_column width=”1/6″][/vc_column][/vc_row][vc_row][vc_column][vc_column_text]
Flying with the ImmersionRC rapidFIRE
Using the ImmersionRC rapidFIRE presents one the most immersive experiences with FPV I have had to date. There has never been a time when I have flown completely free of interference and static in my FPV feed; however, using the rapidFIRE has provided that experience for me, and it’s fantastic. However, that experience didn’t come without some issues, primarily centered on the power that the unit was receiving.
Powering the rapidFIRE
I paired up the module with my FatShark Dominator HD2’s by conducting the power mod on the HDMI board. Through testing the unit flying my Tiny Whoop in the house, I kept getting the low power notification. I was using a fully charged Tattu 2500 mAh goggle battery, and the power readout on the rapidFIRE never dropped below 4.9v. However, the unit detected that it wasn’t receiving enough power and shut off the upper antenna. Only through resetting the module would I get full use of the rapidFIRE back. I then moved to using the auxiliary power board and running the cable through the inside of my goggles, using the hole I created for my Laforge Module. From that point forward, I have had no low power issues with the module. Using the power board eliminates the ability to shut off the module using the switch on the goggles, however.
Image Quality
As I stated above, flying with the rapidFIRE gave an interference free flight experience. The only time that I had any breakup was when flying around a solid stone and metal structure about 250 feet from my location. I made runs out to about 1500ft from my position without a single bit of static in my feed. However, while in rapidFIRE mode, the image is oversaturated with color and darker when compared to legacy mode. I believe this is due to the blending of the two images that allows the ImmersionRC rapidFIRE to work its magic. Some of this can be eliminated by adjusting the contrast and brightness of the FatShark goggles, but when switching into legacy mode, you have to adjust it back due to the brightness.
The image blending makes the rapidFIRE less effective in low light situations, limited by how far you can adjust the goggles themselves. This may lead to users switching into legacy mode for these instances, eliminating the advantage the modules gives. Also, while in rapidFIRE mode, there is a unique image glitch that I noticed when my quad was waiting launch. My camera was pointed at a sunscreen with the sky in the background and when I launched, I could see an after image of the sunscreen in my view for about 20 seconds. The effect can best be described as burn in you would see in a CRT or plasma television left with a stationary image on it. The effect does go away eventually, but it was a bit distracting. In legacy mode, this did not happen at all and the burn in did not translate over to DVR footage.[/vc_column_text][/vc_column][/vc_row][vc_row][vc_column][vc_single_image image=”2690″ img_size=”full” alignment=”center” onclick=”link_image”][/vc_column][/vc_row][vc_row][vc_column][vc_single_image image=”2691″ img_size=”full” alignment=”center” onclick=”link_image”][/vc_column][/vc_row][vc_row][vc_column][vc_column_text]
OSD
The OSD is a great touch to any module, something that I have enjoyed with LaForge v4. However, the way it has been implemented on the ImmersionRC rapidFIRE does leave some room for improvement. Honestly, I see this as a bonus feature to begin with, so it’s not really a deal breaker. However, when using the RSSI bars, they take up the entirety of the top of the video feed. The bars could be shrunk down a bit, say to the top left of the screen. The lock indicator was of little use to me, as I could not find an instance where it didn’t display as long as I had a picture. When the OSD was shut off, there was still a ghost image of it displayed in the feed, similar to the burn in effect described above.
Being a bit spoiled from the LaForge v4, being able to navigate the menu with the goggles still on would be a nice touch as well. Being able to see what bands and channels I was selecting would be useful as well. Perhaps this is planned in a future firmware update? The bars however do give a great indicator of video range, keeping you from flying beyond your video signal.
Frequency Adjustments
I love having the ability to tune the frequency to the specific VTX component, as well as being able to save those to the X-Band. Due to differences in transmitters and antennas, the standard frequencies can begin to shift as the VTX ages or is damaged by crashes. This prolongs the life of your VTX by keeping it tunable. Also, in a race situation, having the ability to save the event channels into their own band makes flying and even spectating much easier.
Pros
- Amazing video quality free of common static interference and multi-pathing.
- On-Board OSD gives great information on range and signal quality.
- Easy channel and band adjustments without having to enter the menu.
- X-Band utility is fantastic, one of the best features beyond the video quality.
- Ability to “tune” the signal by increments as small as one hertz.
- Module bay covers are stylish and clip in securely.
Cons
- Power issues with older goggles
- Will need to use the supplied power cable and power module; or
- Modify your goggles as detailed to remove inductor from HDMI board.
- Voltage sensing drops the module into low power mode even when at 4.8v or above.
- OSD has the potential to be so much more.
- “Burn in” effect can be distracting until it goes away
- Not an issue if you power on and launch quickly
- The image blending component of rapidFIRE mode can be darker and oversaturated compared to legacy mode.
- Adjustment of the goggle brightness and contrast can fix some of this.
Final Thoughts on the ImmersionRC rapidFIRE
The rapidFIRE module is a fantastic work of engineering with some incredible features. It definitely grants quality video feed and utility that is innovative and unique. Navigating the menus is easy and quick, and having the OSD is definitely useful while flying. The X-Band is infinitely useful. To be honest, the ImmersionRC rapidFIRE is worth the money in the video quality alone. I can’t wait to see how it improves with each firmware update. The power issues with the older models of FatShark goggles was a bit frustrating at first but, once resolved were quickly forgotten. I really enjoy using the rapidFIRE and would recommend it to any pilot looking for a quality goggle module.[/vc_column_text][/vc_column][/vc_row][vc_row][vc_column][ultimate_spacer height=”40″][vc_separator][ultimate_spacer height=”40″][/vc_column][/vc_row][vc_row][vc_column][vc_single_image image=”2681″ img_size=”medium” alignment=”center”]
[/vc_column][/vc_row][vc_row][vc_column][ultimate_spacer height=”10″][/vc_column][/vc_row]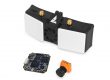


Very thorough article, thank you.
I can’t wait to get mine.
I’m curious what insuatrie published the next years
nice article, interesting product.my friend gave me a car. I would like to have the module in my Googles, the performance seems to be better than mine
Would be interested in hearing from others about success/failure/frustration with modifying HDMI for power regulation.
Very good article, I wonder if my HD1 will be able to handle the power consumption of the RapidFire?
You will either have to complete the power mod, or use the auxiliary power board, but your HD1’s should work just fine.
Waiting to see how the first patch shakes out. Nice article.
Nice review. Just to be clear, does the OSD only display RSSI data at this point?
Can’t wait to get my own module!
Correct, the OSD only has two display options. Signal lock which is indicated by a padlock in the top left corner, and RSSI bars.
would love this module
Nice in depth honest review. Looking forward to seeing how these perform compared to other modules on the market.
Datsick🔥
I love fatshark!
This looks sick, can’t wait to see it in action
Seems to raise the bar, can’t wait to see.
Looks and sound like it will be a good receiver
I had to bail on the first pre-order due to shipping delays… but can’t wait till I can really order one now!
I would love to have one of these. Getfpv is the best!
The Rapidfire’s advanced receiver algorithm is a league ahead typical RSSI in other receivers. This will suppress multipath in indoors or noisy environment.
Can’t wait to get a hold of one.
#GetFPVrapidFIRE giveaway! Hope I win!
I want to win it!!
#GetFPVrapidFIRE
I want to win and replace my True D.
These will look nice on the Fat Shark Dominator HD2 Terminator Edition FPV Goggles
Really hope I win a set in your giveaway! Thanks for being so generous!
The saturated image in RapidFire mode is something no ones talked about yet afaik. Its a good thing I read this review or I would have went in blind. I’ll have to keep that in mind when/if I get this module.
I also have FatShark HDv2’s and the power modification has me intrigued. will someone be doing a modification guide?
Thanks for the great resource!
Very nice article, would love to have one of these!
Looks nice, very clever technology but lets wait for batch 2 to see it wasn’t hyped too much.
if so… maybe ill get 1.
#GetFPVrapidFIRE giveaway!
Don’t understand why the color saturation is so high.
I read reports there is an issue with synching in rapidFIRE mode if the module remains powered and the quad gets its battery replaced (powered / re-powered)
Sweet – solid tech and great article explaining the hiccups encountered (i.e. powering the module via two, different methods).
While nothing (other than what I’m guessing is biased, marketing info) tells me this would not work with a Furious FPV Dock-King Ground Station, I would like to see what that setup looks like. I’d post a video myself, but I can’t justify spending my hard-earned coin to write about my debugging experience 😉
I know it isn’t necessary, but hashing the tag anyway…. #GetFPVrapidFIRE
Can’t thank you guys enough for bringing this wonderful invention to the fpv world amazing tech that makes flying in all environments a pleasure.-
Thanks for the review! Looking forward to trying out myself.
Cant wait for this to come out!
I’ve watched a few videos of the rapidFIRE vs other receivers and the difference is impressive. I’ve made my choice when I go to pick one up it’ll be this unit.
#rapidfiregiveaway be sweet to win
I want one. It’s amazing how quickly I’ve fallen behind the tech curve.
These look amazing! I love the color too! Cant wait to get one once I can save enough.
This module looks sounds like it is super bsd ass! It would be so awesome to win a module from the giveaway
Thanks for the review!
May mean the time for me to upgrade to the HDO’s is coming soon!
-A-
I will definitely order one when it comes in stock!
Considered the best in the market, but considerably high cost for non-professionals. I think we would all love to have this for “no limit freedom”.
#rapidFIRE #giveaway