

I have been following the development of the Helio RC Spring flight controller since it was announced Butterflight dev discussion – podcast. From the beginning, I liked the idea of using an F3 processor as a filtering and gyro management device. This kind of preprocessing of the gyro data leaves more processing power to the main F4 CPU, so no processor overclocking is needed with high gyro update frequency and PID loop times.[vc_single_image image=”2719″ img_size=”large” onclick=”link_image”][vc_row][vc_column][vc_column_text]This feature called IMUF gives the Helio RC Spring board great advantage over the other flight controllers, which combined with the Butterflight firmware enables it to provide smooth and snappy flight characteristics in the same time.
Overview
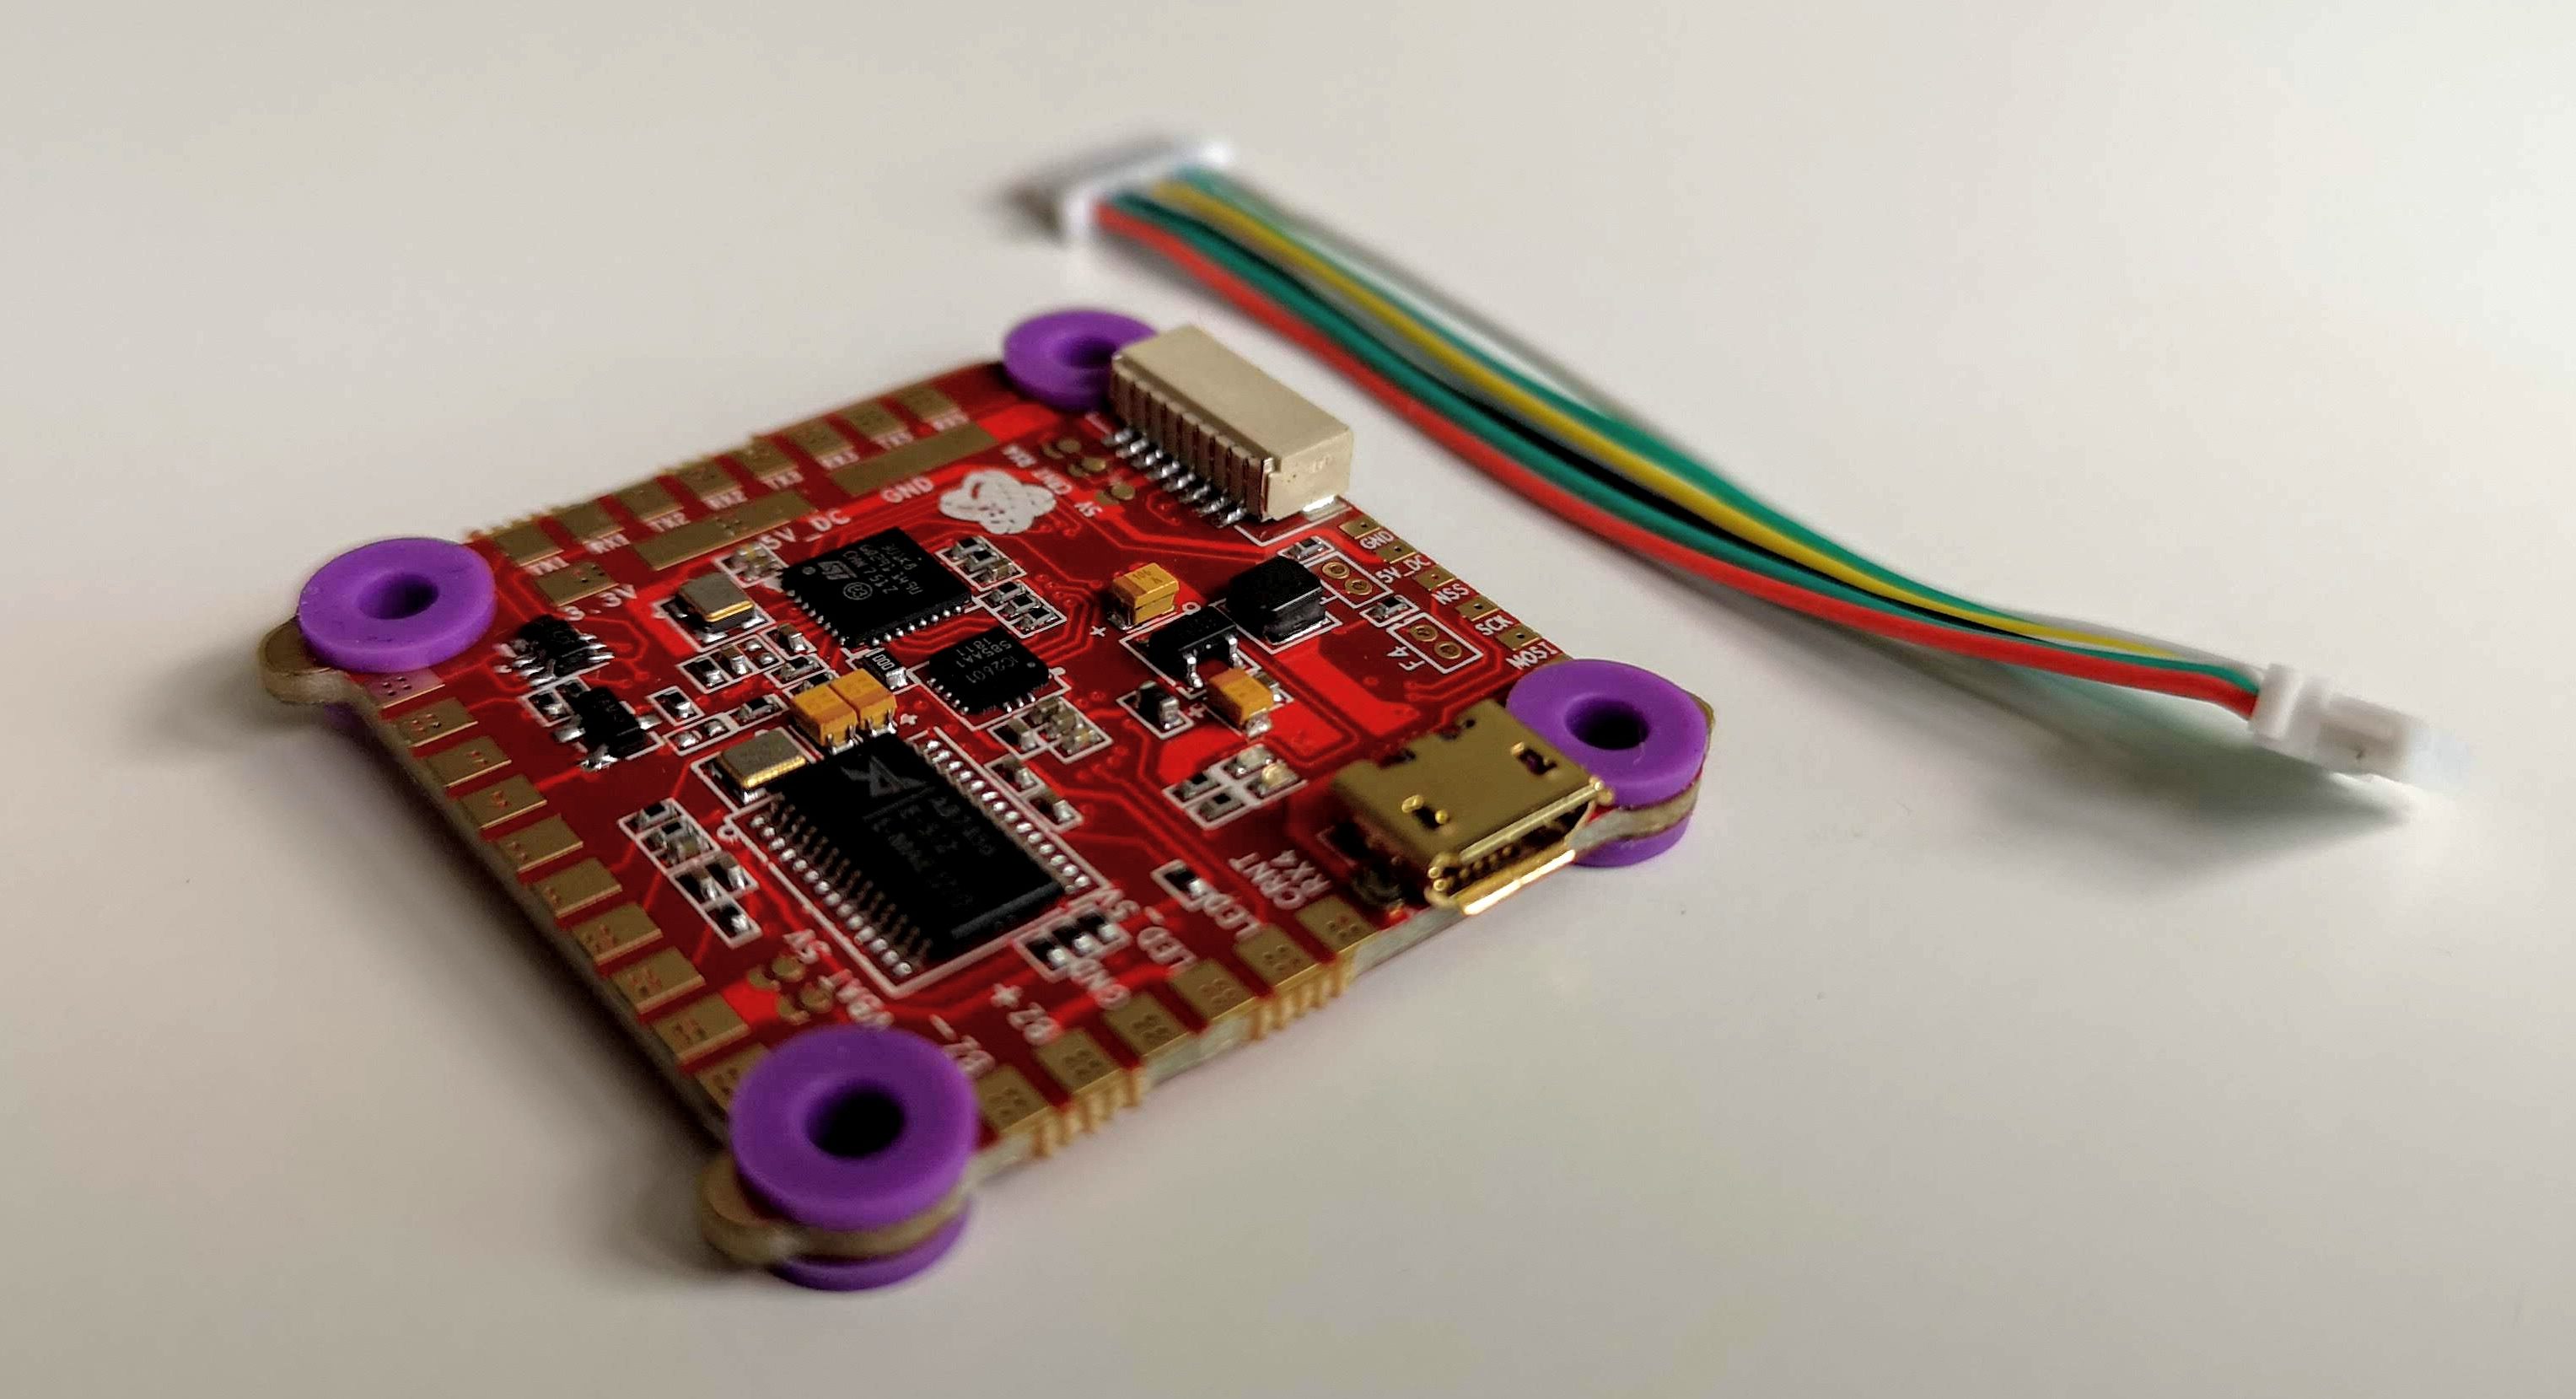
The Helio RC Spring comes in a simple antistatic nylon packing that includes the board, four soft-mounting grommets, and a 4in1 ESC cable. The board has high-quality finish and manufacturing. The soldering pads are big and the layout is well thought out in order to reduce cable clutter.[/vc_column_text][vc_single_image image=”2727″ img_size=”large” add_caption=”yes” onclick=”link_image”][/vc_column][/vc_row][vc_row][vc_column][vc_column_text]There are visible markings on almost all pads. For the ones that are not marked, you will have to look at the connection diagram. The Helio RC team has taken care to mark everything properly on the new Helio RC Spring AIO board intended for pilots that prefer four separate ESCs.
There are several bridged connections on the Helio RC Spring flight controller. The bridges on the board are a very neat feature that enables you to choose how you want to power the board. You can choose vbat or 5V. Also, there are separate bridges available after the 4in1 connector that enable you to select the proper 4in1 voltage output and current sensor, for powering the board through the 4in1 ESC.
Technical Specification
| Processors: | F4 & F3, STM32F405 & STM32F301 |
| IMU: | ICM 20601 |
| OSD: | Full Betaflight OSD support |
| Motor Outputs: | Full DSHOT and MULTISHOT support |
| Receiver Support: | PPM, S.Bus (inverter built-in), DSM, HoTT, SRXL, CSRF, FPort ready. 5V or 3.3V supply for receiver. |
| Telemetry Support: | FrSKY Smart Port, FrSKY Sensor Hub, HoTT Telemetry, SRXL, CSRF, FPort ready. Built-in inverter for FrSKY telemetry. |
| Serial Ports: | 5 full serial ports (UARTs). UART1 and UART2 have inverters for S.Bus and SmartPort telemetry. |
| Buzzer Port: | Dedicated port for 5V (100mA max) buzzers. |
| Analog Inputs: | Voltage sensing up to 26V, current and RSSI inputs (3.3V max). |
| Power: | VBAT up to 6s with voltage regulator 2.5A continuous 3.2A burst. Or 5v in (switchable with jumper pads) |
(source: Helio RC website)
Wiring and setup
There is no visual clue about the flight controller orientation. You can refer to the connection diagram for the proper flight controller placement. To make things easier for you, the front of the board is the opposite side from the one with the 4in1 ESC port.
In some cases when using 4in1 ESCs you may be required to flip the board on the other side or add copper or aluminum tape on the FETs, so you can shield it from ESC electromagnetic interference that may lock up the flight controller mid-flight. It is worth doing some compatibility research before starting a build based on this flight controller. Noise issues appear because one inductor on the FC is too close to the ESC.[/vc_column_text][vc_video link=”https://www.youtube.com/watch?v=zgWefvV8w1E”][vc_column_text]The wiring procedure is relatively straightforward and we can divide it into the following steps:
- powering the Helio RC Spring flight controller – depending on your setup you should decide whether you want to power it trough vbat or 5V. In addition, you have an option to use the power lead from your 4in1 ESC or power it directly on the corresponding pads. (photo of the bridged connections, both on top and the ones near the 4in1 connector). You will have to solder the appropriate bridge connection based on your decision.
- connecting the ESCs – when using 4in1 you just need to connect it to the 4in1 ESC port on the Helio RC Spring board. Take care that the motor order is correct and use the 5V or vbat lead from the 4in1 if you choose to power your flight controller through the 4in1 cable.
- the receiver pads are positioned on the top right of the flight controller. This is the pad order from left to right: GND, +5V, SBUS, S-Port.
- you should connect your FPV camera and VTx (video in and video out) on the third and fifth pad accordingly on the front of the board, the opposite side from the 4in1 ESC port. You can power the VTx from the battery leads and the camera from the 5v rail on the flight controller. The other way is to power the VTx from the vbat pads on the board and power the camera from the Vtx. This should give you cleaner video feed in terms of interference.
- if you plan to use smart audio, which I’m sure you are, connect it to the tx5 pad on the flight controller
The board offers a 5V output for powering your external components, although you should be aware that the current limit is up to 2000ma
Compared to some other boards like for example the Kakute, there is no provided step-by-step manual for the Helio RC Spring except for the wiring diagram. It seems that this FC is leaning more towards the more experienced pilots. Do not expect to be guided through the installation and setup process, but you can ask for help on the Helio RC Spring Slack workspace and they will be happy to help.
The latest 3.5.2 Odin release
“Butterflight_3.5.2_MSD_1.0.0_IMUF_1.0.7-ODIN” is the latest stable release available through the Butterflight configurator. If you want to learn more about it and get some help with the installation and tuning, feel free to join the #odin_release slack channel. Judging by the number of channel members, it seems that fair amounts of pilots are already flying this firmware.
I have spent a fair amount of time on the channel, collecting info about this release. Few fellow pilots on the channel are doing the incredible job of helping everyone in need, whether it is blackbox log analyzing or troubleshooting hardware and software problems. Thank you for all the hard work!
In case you are unable to join this channel here are the required steps for installing and running the Odin firmware release:[/vc_column_text][vc_tta_accordion c_icon=”” active_section=”0″ no_fill=”true” collapsible_all=”true”][vc_tta_section i_icon_fontawesome=”fa fa-info-circle” add_icon=”true” title=”Steps to install the latest firmware – click here” tab_id=”1530891190562-43396637-6235″][vc_column_text]# Last update: 05/07/2018
1. Download and install this configurator
Windows (32bit) – https://flyhelio.slack.com/files/U8GL942AY/FBACHLGKS/butterflight-configurator-installer_10.4.3_win32.exe
Windows (64bit) – https://flyhelio.slack.com/files/U8GL942AY/FBC4XUPHV/butterflight-configurator-installer_10.4.3_win64.exe
MAC – https://flyhelio.slack.com/files/U8GL942AY/FBC0S0WBY/butterflight-configurator_10.4.3_macos.dmg
Linux – https://flyhelio.slack.com/files/U8GL942AY/FBACUT77S/butterflight-configurator-10.4.3-1.x86_64.rpm
2. Download and install this firmware (Full Chip Erase) https://flyhelio.slack.com/files/U9QARG5L5/FBAKUAQ4Q/butterflight_3.5.2_msd_1.0.0_imuf_1.0.7-odin.zip
3. In CLI run imufupdate
4. DO NOT copy in your previous PID/filter config, only copy Rates/OSD/Port Config/FC orientation etc
5. Raise gyro to 32/32 and use Multishot (don’t forget to calibrate)
6. Change BLHeli PWM Freq to 48kHz (see https://oscarliang.com/best-blheli-32-settings/)
7. Go fly and have fun!
8. Tune PIDs (if required). For a base tune see PID Analzyer https://youtu.be/q39qjkdYW4g
(Keep in mind PID Analzyer is not really an indicator of flight “smoothness” but just an indicator of how close it stays to the setpoints)
9. Once PIDs are tuned (if required), then play with Q and W.
###########
# Notes (1) – Hot Topics
###########
– The latest firmware for Helio Spring and AIO is butterflight_3.5.2_msd_1.0.0_imuf_1.0.7-odin.zip (files above). DO NOT install Butterflight 3.5.2 RC3, this is for non-Helio FC’s.
– The LUA script is working again with IMUF 1.0.7 (thank you PaPaYoU), see Notes 5.
##########
# Note (2) – DFU mode (Help! it’s not working)
##########
* CLI command for DFU mode is “BL”
Option 1
– Run ImpulseRC Driver Fixer (https://impulserc.blob.core.windows.net/utilities/ImpulseRC_Driver_Fixer.exe).
Only plug your quad in when ImpulseRC Driver Fixer asks you to do so.
* If Option 1 doesn’t work and your receiver is wired to UART1 then there is a good chance this is preventing the FC from getting into Boot Loader mode.
Option 2
– Temporary workaround: Unplug the JST connector on your receiver (EG R-XSR) so that it looses power. Try DFU mode again.
– Permanent fix: Solder the receivers power to the 5v power rails so that it only receivers power when a lipo is connected.
Option 3
– Double check your wiring
##########
# Note (3) – Filter Settings
##########
– Buttered PIDs are now ON by default for all profiles
– D Term Setpoint, Weight and D Term Notch all have no effect when Buttered PIDs is ON.
– Leave Anti-gravity OFF
– Leave Airmode ON
* Buttered PIDs = new PID controller
##########
# Note (4) – ESC protocol and gyro speed
##########
– 32/32 use either Multishot or Proshot1000 (if you can’t live without turtle mode)
– 16/16 use either Multishot or DSHOT1200 or Proshot1000
* Multishot is preferred in all situations
* To use Proshot1000 you MUST update your ESC firmware from BLheli Github. You need at
least v32.43 “notice the 3 on the end”
* DSHOT1200 was never designed to run with 32/32 gyro. The result is packet loss.
##########
# Note (5) – LUA script for your Taranis
##########
– Download from https://flyhelio.slack.com/files/U9HESG9GQ/FBFQVAHFW/imuf107.zip
– How to install https://github.com/ButterFlight/butterflight-tx-lua-scripts/wiki/How-to-install[/vc_column_text][/vc_tta_section][/vc_tta_accordion][vc_column_text]If you experience problems going into DFU mode, you can download the ImpulseRC driver fixer from the ImpulseRC software page, run it and let it do its magic.
Please note that when using а FrSky receiver, you have to remove the power lead in order to enter in DFU mode or the other way is to bridge the F4 boot pins with tweezers. Also, unsoldering the 5v wire from the receiver pad and soldering it to the big 5v pad will fix your problem permanently. The source of the problem is that your RX is powered through USB and the telemetry shares the same UART as the USB port so when it is powered and you try to go into DFU you will have issues.
PID tuning the latest 3.5.2 release
I have installed the Helio RC Spring flight controller on my Armattan Rooster frame, a relatively fresh build, reviewed previously here.
PID tuning is a bit of individual thing and it depends on your pilot level. The following tune issues are the things that I have noticed and changed in order to make my quad fly better for my preference, so take these with a grain of salt 😉
The lack of P term on the pitch axis is immediately noticeable, by the nose wobbling in a forward flight. Raising the pitch P for quite a bit solves this issue. In addition, since the Helio RC Spring is not using the antigravity feature, you can feel the lack of I when you cut the throttle after punching. Also, there was considerable movement on pitch and yaw on high throttle maneuvers, so I had to raise the I on the pitch and yaw.
In the end, you will have to increase D until there is no pronounced bounce back when doing flips and rolls and the propwash is non-existant. You should tune D in small increments, checking if the motors are getting hot after each flight, since too high D may burn your motors.[/vc_column_text][vc_single_image image=”2717″ img_size=”large” add_caption=”yes” onclick=”link_image”][vc_column_text]
Conclusion
Helio RC Spring flight controller is hardware-wise indeed new and progressive flight controller that positions itself a step in front of its competitors. Even at this stage, while the devs are still actively working on new and improved releases, the Helio RC Spring flies on pair with the other top rated flight controllers. Once tuned properly there is no visible propwash and this opens a completely new set of flying possibilities. Imagine doing a 180 degree turns at full speed while not being afraid that you will have a visible wobble in your flight footage.
If you like, flying quads that run on Butterflight, then you should consider trying the Helio RC Spring flight controller.
Will the Helio Spring be available at GetFPV.com any time soon?
Thank you Aleksandar, I bought this for my first build and can’t wait to get flying
thank you for the article, it helps allot pilots like me who are not new but still progressing in the hobby, i have this FC and i still have a few confusions regarding its wiring, one of them is the SmartAudio function using a tbs unify on this, i know i have to solder the audio wire to the tx5 pad but what about the audio wire coming from the cam where do i hook that same tx5 pad or no?
Please refer to this article on the RC Groups
https://www.rcgroups.com/forums/showthread.php?2940701-TBS-Unify-Pro-Audio-and-Smart-Audio
Your camera out audio goes to the VTX audioin line……if you are using the newer TBS theer anare individual audio and smartaudio wires…if you are using TBS Unify …(0nly one smart audio wire)…use a micro 3-pole switch to connect the TBS Audio to the middle position and the mic audio out from the cam to 1 and tx5 to the position 3. When you wish to change vtx settings switch to tx otherwise leave the mic position-1 on when not adjusting vtx settings via lua or osd. Position-1 will allow onboad audio transmisssion to your goggles and dvr. If you connect both tx and cam-audio wires without a switch….nothing works.
I haven’t had any TBS Unify units available while I was doing the review, so your input on this matter is very valuable. Thank you for that!