

It has been four months since Armattan Quads had released the Armattan Rooster. By now, they have already sorted out all early bird issues. Also, they have released the Chameleon Ti as a successor to the original Chameleon, taking the titanium camera cage from the Rooster and mashing it up with the basic design of the original Chameleon thus providing all new customers with one more choice.[vc_single_image image=”2546″ img_size=”large” alignment=”center” onclick=”link_image”][vc_column_text]I had ordered my Armattan Rooster frame by the time Amattnan was already shipping them with the second batch of screws, and I have been using it for about two months, more than enough time for me to find all the pros and cons. Also, I have spent quite a lot time flying it, to see the flight characteristics and the overall way this quad feels.
This article is intended to help you determine if the Rooster is the right frame for your new build. It can also help you with some building and configuration tips.[/vc_column_text][vc_column_text]
The story about the Rooster
Armattan Quads created the Rooster frame as an evolutionary step up from the Chameleon that in time turned out to be one of the best and most robust frames with features ahead of its time.
In a nutshell, they have upgraded the baseplate with removable arms and changed the aluminum camera protection cage on the Chameleon with a titanium one, but they have done that Armattan style; creating a frame that looks very nice and it is an excellent frame option for almost every freestyle pilot when starting a new build.[/vc_column_text][vc_single_image image=”2548″ img_size=”large” alignment=”center” onclick=”link_image”][vc_column_text]
Why choose the Rooster?
What is so special about this frame? Why choose the Rooster instead the Reverb or maybe Ummagawd remix or even sticking with the old trusty Alien?
The main reasons that the Armattan Quads frames became so popular are the quality of the carbon, the overall frame finish and toughness, the flight characteristics and most important the lifetime warranty in case you break the frame.
My decision to buy the Armattan Quads Rooster frame was also based on the abovementioned reasons. Besides, a flying buddy was also going to order a Rooster. I liked the idea of ordering, building and flying two of them altogether and made a final decision to order it.[/vc_column_text][vc_column_text]
Already a Chameleon user?
If you intend to switch over to the Chameleon Ti, you should be aware that you would get the shiny titanium cage but loose the adjustable GoPro angle.
In case of the rooster, you will get the titanium camera cage and the ability to have separate switchable arms. You will lose some space inside the frame because of the way the arms are mounted. Also, you will get an insulated VTX antenna mount and only four screws to remove the top plate.
Check the Joshua Bardwell latest video for a comprehensive comparison between the Chameleon, Chameleon Ti, and the Rooster:[/vc_column_text][vc_video link=”https://www.youtube.com/watch?v=ekw7y4Ll-9c” align=”center”][vc_column_text]
Build process and thoughts
The frame came in the standard Armattan envelope package, with an extra bag of screws (second batch) and the inevitable candy.[/vc_column_text][vc_single_image image=”2562″ img_size=”large” alignment=”center” onclick=”link_image”][vc_column_text]It is easy to put it together even without the assembly diagram. Everything fits together nicely, but I had to replace some of the screws since the second batch had some bad ones. Replacing the screws helped me tighten the arms properly, so there were no signs of arms play.
The press nuts
I would like to point out is that the press nuts are not seated into the carbon. You can insert them either by using a vice or by tightening them with a better quality M3 screw. By tightening the screw, you are slowly forcing the press nut into the carbon. You should place the washer between the carbon and the screw head to prevent the screw head from damaging the carbon.
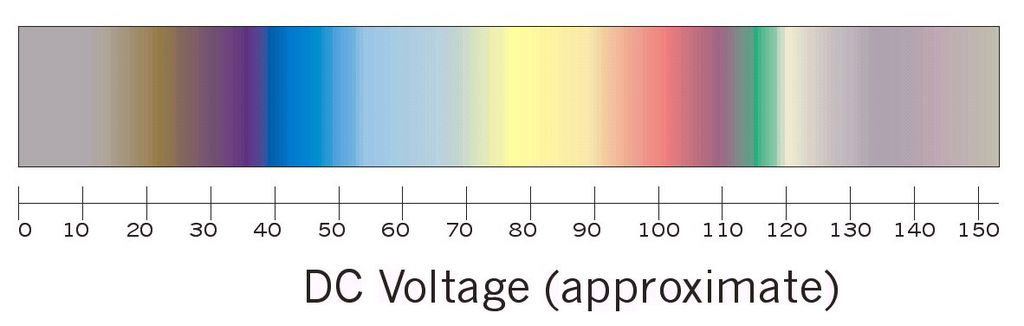
As a successor to the Chameleon, the Armattan Rooster frame also has a good community base, which means that there are a lot of tips and tricks and plenty of aftermarket parts to help you make your build even better.[/vc_column_text][vc_single_image image=”2550″ img_size=”large” alignment=”center” onclick=”link_image”][vc_column_text]I have decided to cover it with a skin from stikitskins.com and anodize the titanium camera cage since the anodizing does not void the warranty. Also, since I’m using a 4in1 ESC, I have inserted the motor wires into a nylon braided tubes to protect them from prop strikes.[/vc_column_text][vc_cta h2=”Anodizing the titanium cage” add_icon=”left” i_icon_fontawesome=”fa fa-info-circle” i_color=”black” i_size=”lg”]For the anodizing process, you will need some distilled water, borax or baking soda (NaHCO3) a bit of aluminum foil, some 3S and 4S batteries, plastic container or a big jar. Place a piece of the aluminum foil on the bottom of the jar and connect it to the negative wire. Fill the jar with distilled water and stir in 3-4 spoons of borax or baking soda. Connect the titanium cage parts on the positive wire. Check the voltage-coloring chart below to see how many volts you will need to achieve the desired color. I have used 6S for purple color and 8S (2x 4S in series) for blue. Place the cage parts in the jar, connect the power source and wait two to three minutes to achieve the desired color. If you want to learn more, check the following video.
 [/vc_cta][vc_column_text]
Internals
Things start to feel a bit tight if you plan to use a 4in1 ESCs. Once you place the ESC’s, the flight controller and the VTx inside the frame, you will have to be a bit creative placing the remaining components.
Armattan uses FrSky XM+ on the BNF version. They are placing it over the arms brace since it is small enough and there is enough space for it. I was planning to use Fsky XSR, so I had to place the receiver behind the camera since my video transmitter has taken most of the space over the rear arms brace.[/vc_column_text][vc_single_image image=”2557″ img_size=”large” alignment=”center” onclick=”link_image”][vc_column_text]
FPV Camera
I am using the Foxeer Monster V2 with 1.8mm lens. The camera is 28mm wide, and it fits just right. The distance between the titanium cage parts is around 28.5mm. Some users have had complains that the cage may be too wide for specific cameras. That could be easily corrected by placing plastic shims between the camera body and the cage parts.
VTx
At the time of assembly, I have not had a pigtailed VTX. I have decided to try to fit a spare VTX with an integrated SMA connector, but there is no way to place it because there is not enough clearance between the rear standoffs. Alternatively, you can place it if you remove the carbon plate at the back of the frame and secure the VTX with zip ties.
If you are into 3D printing and you own a printer, you could check Thingiverse and search for “Armattan Rooster.” Many parts are available for 3D printing.[/vc_column_text][vc_column_text]
Flight characteristics
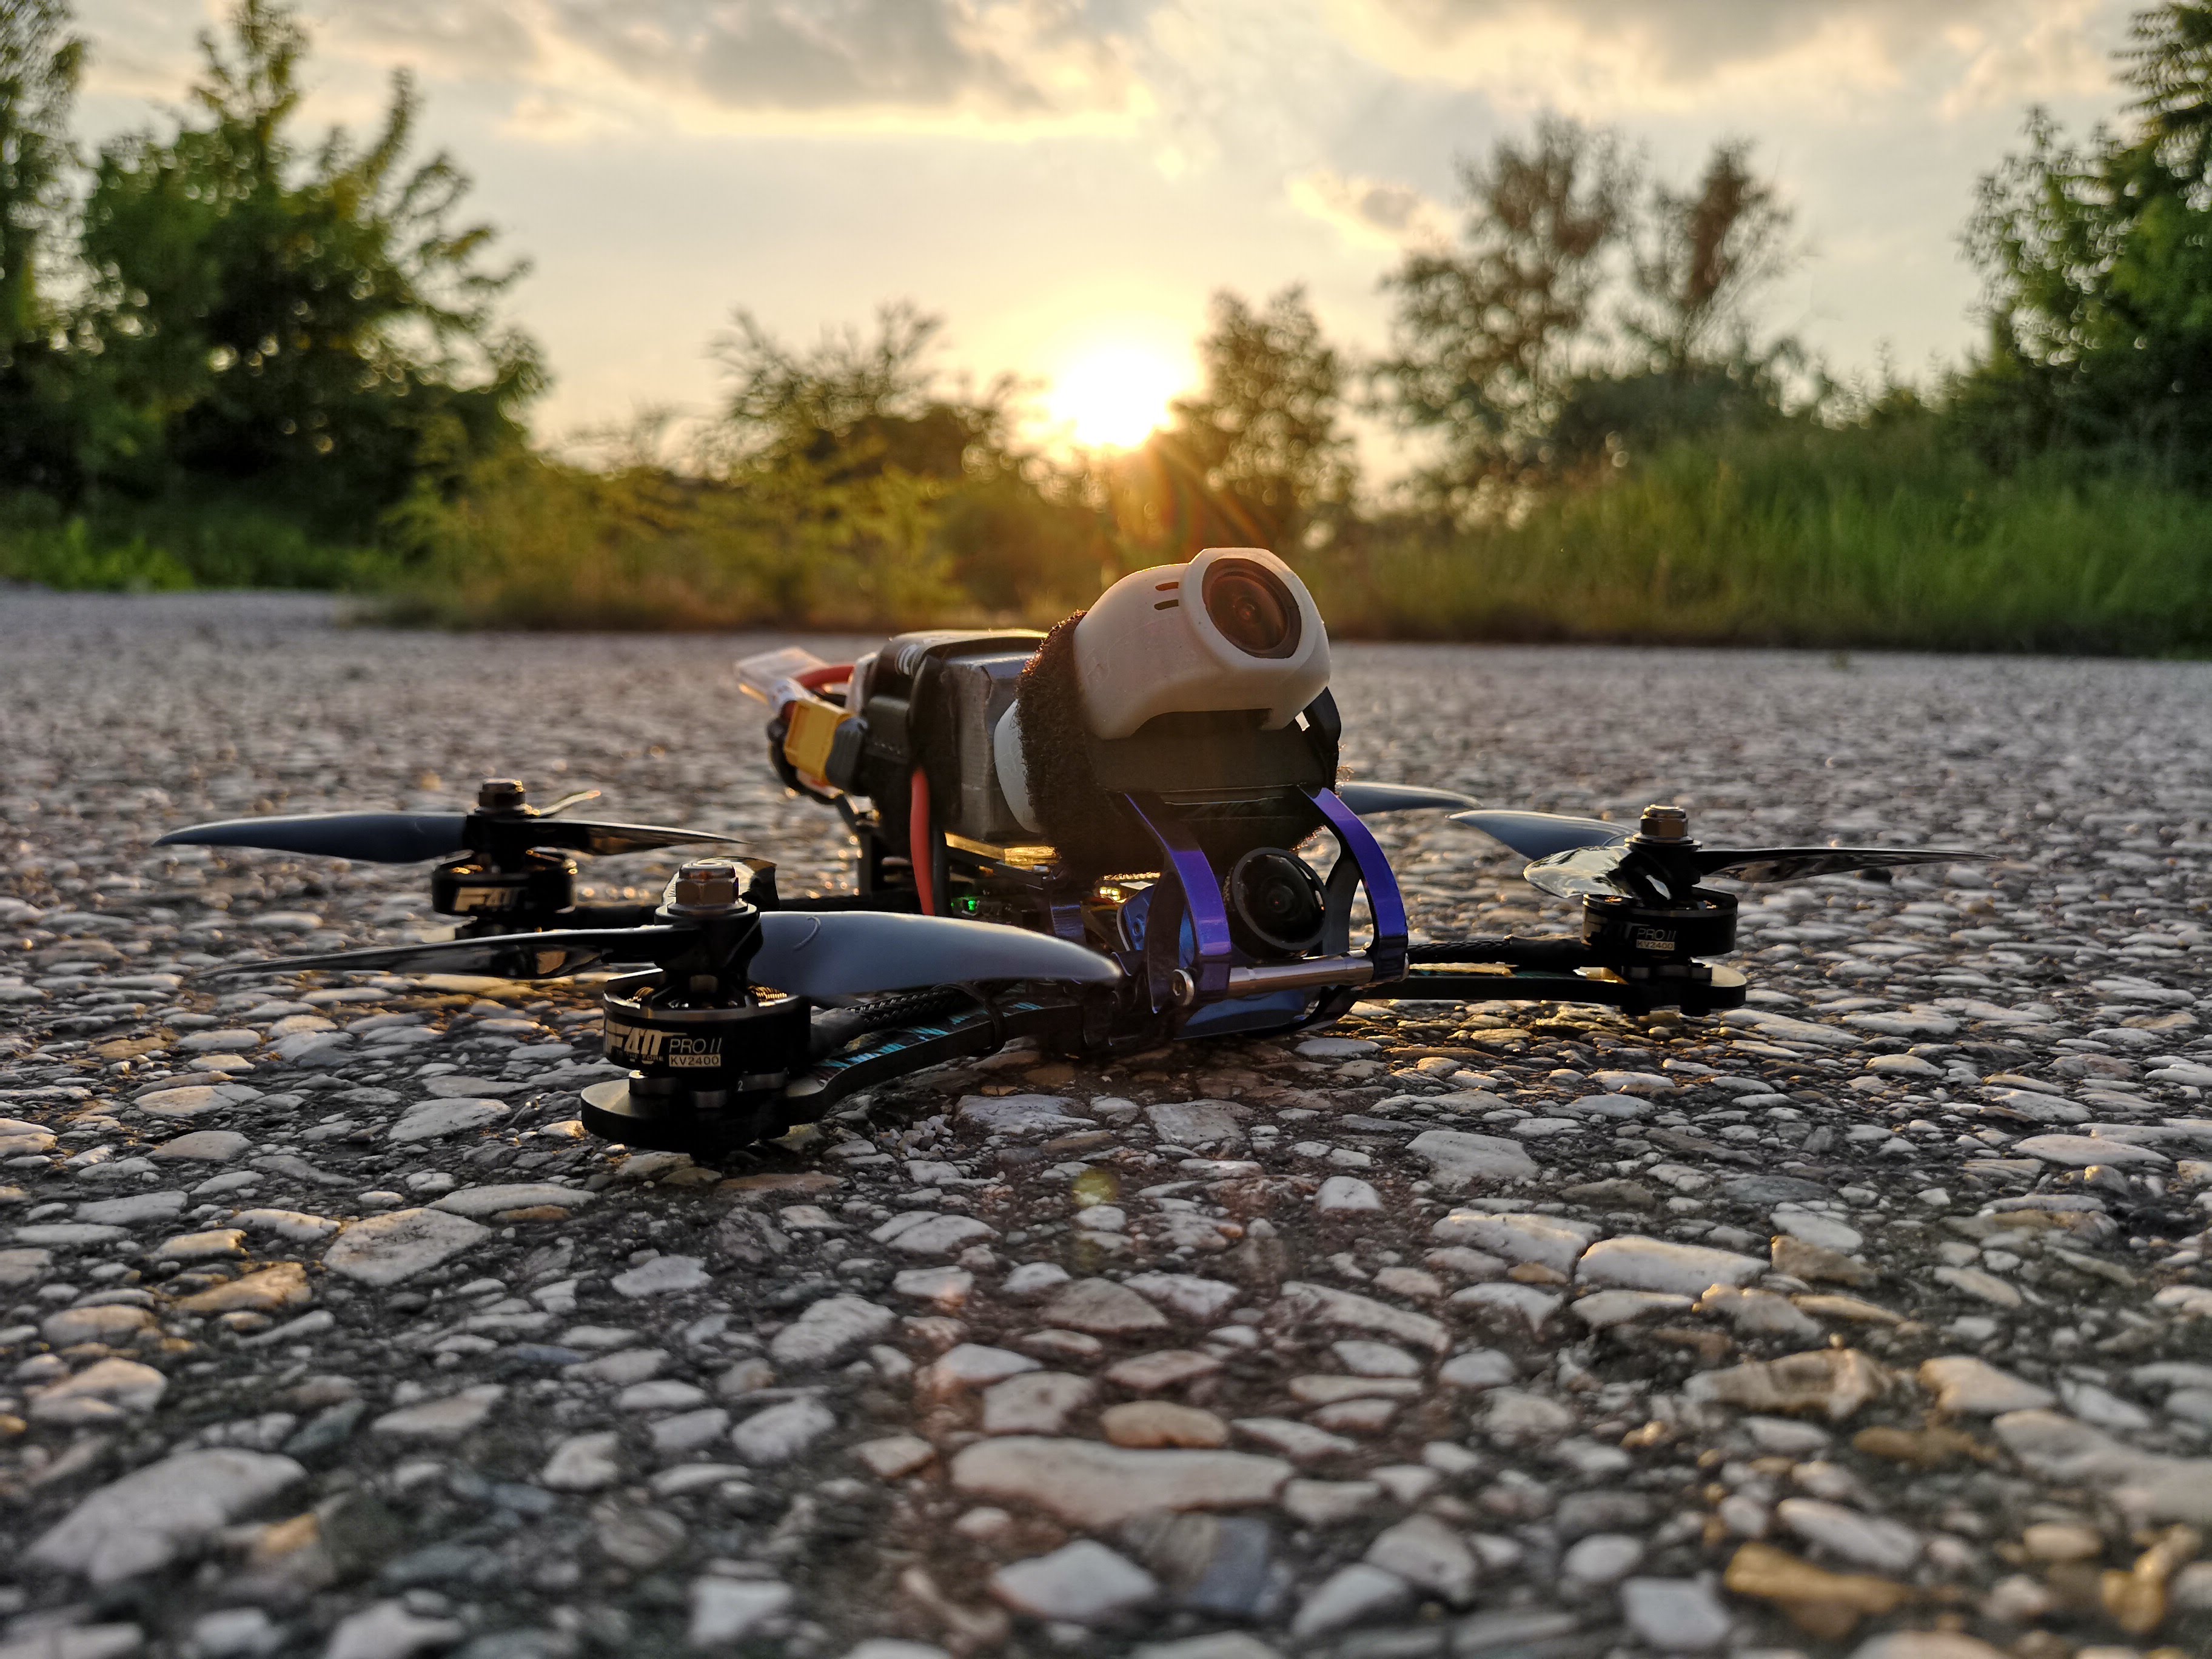
The Armattan Rooster frame has compressed-x geometry. My Rooster has Kiss flight controller, Lumenier BLHeli_32 35A 4in1 ESC and T-Motor F40 Pro II motors.
In flight, it feels smooth and responsive, very similar to the Chameleon, since they share the same geometry. It is a bit more sensitive on Yaw compared to a traditional X frame with the same rates. However, that feeling went away after flying couple more packs.[/vc_column_text][vc_column_text]
Summary
Pros:
- Lifetime broken parts replacement warranty, you pay $5 shipping fee.
- Gorgeous look.
- High-quality carbon parts, with updated weave, resin, and curing technique.
- Robust design, so it is not easy to break.
- Polished titanium camera protection cage that could be easily colored by anodizing.
- Better at holding camera angle than its predecessor.
- Easy access to the electronic parts for quick in the field repairs.
- Removable arms (it takes around 7 minutes to replace a broken arm).
- Great flight characteristics.
- Big user base, so you could easily find help regarding any issue, PID tuning, electronics mounting, 3d printed parts, etc.
- New frames come with 12.9 hardness screws (1080 mPA tensile yield strength).
- The rear SMA mount is electrically isolated with a rubber O ring from the carbon part. This is preventing odd electrical noise issues.
- Bonus candy with each order 😉
Cons:
- Press nuts not mounted.
- First two batches had low-quality screws which are later replaced with 12.9 hardness screws.
- Some users had complained that no matter how much you tighten the arm screws there is about 1mm arm play when you try to move the arms forcibly. This could cause the props to touch when flying bigger than 5” propellers on the 5” Rooster.
- The lowest camera angle is 25 degrees. In case you are using 1.8mm lens, it gets to 27-ish because of the lens size. This may not be the best angle for beginner pilots.
- It may seem hard if this is your first build because of the low clearance.
- Problems mounting the receiver, no room at the back, in general when using 4in1.
- Fixed GoPro uptilt that could only be modified by using washers or foam pads.
[/vc_column_text][vc_column_text]
Alternatives?
If you are looking for alternatives in the same category, you should consider the the SKITZO Nova, Ummagawd Remix, AstroX X5 Freestyle, ImpulseRC Reverb, Hyperlow CG or if you want something cheaper you could go with the GePrc Mark 2.[/vc_column_text][vc_column_text]
Conclusion
Armattan has proven again that they know how to design and build a frame that is tough as a tank with considerable weight for a freestyle frame that files exceptionally well in the same time. In my opinion, the Armattan Rooster frame is one of the best frames for 2018. If you are flying freestyle, I would highly recommend you buying it.
Great info, looking to get into fpv and this helps!
Thanks, you are in the right place. Check the “New to FPV” category for some great info geared towards beginners
That was a great review. Love the concise list of Pros and Cons.
thanks for the review, i like the lifetime warranty.
Great article, thanks!
Thanks for the great review. I have the 7 inch on the way
This is my dream frame! I hope to get it soon to build a 2307 motor 35 amp esc set up!
Handy review a few months after the hype. Thanks!
Thanks for the description of the Rooster.
I’m very excited to try the Rooster. I am used to the Chameleon and am happy with it. Just waiting on my Le Drib hype trains to complete my build.
Super nice frame.
Rooster is one of the best frames ive tried!
I have this frame. It flies like a dream. Its a very tough frame. I have broken one arm; from flying straight into concrete.
I own one.
Very recommended to use aio fc due to the low profile of the frame.
Very nice review. Thanks!
love my Rooster, was first premium quad I had ever bought and it is gorgeous. just working out my taranis and then I can fly! So all these articles are super helpful, Thank you!
Does anodizing void the warranty?
No, if it is done the way it is described in the article.
Looks like a solid frame!
Love This frame
I like the Chameleon Ti a little better. The removable arms are a little wiggly.
Excellent review. I anodized my Chameleon TI camera cage using three 9-volt batteries. Got a lovely shade of blue. Pretty quick process. The setup is what takes time. Once I finish the Chameleon, I’ll start work on the Rooster. Thanks for the insight
Just built a Rooster 6″ and I must say the frame is incredibly functional, accessible, and yet it’s also a tank and protects your components very well.
Another huge draw for me, was the placement of the GoPro above a titanium roll cage. We can’t completely protect our GoPro’s, but compared to what I was flying (AstroX) this provides a ton of protection.
Only cons I can think of is the weight of this frame. I put Tmotor F80’s which are massive heavy motors on my frame and it makes the quad fly incredibly stable and responsive, but I have to be conscious of my amp draw or my packs don’t last (and my ESC might not either). Running a 6″ very mild 6x3x3 V1S prop I still pulled 68amps on a punch out!
I love the Rooster. I bought mine before reading your article, but now I have a deeper appreciation for it. Great write-up!
BTW I originally came because of the rapidFIRE giveaway, but i’m going to stay and read more BC this is some great stuff!
Love my Rooster It a real nice frame now to get it some brothers .