

The Taranis QX7. If there ever was a radio to get into FPV in the past few years, it was this one. It was affordable, had all the features of its big brother, the X9D, and many pilots flew it. Now, we will be taking another look at this long-standing budget radio and comparing it with other options on the market.[vc_row][vc_column width=”1/6″][/vc_column][vc_column width=”2/3″][vc_single_image image=”5223″ img_size=”full” alignment=”center” onclick=”link_image”][vc_column_text]
This article was submitted through the GetFPV Community Program by Lawrence Ro.
Disclaimer: This article was written solely by a member of the FPV Community. Views and advice in this article are that of the author and does not necessarily reflect the opinion or views of GetFPV.
[/vc_column_text][/vc_column][vc_column width=”1/6″][/vc_column][/vc_row][vc_row][vc_column][vc_column_text]
FrSky Taranis QX7 – External Thoughts
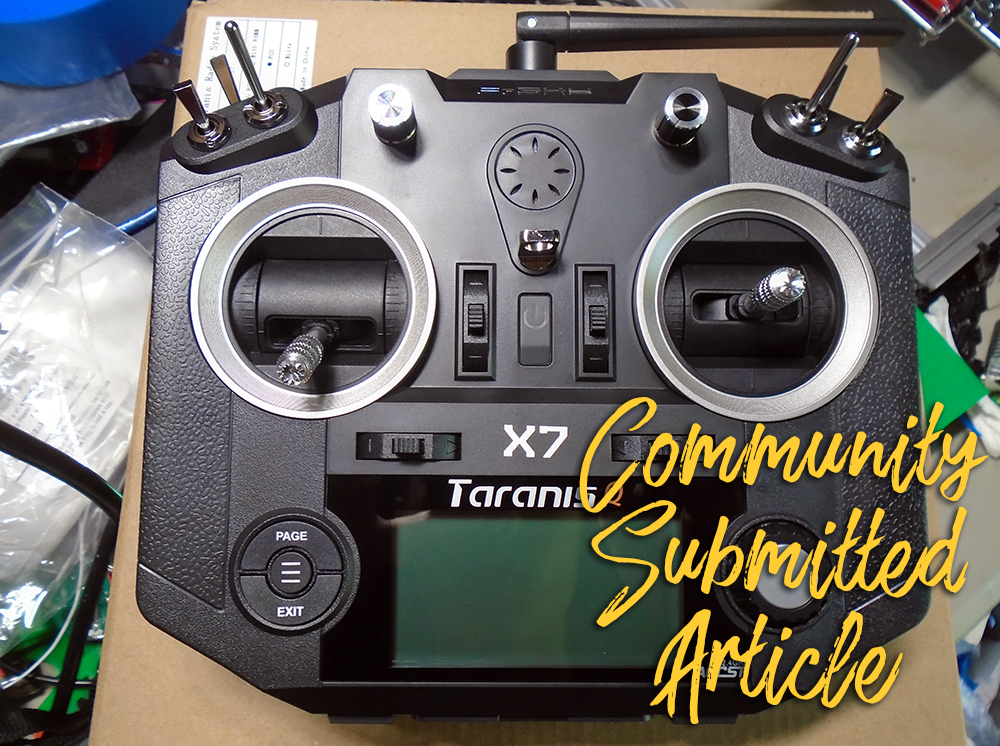
When you order the FrSky Taranis QX7, it comes in a nice box, well protected by foam and plastic wrapped. Also, the radio comes with a FrSky transmitter strap and a SmartPort cable. The included transmitter strap is really nice and high quality. It is a thick fabric material that feels comfortable on the neck.
The rubberized side grips are a nice touch and feel comfortable when held. However, it seems like the ergonomics of this radio are more geared towards the thumb method of control, as opposed to the pinch or hybrid pinch.
On the bottom of the radio are four ports. There is the SmartPort, used for updating receiver firmware, An SD card slot, the USB port for simulators and computer connectivity, and a battery charging port on the far-right side.[/vc_column_text][/vc_column][/vc_row][vc_row][vc_column width=”1/6″][/vc_column][vc_column width=”2/3″][vc_single_image image=”5224″ img_size=”full” alignment=”center” onclick=”link_image”][/vc_column][vc_column width=”1/6″][/vc_column][/vc_row][vc_row][vc_column][vc_column_text]The sticks feel nice and smooth, being potentiometer gimbals. However, they are not as great as hall effect gimbals, and can feel a bit chalky around the edges of the sticks. This is not too much of a problem, but I believe that the upgrade to hall effect gimbals provides a huge boost in the usability of the radio.
However, I can’t say the same thing for the switches. They felt cheap, and some of them had a significant amount of play in the middle position. I wish FrSky put in some nice switches into the Taranis QX7, but again, it is a budget radio and you can’t really complain for the price.
The user interface is also improved from the X9D, as a scroll wheel and three easy to press buttons are installed right next to the LCD. The X9D had individual buttons on each side of the LCD, making navigating through the menus a bit more tedious.
On first power up, you are welcomed with the Taranis splash screen, and then brought to the default model screen. From there, you may go and configure you radio to your heart’s content. But for now, let’s inspect the hardware.[/vc_column_text][/vc_column][/vc_row][vc_row][vc_column width=”1/6″][/vc_column][vc_column width=”2/3″][vc_single_image image=”5225″ img_size=”full” alignment=”center” onclick=”link_image”][/vc_column][vc_column width=”1/6″][/vc_column][/vc_row][vc_row][vc_column][vc_column_text]
FrSky Taranis QX7 – Internal Teardown
Opening the battery port reveals a few screws which enable us to peek inside the main radio. Unscrew the two top ones, and then the two bottom ones first, and then take off the back cover.
There are three main PCB boards in the Taranis QX7. At the lower part of the radio, we have the main board, hosting the CPU, power circuitry, clock, LCD circuitry, and inputs/outputs. The middle PCB enables access to the JR port, allowing users to plug in external transmitter modules, such as the FrSky R9M system and the TBS Crossfire (with some modification). The top PCB is the internal transmitter module, which modulates the stick inputs into radio waves to go to the receiver.[/vc_column_text][/vc_column][/vc_row][vc_row][vc_column width=”1/6″][/vc_column][vc_column width=”2/3″][vc_single_image image=”5226″ img_size=”full” alignment=”center” onclick=”link_image”][/vc_column][vc_column width=”1/6″][/vc_column][/vc_row][vc_row][vc_column][vc_column_text]Overall, the build quality internally of the Taranis QX7 is impeccable. However, I did notice that one of the solder joints going to my buzzer was a little bit questionable. Other than that, everything was great.
Moving on to the switches, they were nice and snug in their holders, despite the cheap feel. FrSky did a nice job making sure that each solder joint was insulated with heat shrink. Honestly, there isn’t much to say about them because they do their job so well: make and break the connection.
The gimbals are solidly installed in the radio as well. There is easy access to the tensioning of the gimbals and throttle ratchet. The fact that FrSky included both throttle tension and ratchet to both sides of the gimbals really shows that they care for their international customers who may not necessarily use Mode 2 to fly.[/vc_column_text][/vc_column][/vc_row][vc_row][vc_column width=”1/2″][vc_single_image image=”5228″ img_size=”full” alignment=”center” onclick=”link_image”][/vc_column][vc_column width=”1/2″][vc_single_image image=”5227″ img_size=”full” alignment=”center” onclick=”link_image”][/vc_column][/vc_row][vc_row][vc_column][vc_column_text]Another thing to note about the radio is how clean the wiring is. The cables going to the switches and gimbals are twisted and routed out of the gimbal motion area. Also, all cables are twisted together. I think that this is to not only improve the cleanliness of the build, but also to prevent electrical interference from the current flowing through different wires in the radio.
Overall, the internal build quality of the Taranis QX7 is rock-solid, and I have no doubt that it will last for many years of service.
But the final question: It this radio still relevant in today’s market? Well, it can be hard to recommend, compared to other radios out there today.[/vc_column_text][/vc_column][/vc_row][vc_row][vc_column][vc_column_text]
Comparison with Other Radios
FrSky Taranis X9 Lite
For almost $20 cheaper, you can go out and purchase a FrSky X9 Lite for $90. The X9 Lite has more features, more channels (ACCESS protocol), lower latency, and the same range and functionality of the Taranis QX7. Also, it is more ergonomic for pinchers and hybrid pinchers.
However, the Taranis QX7 is better suited for thumbers, and has stood the test of time as one of the best budget radios on the market. Also, the QX7 has reportedly better build quality then the X9 Lite. Another important thing to note is that since the QX7 has been out for longer, there are more guides and setup tutorials on the QX7 than the X9 Lite.[/vc_column_text][/vc_column][/vc_row][vc_row][vc_column width=”1/6″][/vc_column][vc_column width=”2/3″][vc_single_image image=”5231″ img_size=”full” alignment=”center” onclick=”link_image”][dt_default_button link=”url:https%3A%2F%2Fwww.getfpv.com%2Ffrsky-taranis-x9-lite-2-4g-24ch-radio-transmitter.html||target:%20_blank|” size=”medium” button_alignment=”btn_center”]Check out the FrSky Taranis X9 Lite[/dt_default_button][/vc_column][vc_column width=”1/6″][/vc_column][/vc_row][vc_row][vc_column][vc_column_text]
FrSky X-Lite
The FrSky X-Lite is a bit more expensive than the QX7. It comes with the FrSky ACCESS protocol, which gives lower latency, more channels, and more features. The form factor is obviously geared towards the thumb grip, as it looks just like a game controller!
Also, the X-Lite-S version has M12 hall effect gimbals, which are vastly superior to potentiometer gimbals. If you favor the thumb grip of the familiar game controller feel, then the X-Lite is undoubtedly the winner against the QX7.[/vc_column_text][/vc_column][/vc_row][vc_row][vc_column width=”1/6″][/vc_column][vc_column width=”2/3″][vc_single_image image=”5232″ img_size=”full” alignment=”center” onclick=”link_image”][dt_default_button link=”url:https%3A%2F%2Fwww.getfpv.com%2Ffrsky-x-lite-w-t-antenna-brace-lite-long-short-gimbal-stick-ends-2-4ghz-radio-controller-red.html||target:%20_blank|” size=”medium” button_alignment=”btn_center”]Check out the FrSky X-Lite[/dt_default_button][/vc_column][vc_column width=”1/6″][/vc_column][/vc_row][vc_row][vc_column][vc_column_text]
FrSky Taranis X9D Plus
This really is not a fair comparison because the QX7 is $107, while the X9D Plus is $182. If you can afford to go with the X9D Plus, then you should. It is better in almost every way compared to the QX7. ACCESS protocol, better scroll wheel, better ergonomics, faster processor, Spectrum analyzer capability, and higher resolution LCD to name a few.
The X9D Plus does not come with hall effect gimbals, but there is the SE version that includes M9 hall effect gimbals, upgraded switches, and wireless training functionality for $250. The one downside to the X9D Plus is that the FrSky ACCESS protocol has dropped compatibility with the older D8 radio protocol. Instead, it only supports D16 and ACCESS.
This can be a negative thing, because if you are using a board like the Crazybee F3/F4 used in the Mobula7 and other micro quads, the X9D Plus will NOT be able to bind to the aircraft without further modification.[/vc_column_text][/vc_column][/vc_row][vc_row][vc_column width=”1/6″][/vc_column][vc_column width=”2/3″][vc_single_image image=”5233″ img_size=”full” alignment=”center” onclick=”link_image”][dt_default_button link=”url:https%3A%2F%2Fwww.getfpv.com%2Ffrsky-taranis-x9d-plus-2019-access-2-4g-24ch-radio-transmitter-pre-order.html||target:%20_blank|” size=”medium” button_alignment=”btn_center”]Check out the FrSky Taranis X9D Plus[/dt_default_button][/vc_column][vc_column width=”1/6″][/vc_column][/vc_row][vc_row][vc_column][vc_column_text]
Jumper T16
The Jumper T16 is an amazing radio for only $150 because it is basically a FrSky Horus, a $400 radio, but packed into a smaller form factor and $250 cheaper. In fact, Joshua Bardwell stated that the Jumper T16 will be his new daily driver, since the T16 Pro includes hall effect gimbals.
Also, the T16 has a nice, big 480*272 full color LCD screen. This makes it nice to navigate through the menus, and greatly improves the user interface. Since the T16 runs on OpenTX, the usability should not differ too much from that of FrSky’s
Another think that T16 has going for it is multi-protocol support. Included with it is the JP4IN1 multi-protocol module, which combines the CC2500, CYRF6936, A7105, and NRF24L01 RF chips in one. This basically means that you can use this radio with pretty much any toy grade quadcopter and receiver on the market. For example, with the JP4IN1, controlling your Eachine E010 from the T16 becomes possible.
If you want a fully featured multi-protocol radio for only $50 more than the QX7, then the Jumper T16 is no doubt, the one you want to purchase.[/vc_column_text][/vc_column][/vc_row][vc_row][vc_column][vc_column_text]
Flysky FS-i6
The QX7 beats the Flysky FS-i6 out of the water. It is more comfortable and has a feature set that Flysky can’t even touch. But this is not to say that the FS-i6 is a bad radio is any means. I have personally used this radio for years, and can testify that it is light, super easy to use, and is very durable.
The main thing going for the FS-i6 is its simplicity. The whole menu system of the radio is to intuitive and easy to learn. OpenTX can be a daunting system to learn, and navigating the jungle of menus, scripts, and firmware options may turn away many newcomers to this hobby.
The FS-i6, on the other hand, can be opened, turned on, and set up in a few minutes by an absolute beginner. That’s how easy the Flysky system is to use.
If you are trying to save every dollar here, then the FS-i6 is a solid choice that will last you a long time. There is even custom firmware that can be uploaded to it to allow it to go up to 10 channels![/vc_column_text][/vc_column][/vc_row][vc_row][vc_column width=”1/6″][/vc_column][vc_column width=”2/3″][vc_single_image image=”5234″ img_size=”full” alignment=”center” onclick=”link_image”][dt_default_button link=”url:https%3A%2F%2Fwww.getfpv.com%2Fflysky-fs-i6-afhds-6ch-transmitter-and-6ch-fs-ia6b-receiver.html||target:%20_blank|” size=”medium” button_alignment=”btn_center”]Check out the FlySky FS-i6[/dt_default_button][/vc_column][vc_column width=”1/6″][/vc_column][/vc_row][vc_row][vc_column][vc_column_text]
Conclusion
In conclusion, the FrSky Taranis QX7 remains a great choice for a budget FPV radio system. Sure, there are other radios out there that are better than it for just a little bit more money, but the Taranis QX7 has stood the test of time, and has proved itself more than worthy of consideration for FPV. Furthermore, since the QX7 has been out for a while, it also has the most support for it from websites, reviewers, and guides.[/vc_column_text][/vc_column][/vc_row]
For the life of me I need help I can’t get it to work