

A single drone can use up to five feet of FPV drone wire to connect its electrical components together. The wire thickness used for connecting different components together also varies depending on the power that component uses. In this guide, I will discuss what gauge/thickness of sure you should be using for each FPV drone component as well as providing some suggestions for cable management to make your build neater and easier to work on.
A Reminder About Voltage Current and Resistance
The resistance (R) of a wire is defined by its materials resistivity (p), length (L) and cross-sectional area (A). These variables are linked by the equation:
R=pL/A
Thin, long wires will have a high resistance and thick, short wires will have a low resistance. An increase in resistance effectively decreases the quantity of power that a wire can deliver to a component. For your motors, this means less performance. To read more on voltage, current, power and resistance, you can read my article on 6S vs 4S LiPO batteries.
[/vc_column_text][/vc_column][/vc_row][vc_row][vc_column][vc_column_text]
FPV Drone Wire Gauge
Wire diameter is measured using its gauge. The following table lists the most common FPV drone wire gauges and their corresponding diameters. GetFPV sells most of these wire gauges which can be found here. I would recommend buying an assortment.[/vc_column_text][ultimate_info_table design_style=”design02″ color_scheme=”custom” color_bg_main=”#fbfbfb” color_txt_main=”#000000″ color_bg_highlight=”#ffcd32″ color_txt_highlight=”#000000″ package_heading=”Wire Gauge Chart” heading_font_color=”#000000″]
| Wire Gauge (awg) | Diameter (mm) | Diameter (in) |
| 10 | 2.59 | 0.1019 |
| 12 | 2.05 | 0.0808 |
| 14 | 1.63 | 0.0641 |
| 16 | 1.29 | 0.0508 |
| 18 | 1.02 | 0.0403 |
| 22 | 0.643 | 0.0253 |
| 26 | 0.404 | 0.0159 |
| 30 | 0.254 | 0.0100 |
[/ultimate_info_table][/vc_column][/vc_row][vc_row][vc_column][vc_column_text]
High Power Electronics
The high-power electronics of an FPV drone are its motors, speed controllers and battery. As these electrics suck, handle and deliver a large quantity of power, their FPV drone wires must be significantly thicker than the rest of the craft.[/vc_column_text][vc_row_inner][vc_column_inner width=”1/6″][/vc_column_inner][vc_column_inner width=”2/3″][vc_single_image image=”3236″ img_size=”full” alignment=”center” onclick=”link_image”][/vc_column_inner][vc_column_inner width=”1/6″][/vc_column_inner][/vc_row_inner][/vc_column][/vc_row][vc_row][vc_column][vc_column_text]
Battery
The battery wire should be the thickest FPV drone wire as it handles up to or over 150A of current. The FPV drone wire for the battery should be in the size of 10awg to 14awg.[/vc_column_text][vc_row_inner][vc_column_inner width=”1/6″][/vc_column_inner][vc_column_inner width=”2/3″][vc_single_image image=”3238″ img_size=”full” alignment=”center” onclick=”link_image”][/vc_column_inner][vc_column_inner width=”1/6″][/vc_column_inner][/vc_row_inner][/vc_column][/vc_row][vc_row][vc_column][vc_column_text]
Motors
Motors handle about one quarter of the current from the battery. The recommended motor FPV wire size is 20awg to 18awg. Some pilots run the thinnest motor wire they can to minimise weight. The resistance of thin high-power wire will force the battery to supply high current which can result in voltage sagging. Skinny high-power FPV drone wires can also melt easily in a crash and increase the ‘sloppiness’ of power delivery.[/vc_column_text][/vc_column][/vc_row][vc_row][vc_column][vc_column_text]
Low Power Electronics
All low power electronics draw significantly less power than the high voltage electronics. As a result, low power FPV drone wire sizes range from 26awg to 30awg.[/vc_column_text][vc_row_inner][vc_column_inner width=”1/6″][/vc_column_inner][vc_column_inner width=”2/3″][vc_single_image image=”3237″ img_size=”full” alignment=”center” onclick=”link_image”][/vc_column_inner][vc_column_inner width=”1/6″][/vc_column_inner][/vc_row_inner][/vc_column][/vc_row][vc_row][vc_column][vc_column_text]
Wire Material
Wire material is another factor to consider. I recommend silicone wires because of their flexibility and heat resistance. Most FPV drone wires will usually be silicone. Other wire materials are okay although soldering tends to melt their outer coatings.[/vc_column_text][vc_row_inner][vc_column_inner width=”1/6″][/vc_column_inner][vc_column_inner width=”2/3″][vc_single_image image=”3242″ img_size=”full” alignment=”center” onclick=”link_image”][/vc_column_inner][vc_column_inner width=”1/6″][/vc_column_inner][/vc_row_inner][/vc_column][/vc_row][vc_row][vc_column][vc_column_text]
Cable Management
Cable management is very important for an FPV build as it simplifies and neatens the wiring. Before soldering your electronics together, cable management is something that you should consider. Here are some of my cable management tips:
Tip 1:
Consider and lay out your wire placement before soldering. This will allow you to come up with the neatest wiring layout which simplifies component maintenance the most.
Tip 2:
Keep wires tangle free. Un-tangled FPV drone wires simplifies component replacement and maintenance aw well as looking neat.
Tip 3:
Secure wires with cable ties. Cable ties are cheap and an easy way to organise FPV drone wires. I would recommend purchasing them in a variety of different sizes.
Tip 4:
Consider using connectors where possible. Using a clip on one end of a component makes component replacement significantly easier. The best example of this is 4-in-1 ESC or camera connectors. If your ESC breaks, you only have to disconnect and de-solder the motor wires to replace it.[/vc_column_text][vc_row_inner][vc_column_inner width=”1/6″][/vc_column_inner][vc_column_inner width=”2/3″][vc_single_image image=”3243″ img_size=”full” alignment=”center” onclick=”link_image”][/vc_column_inner][vc_column_inner width=”1/6″][/vc_column_inner][/vc_row_inner][vc_column_text]
Tip 5:
Bunch thin wires together with heat shrink rings. Cut a few rings of heat shrink and shrink them over a bunch of thin wires coming from a low power component. This will significantly neaten up the wiring process.
Tip 6:
Solder wires from the same component to a similar flight controller location. Instead of wiring the components from your camera, VTX or receiver to all different points on the fc, try wiring them to the same corner or edge of the board. This will simplify maintenance and replacements.
Tip 7:
Use coloured wire. To make FPV drone wires easily identifiable I recommend using a wiring standard where each wire colour has a purpose. For example, I use black as ground, red as positive and yellow for video. Electronics such as ESC’s will often use their own wiring colours, but this is generally a good practice to apply.
Tip 8:
Trim excess wire length. Excess wire lengths can flap around and potentially catch in the propellers and tear. Wires should have some slack so as not to put tension on the solder joints. The best way to get perfect wire lengths is to solder components when they are already in place on the drone.
Tip 9:
Use race-wire with 4-in-1 ESC’s. Race-wire replaces long motor wires to the ESC. They reduce weight and improve the neatness of the craft. You can find them here. [/vc_column_text][/vc_column][/vc_row][vc_row][/vc_row][vc_column][/vc_column][vc_column_text]
Final Word
Hopefully now you will be able to make the best FPV drone wire size and management decisions when building your FPV drone. Making the right cable layout and wire sizing choices is an important part of having a functional yet neat and easy to repair drone.[/vc_column_text][ultimate_spacer height=”40″][vc_separator][vc_row_inner][/vc_row_inner][vc_column_inner width=”1/6″][/vc_column_inner][vc_column_inner width=”2/3″][vc_single_image image=”3277″ img_size=”medium” alignment=”center” onclick=”custom_link” link=”https://www.getfpv.com/accessories-390/wire.html”][vc_column_text]
Silicone Wire for FPV Drones
[/vc_column_text]
[/vc_column_inner][vc_column_inner width=”1/6″][/vc_column_inner][vc_separator]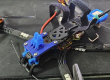


Awesome! Thanks!
Thanks
Thanks
I would like to see a chart: which gauge is recommended for a given Amp.
Amzing
Very valuable post! Great tips, very informative and very useful for those who have thorough knowledge about works wires and cables. Thank you for this valuable information. Keep Posting.
Another great tip is to twist common connector wires. It has a shielding effect and also keep your wires layouts clean and easy to repair.
thanks for providing useful information on fpv drone wire
The main reason I always bundle the small wires of a component together is to protect the individual wires from stress and strain. The stress of accidental pulls and yanks is distributed over all the wires in the bundle rather than concentrating it on just one fragile wire. The old story about how easy it is to break a bundle of sticks when you break only one stick at a time but its very hard to break the entire bundle at once is the phenomena in play here. So when you accidentally tug one of the wires in a bundle, the stress is spread out to all the wires in the bundle and it is much harder for an accidental pull to damage something.