

Some pilots are diving into digital FPV, but analog video isn’t going anywhere just yet. SD cameras are small, lightweight, have low latency, are inexpensive, and work with existing video transmitters. This summer, I smashed the daylights out of the flight camera on my freestyle quad, so I wanted to find out if the new Foxeer Predator Micro V4 would be a suitable replacement.[vc_row][vc_column width=”1/6″][/vc_column][vc_column width=”2/3″][vc_single_image image=”4960″ img_size=”full” alignment=”center” onclick=”link_image”][/vc_column][vc_column width=”1/6″][/vc_column][/vc_row][vc_row][vc_column][vc_column_text]
Foxeer Predator Micro V4 Specs
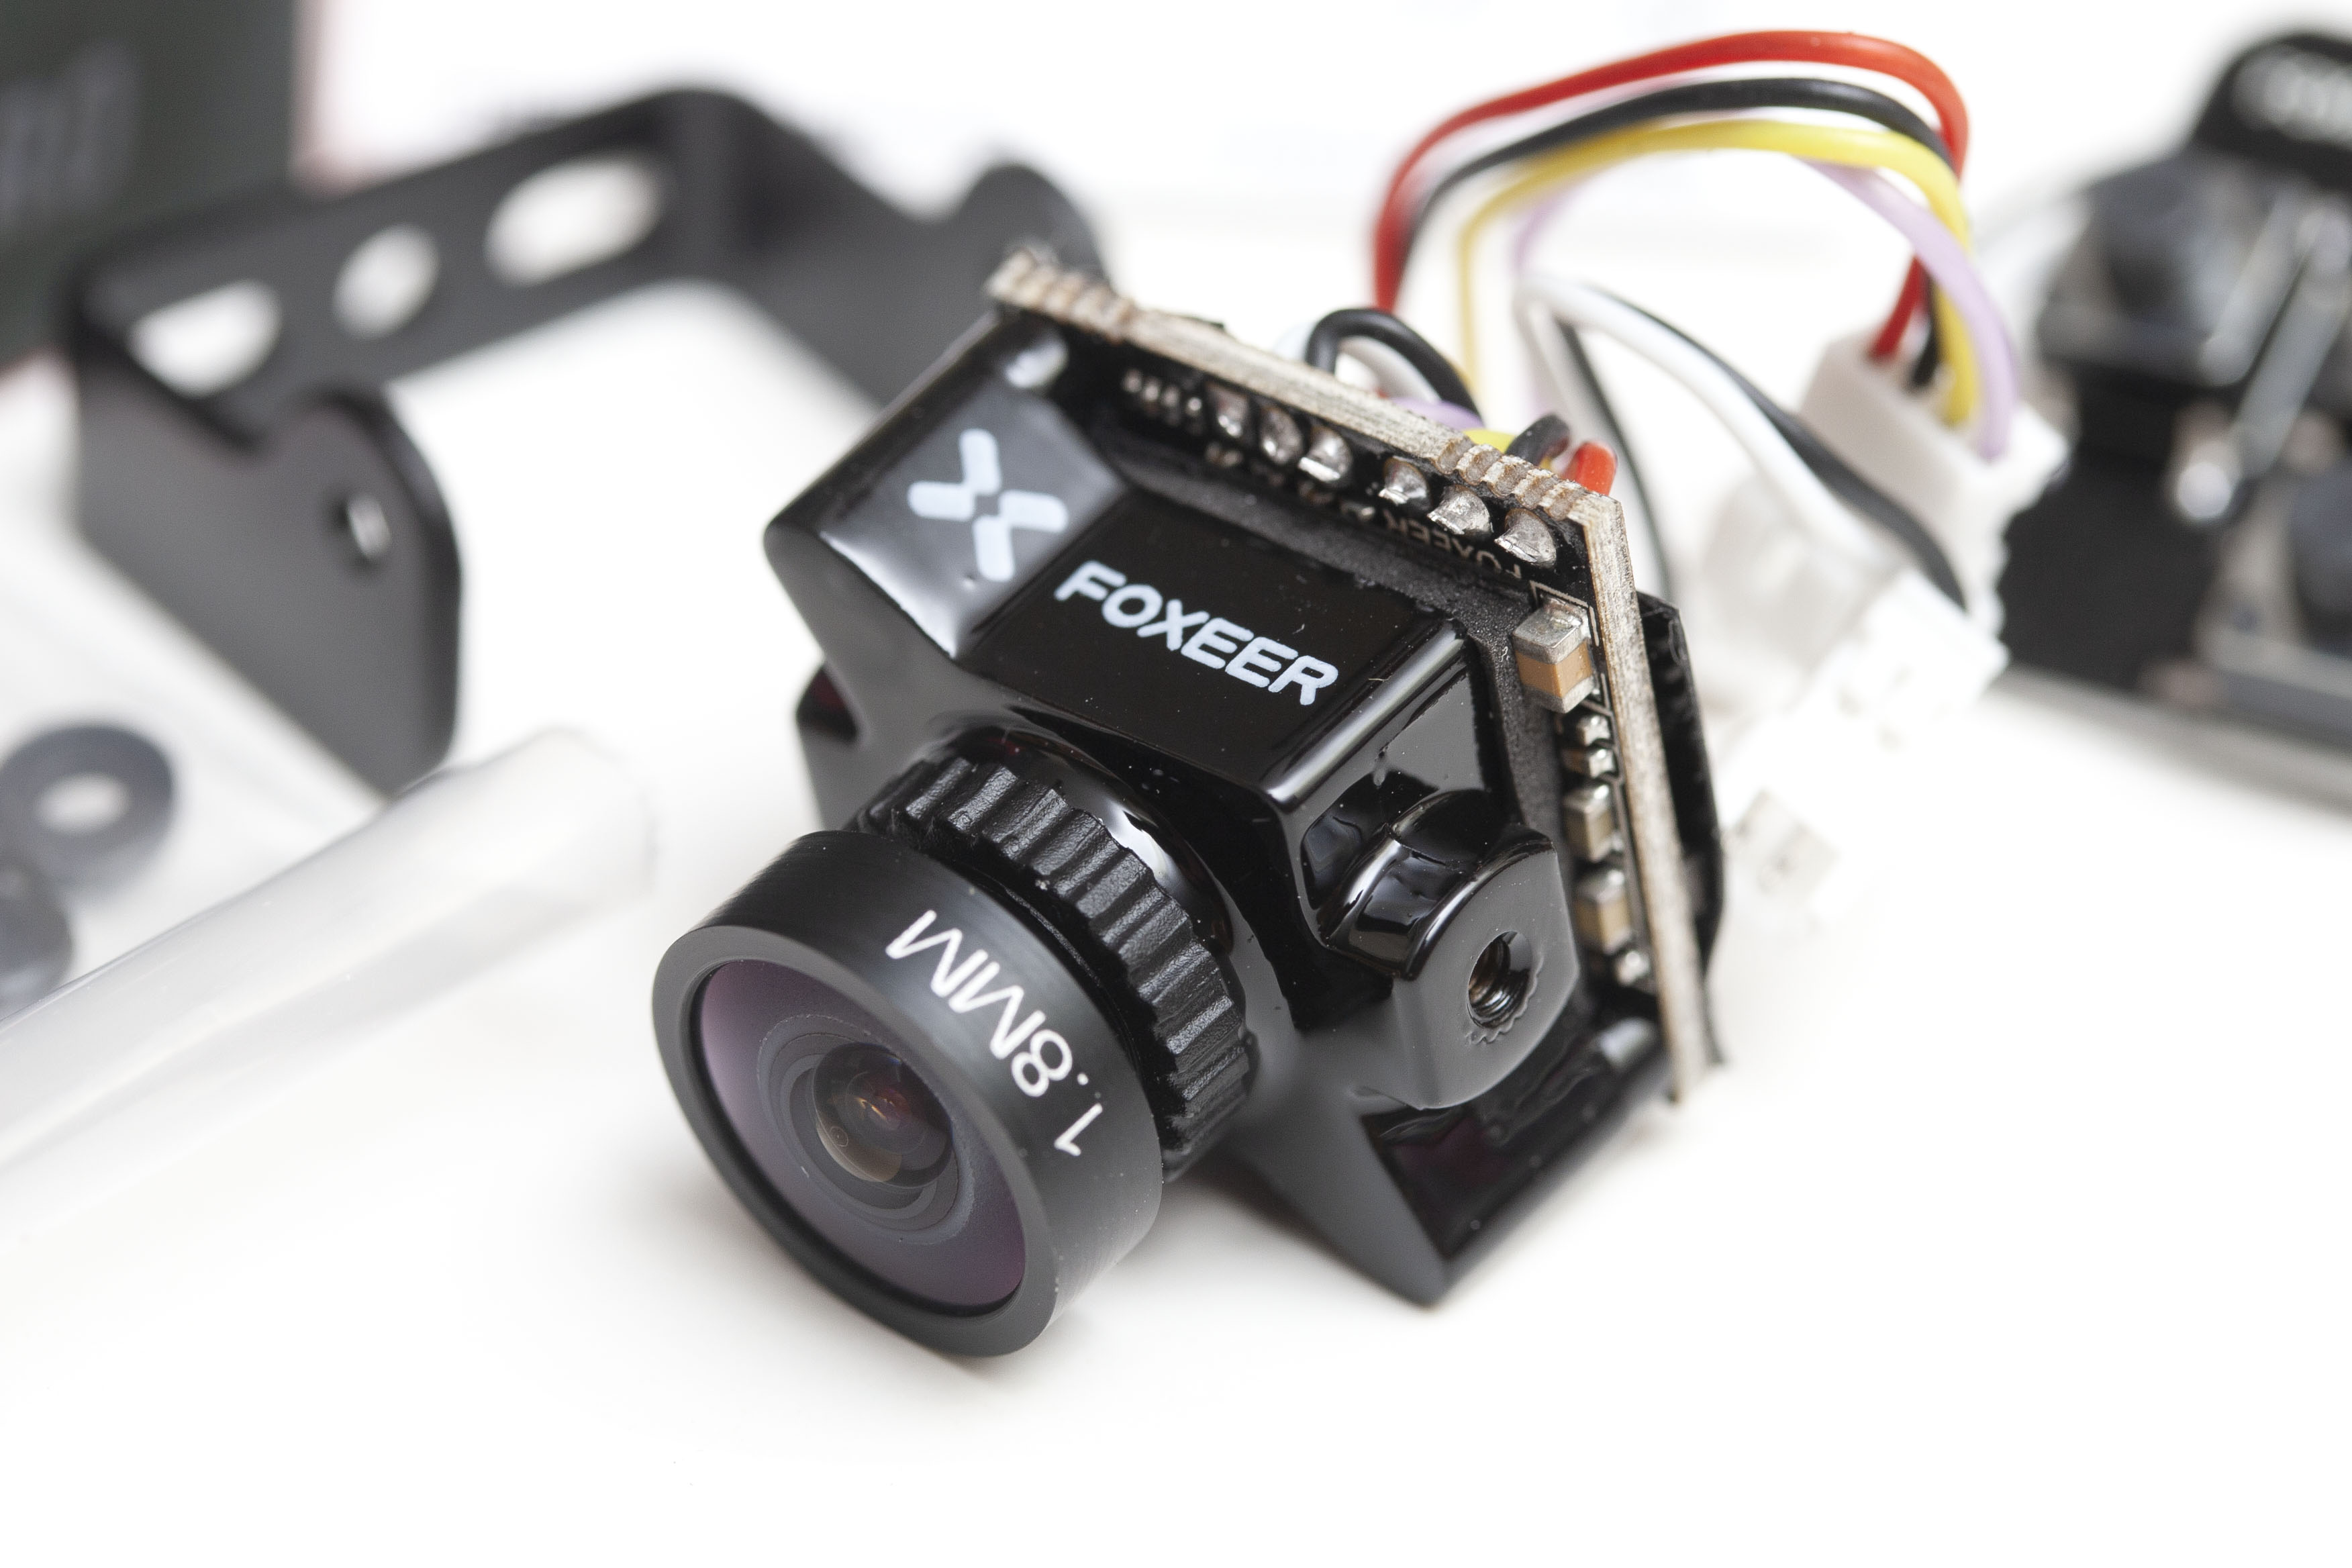
The Foxeer Predator Micro V4 is an analog SD 1000TVL camera with CMOS sensor. The 1.8mm lens it ships with provides a 150° FOV on the diagonal. It has an integrated OSD and voltage sensor. Foxeer advertises a very low 4ms latency, 4:3/16:9 switchable aspect ratio, and super wide dynamic range. It’s switchable between NTSC and PAL. The input voltage accepts anywhere from 5V up to a massive 40V, so you shouldn’t have a problem with voltage spikes when powering directly from a battery. It’s available in four different colors (red, blue, black, or purple,) and you can choose either the “pad” or “plug” version. If you want to replace the lens, it’s an 8mm threaded mount.
In the box you get the camera, a cable for Foxeer’s ClearTX, a cable for a TBS Unify VTx, the OSD joystick and a cable for it, a mounting bracket, bracket screws, case screws, and a user manual.
Even though the default is 4:3, the sensor is 16:9. When you switch it to 16:9 mode, you gain some picture on the left and right sides that was previously being cropped out. It defaults to PAL, which is lower resolution but a faster refresh rate.[/vc_column_text][/vc_column][/vc_row][vc_row][vc_column width=”1/6″][/vc_column][vc_column width=”2/3″][vc_single_image image=”4958″ img_size=”full” alignment=”center” onclick=”link_image”][/vc_column][vc_column width=”1/6″][/vc_column][/vc_row][vc_row][vc_column][vc_column_text]
Build Quality
I chose the ‘pad’ version because it’s a little unusual for cameras not to have a connector plug. The photos on the product page show bare solder pads, but that’s not actually how it’s built. Take a look at the photos here and you’ll see there’s a pigtail a couple centimeters long that terminates in a plug. For me it was a welcome surprise. Since you can still use camera cables, I would recommend the pad version to anyone even if they do not have much soldering skill. Not having a large plug on the case allows the camera to fit better into tight spaces. Far too many times I have had to rethink a camera mount because the board plugs got in the way.
If you really wanted solder pads, the pigtails could be removed but it’ll take some intermediate soldering skill to do so. They’re soldered via a thru-hole from the back onto the front of the board. Removing the cable would give you pads on both sides, with the back-side pads being a bit larger.
The case mounts to a quad by two side mount screws, and the holes for these appear to have metal threaded inserts. This is a very good thing, structurally. Cheaper cameras without them eventually strip out and have problems being mounted again. The mount screws were M2. This is a larger hex than most screws of this size, but it’s another appreciated detail. I don’t carry a 1.5mm hex in my flight bag, but I do have a 2mm since 5-inch quads use this size frequently.[/vc_column_text][/vc_column][/vc_row][vc_row][vc_column width=”1/6″][/vc_column][vc_column width=”2/3″][vc_single_image image=”5093″ img_size=”full” add_caption=”yes” alignment=”center” onclick=”link_image”][/vc_column][vc_column width=”1/6″][/vc_column][/vc_row][vc_row][vc_column][vc_column_text]
Settings
The OSD joystick can be plugged into the “Key” pad, or used to wire into a flight controller’s camera control. My build is using a CLRacing F4S, which offers a CAM_C pad for this purpose. Not much more was required to set this up than just hooking those together—but if you do this you’ll either need to desolder the pigtail, cut it, use a spare plug, or repurpose the joystick cable that comes with the camera.
Once in, the menus aren’t super intuitive. It takes a little getting used to where you find each of the settings. When you have control, a long press of “enter” gets you into the main menu. Pressing “up” instead gets you to the “Display” menu, and pressing “right” changes image mode.
The main menu lets you adjust some of the high-level features:
- ID allows you to choose a text string (usually pilot name) to display on screen at all times
- Picture controls provide the ability to flip the picture, and fine tuning of brightness, contrast, color, and sharpness
- Day/night can be set to auto or manual. When the camera doesn’t have enough light to run normally, this affects how it changes exposure method. It isn’t clear how this setting interacts with the day, night, and B&W modes activated with quick switching.
The Display menu allows you to:
- select what appears on the OSD (time, voltage, voltage alarm)
- calibrate the voltage sensor
- choose the display mode (day/night/LED/B&W)
- choose the aspect ratio (4:3/16:9)
- switch between NTSC and PAL (reboots the camera immediately when changed)
Quick switching of modes is welcome, especially if you have camera control set up through the flight controller.
- Day is good for most flying. If you don’t have camera control set up, this is likely where you’ll leave it.
- Night enhances low light detail at the expense of color saturation. Low light noise is improved in this mode.
- LED is presumably for use on nighttime courses with bright LED gates. This forces the camera to maintain a “daylight” exposure when light levels are very low so that it doesn’t try to reduce image quality.
- B&W switches the camera to black and white mode. A sensor running in black and white can make better use of all its pixels, giving better low-light performance.
[/vc_column_text][/vc_column][/vc_row][vc_row][vc_column width=”1/6″][/vc_column][vc_column width=”2/3″][vc_single_image image=”4962″ img_size=”full” alignment=”center” onclick=”link_image”][/vc_column][vc_column width=”1/6″][/vc_column][/vc_row][vc_row][vc_column][vc_column_text]
Camera Performance
So, what does the picture look like?
Color
The first thing I noticed was the color. It’s very saturated and there’s a bluish-teal cast that makes grass and sky pop out. If you’re looking for a beautifully represented scene, this isn’t going to be a first choice—but it’s well within acceptable and might even provide a slight edge when picking out details that are important in fast flight.
In low light the camera holds this same color rendering characteristics. That’s a great benefit; other cameras often become oversaturated and lack detail as light becomes scarce.
Exposure
The camera biases exposure to its highlights. This means highlight details will typically be better displayed than shadow detail. There’s a pretty considerable exposure bias to the brightest object in view even when it’s quite small. If only a small part of the image is bright, the camera will still try to show detail in that area. This can mean dark areas of the picture stay dark until that small bright area is completely gone from view.
Dynamic Range
Normally, a heavy exposure bias toward highlights would make a camera difficult to use for FPV. However, this Foxeer has very good dynamic range. From under a tree looking outward, there’s detail in both the sky and in the tree canopy. There’s an impressive amount of detail in both highlights and shadows, which is awesome for flying in difficult lighting.
The opposite side of the dynamic range coin is picture contrast. As expected with such a high dynamic range, the Foxeer delivers a picture that’s a bit flat in its tonal representation. At times the image doesn’t have any black areas at all, and the midtones all compress together. When this happens, you rely on color contrast to pick out objects in view. This could be a consideration for colorblind users.[/vc_column_text][/vc_column][/vc_row][vc_row][vc_column width=”1/6″][/vc_column][vc_column width=”2/3″][vc_single_image image=”4963″ img_size=”full” alignment=”center” onclick=”link_image”][/vc_column][vc_column width=”1/6″][/vc_column][/vc_row][vc_row][vc_column][vc_column_text]
Noise
Foxeer advertises a noise-free picture. The low-light noise performance is very good, but I won’t agree with the marketing hype completely—I’ve seen a few other FPV cameras with better low-light noise handling. To be clear, there was nothing to complain about here. This is a very capable camera. Noise and sharpness are opposite ends of a spectrum, bringing us to our next point.
Sharpness
By default, the camera has more sharpening than most. You have the ability to tune this in the OSD. Again, I wouldn’t want this much sharpening were I choosing a camera for picture quality—but it’s a benefit for navigation. Sharpening helps you identify the edges of obstacles such as gates and branches just a little bit faster. If this extra time saves you from a collision, it could be worth the price of admission right there.
Exposure Transition
A flight camera must react quickly to changes in light and dark scenes. One second you might be flying into the sun, the next dipping through the dark shadow of a tree. The Predator V4 absolutely excels in this area, adjusting to a new exposure scenario almost immediately. You certainly won’t be caught blinded by a sudden change in lighting.
Distortion
Most wide angle lenses will distort the image as light passes through to the sensor. (Lenses with minimal distortion cost hundreds or thousands of dollars.) The 1.8mm lens that ships with the Predator V4 is no exception. It appears to have a simple barrel distortion (pushing the center outward) that most pilots will be used to. There’s nothing unusual or problematic here.[/vc_column_text][/vc_column][/vc_row][vc_row][vc_column width=”1/6″][/vc_column][vc_column width=”2/3″][vc_single_image image=”5092″ img_size=”full” add_caption=”yes” alignment=”center” onclick=”link_image”][/vc_column][vc_column width=”1/6″][/vc_column][/vc_row][vc_row][vc_column][vc_column_text]
Sample Images
The samples here are pulled from a DVR, which isn’t fully representative of the picture quality but are enough to be useful. Each image is paired with a high-quality HDR photo from a dedicated camera to give you a better understanding of the scene. As you review them, consider and evaluate color, highlight and shadow detail, sharpness, and lens distortion. Don’t use these images to evaluate noise and resolution—the DVR introduces artifacts and reduced image quality in this way.[/vc_column_text][/vc_column][/vc_row][vc_row][vc_column width=”1/4″][vc_single_image image=”5174″ alignment=”right” onclick=”link_image”][/vc_column][vc_column width=”1/4″][vc_single_image image=”5176″ onclick=”link_image”][/vc_column][vc_column width=”1/4″][vc_single_image image=”5173″ alignment=”right” onclick=”link_image”][/vc_column][vc_column width=”1/4″][vc_single_image image=”5175″ onclick=”link_image”][/vc_column][/vc_row][vc_row][vc_column width=”1/4″][vc_single_image image=”5172″ alignment=”right” onclick=”link_image”][/vc_column][vc_column width=”1/4″][vc_single_image image=”5180″ onclick=”link_image”][/vc_column][vc_column width=”1/4″][vc_single_image image=”5171″ alignment=”right” onclick=”link_image”][/vc_column][vc_column width=”1/4″][vc_single_image image=”5179″ onclick=”link_image”][/vc_column][/vc_row][vc_row][vc_column width=”1/4″][vc_single_image image=”5170″ alignment=”right” onclick=”link_image”][/vc_column][vc_column width=”1/4″][vc_single_image image=”5178″ onclick=”link_image”][/vc_column][vc_column width=”1/4″][vc_single_image image=”5169″ alignment=”right” onclick=”link_image”][/vc_column][vc_column width=”1/4″][vc_single_image image=”5177″ onclick=”link_image”][/vc_column][/vc_row][vc_row][vc_column][vc_column_text]
Conclusion
The Foxeer Predator Micro V4 is cast as a modern, high-performance analog camera.The designers seem to be paying attention to the requirements of FPV pilots. Images off this camera certainly won’t win any awards for artistic merit—the output has been tuned around its purpose as a navigation tool. This is obvious through its poor color balance and flat tonality, but massive dynamic range and aggressive sharpening. If you’re looking for a new analog camera, this is a great choice that I’d be happy to have on any of my freestyle or racing rigs.[/vc_column_text][/vc_column][/vc_row][vc_row][vc_column][ultimate_spacer height=”40″][vc_separator][ultimate_spacer height=”40″][/vc_column][/vc_row][vc_row][vc_column width=”1/2″][vc_single_image image=”5319″ img_size=”medium” alignment=”center”][dt_default_button link=”url:https%3A%2F%2Fwww.getfpv.com%2Ffoxeer-predator-micro-v4-1000tvl-1-8mm-fpv-camera-plug-version.html||target:%20_blank|” size=”medium” button_alignment=”btn_center”]Buy the Foxeer Predator Micro V4 – Plug Version[/dt_default_button][/vc_column][vc_column width=”1/2″][vc_single_image image=”5320″ img_size=”medium” alignment=”center”][dt_default_button link=”url:https%3A%2F%2Fwww.getfpv.com%2Ffoxeer-predator-micro-v4-1000tvl-1-8mm-fpv-camera-pad-version.html||target:%20_blank|” size=”medium” button_alignment=”btn_center”]Buy the Foxeer Predator Micro V4 – Pad Version[/dt_default_button][/vc_column][/vc_row]