

The Drone FPV Camera in your multirotor is the key component that allows you to enjoy that ‘First Person View’. It makes sense to take some time and ensure that you choose the camera that will best suit the type of multirotor that you own, and flying that you would like to do.
There are 5 main points to consider when choosing a camera for your multirotor:
- Size
- Aspect ratio
- Sensor Type
- Lens Field of View
- Additional Features
The following article will attempt to cover these main points, and provide a simple guideline that can be used to help you find the correct camera, so that you get the most enjoyment out of seeing the view from your multirotor first hand.
[vc_single_image image=”344″ img_size=”full” alignment=”center”][vc_column_text]
Drone FPV Camera Size
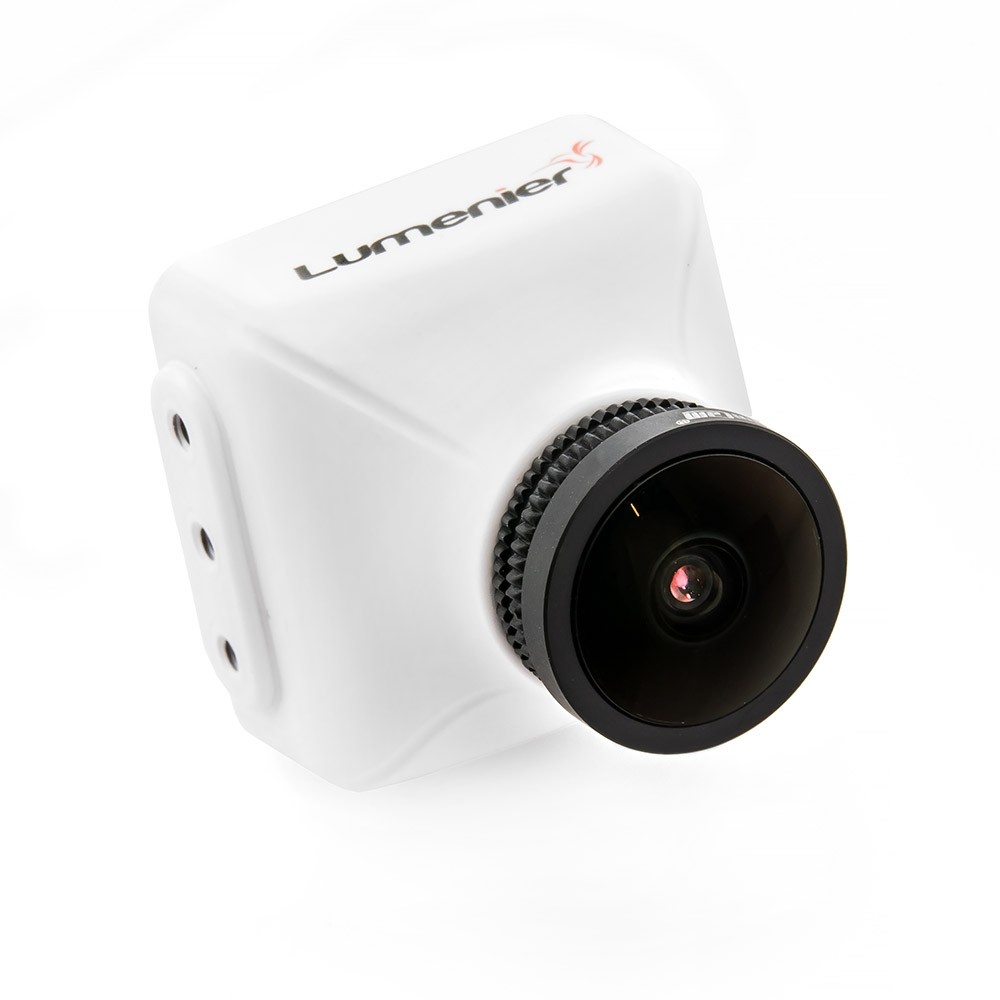
One of the first things you will notice when shopping for cameras is that they come in various sizes. FPV originally started with pilots using PCB board cameras repurposed from security cameras, these already had an industry standardised size and multirotor frames were designed accordingly. Eventually people realised that having all the electrical components exposed was an unnecessary risk and simple cases were created to house the PCB board cameras. These became commonly known as a HS1177 style camera, named after the board camera that was most commonly used inside. The HS1177 style camera is roughly 28mm square and is still a very common size format. Many of the most popular cameras from the main manufacturers continue to be made in this size, and accordingly, many frames are designed to accept this size camera. It is a common feature for the camera mounting points to be built right into the frame. Due to the overall size of the HS1177 style camera, it is most commonly found in multirotors with a blade diameter of 5” or more.
As multirotor technology has progressed, components have become smaller and lighter, and this has filtered through to cameras. Manufacturers have created new smaller variants.
Naming conventions for the more compact cameras can vary a bit between manufacturers and websites, but most commonly the sizing in descending order goes: HS1177, Mini, Micro, Nano/AIO.[/vc_column_text][vc_single_image image=”345″ img_size=”full” alignment=”center”][vc_column_text]The Mini camera is roughly 21mm square and uses the same lenses and sensors as its larger counterpart, the hs1177 style Drone FPV Camera. This mini size camera has been less commonly adopted by frame designers mainly due to the odd width and minimal size and weight difference.[/vc_column_text][vc_single_image image=”346″ img_size=”full” alignment=”center”][vc_column_text]
The Micro camera is roughly 19mm square and most commonly has a bare PCB with a moulded front cover that allows the lens to be mounted. While on paper this seems like a step backward in camera technology, this was a large advance for the multirotor industry. For the first time, a FPV camera with a good quality sensor and impressive light handling could be weighed in singular digits. Up until the micro camera was released, smaller cameras typically suffered from poor light handling, that made it difficult to fly in changing light conditions. Arguably the view from the multirotor is the most critical feature, and this limited most FPV enthusiasts to multirotors that were large enough to house a typical HS1177 camera. The arrival of the micro camera has assisted a huge explosion in the popularity of micro multirotors. Now the micro pilots do not have to put up with sub-standard video quality.
As the camera name suggests the Micro camera is most often found in ‘Micro’ multirotors with blade diameters of 3” or less.[/vc_column_text][vc_single_image image=”348″ img_size=”full” alignment=”center”][vc_column_text]The Nano/AIO cameras vary in shape and size more than any other standard of FPV camera. They are most commonly found in very small indoor multirotors like the hugely popular Tiny Whoop type machines.
Nano/AIO cameras have gone largely unchanged in both size and performance since they were introduced, Typically the Nano camera is a press fit sensor cover/lens assembly over a PCB mounted sensor that is usually around 12mm square.
In AIO cameras the name is an acronym for ‘All in One’. As the name suggests, an all in one camera usually contains all the required components for video transmission (Camera/VTX) in one compact unit. Again, sizes vary more in these cameras than any other size standard in FPV but the most common are rectangular in appearance/layout with external dimensions of around 20mm wide, 13mm high, and 6-10mm thick (not including lens).[/vc_column_text][vc_single_image image=”349″ img_size=”full” alignment=”center”][vc_column_text]Usually the size camera required will be dictated by the frame that you wish to fly, make sure to pay attention to what the frame designer/manufacturer recommends, and make sure that you buy a camera that is compatible. Usually you can adapt a smaller camera to fit in a larger frame, but it is often impossible to fit a larger camera into a frame designed for a smaller camera.[/vc_column_text][vc_row_inner][vc_column_inner][ultimate_spacer height=”25″][vc_separator el_width=”20″][ultimate_spacer height=”25″][/vc_column_inner][/vc_row_inner][vc_row][vc_column][vc_row_inner][vc_column_inner][vc_column_text]
Drone FPV Camera Aspect Ratio
Aspect ratio refers to the shape of the image that the Drone FPV Camera captures. There are two options: 16:9 and 4:3. The shape of a 16:9 image is like a common LCD TV or computer monitor, a 4:3 image is like an old CRT television and is more square. Neither aspect ratio is newer or better than the other. Aspect ratio has very little effect on the image captured but you need to make sure that you match the aspect ratio of your camera to that of the display screens in your goggles or HMD (head mounted display) to ensure the image displayed is not distorted.
Because FPV Goggles are often the singularly most expensive piece of equipment to be purchased by an FPV enthusiast (see the article on FPV goggles here: xxxxxx ) it is often not feasible to have different goggles to suit different cameras and therefore it makes sense to choose cameras that match your goggles native aspect ratio.
It is a common misconception that 16:9 cameras give you a wider peripheral (side to side) view than 4:3 cameras. This is actually false assumption, due to the maximum pixel ratio able to be transmitted by the camera and VTX back to the goggles, both cameras will provide the same width image however the 4:3 camera will provide more image vertically. This can be altered by changing the lens field of view used on the cameras but that will be discussed in further detail below.
When choosing what aspect ratio Drone FPV Camera to purchase, consider your equipment and buy a camera that is going to the most compatible with what you already own. Preferred aspect ratio is a personal thing and there are no concrete benefits/disadvantages to either.[/vc_column_text][vc_single_image image=”347″ img_size=”full” alignment=”center”][/vc_column_inner][/vc_row_inner][vc_row_inner][vc_column_inner][vc_column_text]
Drone FPV Camera Sensor Type
The sensor in your FPV camera is the component responsible for capturing the light/image entering the lens and converting that information into transmittable electrical signals. There are two types of sensors used in FPV: CCD and CMOS. The differences in the sensor technology is a very complex subject worthy of an article in its own right. Rather than discuss the detailed specifics of the technology, this section will cover the basic attributes of each sensor type and how that may impact your FPV experience.
Latency is the biggest enemy of FPV, latency refers to the delay caused by the time it takes for the camera to capture the light entering the lens and process that information into transmittable electrical signals. Any delay in the FPV system, means the multirotor will actually be ahead of where you see it through the goggles when flying. When traveling at up to 100mph even the slightest delay can mean that you hit that tree or race gate that you thought you could avoid.
Originally CCD cameras were considered superior because they have very low latency (around 20ms) and have very good WDR (wide dynamic range) which allows them to see both light and dark areas without overexposing or underexposing either. CMOS cameras typically either had high latency or very poor light handling.
At the time of writing this article, CMOS cameras are becoming more popular. It appears the manufacturers have managed to reduce the latency to be comparable with CCD cameras and due to the nature of the sensor they can create a sharper/crisper image that allows you to see more detail when flying. The latest CMOS cameras are now including ‘Super WDR’ which is reportedly superior even to the light handling of the CCD cameras.
CCD cameras are still the most commonly reliable option, if good light handling is important for where you fly (Low sun, in and out from under trees etc).
But, CMOS cameras are rapidly catching up and as mentioned have the capability to provide even clearer FPV video. Research reviews for whatever camera you are considering buying and you should be able to see flight samples that will help you make your decision.[/vc_column_text][vc_single_image image=”350″ img_size=”full” alignment=”center”][/vc_column_inner][/vc_row_inner][vc_row_inner][vc_column_inner][vc_column_text]
Drone FPV Camera Lens Field of View (FOV)
When searching for a suitable camera to put on your multirotor you will likely be offered more than one lens option.
Usually the lens options are given in millimetres and this number refers to the Focal length of the lens. A larger number means the lens will have a narrower FOV (Field of View) and a smaller number will have a wider FOV. Traditionally a 2.8mm lens has been the most commonly used and because of this, most camera manufacturers were providing 2.8mm lenses with their cameras. As multirotors have gotten faster, and flying has become more extreme, many pilots have found the 2.8 lenses too narrow and it was soon discovered that a GoPro replacement lens would fit into the hs1177 cameras. The GoPro lenses provided a great balance of having a wider FOV (roughly 2.5mm) and still being able to see details in the FPV feed. The GoPro lens modification was noticed by manufacturers and now many cameras come with a 2.5mm lens option.
When choosing what lens you want to purchase remember, ‘less is more’ if you chose to have ‘less’ FOV you will see ‘more’ detail in the FPV video. There needs to be a balance of the two and if you try to fly with a very wide FOV it can be difficult to gauge your proximity to both objects and the ground, this can make it difficult to line up for racing gates or tree gaps etc. Alternately if you fly with a very narrow FOV it can be like trying to fly while looking through a cardboard tube, it is easy to focus on the details in front of you, but difficult to keep track of what is around you. 1.8, 2.1, 2.3, 2.5 and 2.8mm lenses are the most commonly chosen sizes.[/vc_column_text][vc_single_image image=”351″ img_size=”full” alignment=”center”][/vc_column_inner][/vc_row_inner][vc_row_inner][vc_column_inner][vc_column_text]
Drone FPV Camera Additional Features
Cameras have evolved significantly since the early days of repurposed security cameras, and along the way some manufacturers have taken the opportunity to add additional features to the cameras with the intention of simplifying your build and allowing you easy access to more information.
The biggest advance for Drone FPV Camera features was the addition of a camera based On Screen Display (OSD) and this is now common in most popular cameras. A camera based OSD can let you display important information like battery voltage and ‘ON’ time to help you keep track of the length of your flights and the amount of battery that you have remaining. If you are choosing to use a Flight Controller (FC) that does not have OSD capability (see Flight Controller article here xxxxxxx) then using a camera with built in OSD can make it much easier to keep track of your battery levels and Flight times.
Some Cameras include a microphone that can be used to record the sound from the quadcopter perspective, usually this is just an incessant whine from the propellers, although some people find it useful to be able to hear what their motors are doing even if the quadcopter is physically out of earshot. This can help with throttle control. Most VTX’s have the capability to transmit a sound signal back to the FPV receiver in the goggles where you can listen to it using a headphone.
Night Cameras: The cameras used for FPV are typically very sensitive to light and because of this can often operate in almost complete darkness if configured with the right lens and settings. There are cameras specifically designed for use in the dark available from a number of manufacturers, these can be great if you live in an area that gets very few daylight hours in winter, or if you simply want to take advantage of areas when most people are inside at home.[/vc_column_text][/vc_column_inner][/vc_row_inner][/vc_column][/vc_row][vc_row][vc_column][ultimate_spacer height=”25″][vc_separator el_width=”20″][ultimate_spacer height=”25″][/vc_column][/vc_row][vc_row][vc_column][vc_column_text]
Conclusion
Hopefully this article has clarified some of the mystery around FPV cameras and what all the options are. As always, researching possible options and watching online reviews is a great way to gauge whether a products performance will suit your intended application.[/vc_column_text][ultimate_spacer height=”25″][dt_default_button link=”url:https%3A%2F%2Fwww.getfpv.com%2Ffpv%2Fcameras.html||target:%20_blank|” size=”medium” btn_width=”btn_full_width” button_alignment=”btn_center”]PURCHASE YOUR DRONE FPV CAMERA HERE[/dt_default_button][/vc_column][/vc_row]
Great article. Funny thing is I always thought AIO was a brand when people said that. Still learning FPV lingo so learned something new today.
it seems i see more people choosing 2.1mm. is that the case?
i dont see 4 k or 1080 cameras
Too high of a resolution introduces greater latency because more information needs to be processed by the sensor itself, as well as more time being required to send that information to your goggles (smaller resolutions means that less information needs to be sent over to your receiver).