

Getting started flying FPV quads can be difficult, intimidating, and complicated. One of the latest attempts to make this easier is the NewBeeDrone AcroBee Lite RTF Kit. RTF stands for “ready to fly” and means that everything that’s needed comes in the box—all you should have to do is open the box, charge up, and get flying. Thanks to NewBeeDrone, it’s never been easier to get started.[vc_row][vc_column][vc_single_image image=”4969″ img_size=”full” add_caption=”yes” alignment=”center” onclick=”link_image”][/vc_column][/vc_row][vc_row][vc_column][vc_column_text]
The AcroBee Lite
The AcroBee Lite has a great set of modern-day specs: a full Betaflight flight controller with OSD, high-durability frame, video transmitter which can be adjusted remotely (SmartAudio), 22,500Kv “Plaid” motors, and efficient “Venom” props. These aren’t base-grade parts, but fully capable race-spec equipment.
Build Quality
Micro quads are as close to indestructible as any FPV quad gets. While I don’t recommend flying full speed into the wall, you’ll probably get away with it multiple times. The “Cockroach” frame is the gold standard in durability for micro quads and offers solid protection for almost everything but the camera. Up top, NewBeeDrone adds a custom-molded “Goober” canopy that prevents almost any direct hits to the camera board. Each of these parts is made from a plastic which deforms with impact and then returns to its original shape.
The flight controller is a future-proof F4 processor. (Slower processors are no longer supported by new software.) The receiver is full range, binds in either D8 or D16 (FrSky radio protocols) and has diversity (loses connection much less easily.) There are programmable LEDs on both the top and bottom of the board. It even supports active braking, which is a first for any brushed micro drone.
There are only a few disadvantages. One, if you want to re-bind the on-board receiver to a new radio, the button is small and tough to locate and press. The video antenna could also be improved—this style without shrink wrap on the end can flex over time and break off. Adding a little extra shrink tubing over the top may prevent the issue. Finally, you MUST be sure to plug in a battery before connecting the flight controller over USB—there are reports of flight controllers breaking when this isn’t followed, and it’s easy to forget.
Flight Characteristics
I’ve flown more micro quads than most, and I have to say—this one is fantastic. The AcroBee Lite offers smooth, tight control and is perfectly matched to indoor spaces. If this is your first drone, you’ll be spoiled! Throttle control and hitting gaps is easier than with most micros. The AcroBee Lite has none of the usual problems of other 65mm 1S drones and is a joy to fly. This is a micro that I would be more than happy to take to an indoor “tiny whoop” race—it will be as competitive as anything else out there.
Descending straight down through your own prop-wash is a challenge for most micros, often causing them to spin out of control. The AcroBee Lite handles this like it’s clean air. Hard turns, which inevitably cause washouts on most micro quads, are entirely possible without incident. I’m more of a racer than a freestyle pilot—but I was able to pull off flips, rolls, and even a split-S without leaving my living room. I’m a tough critic, and I’m thoroughly impressed.
Higher than average power and tight handling will satisfy experts and enthusiasts, but this still is a great quad for beginners. Brushed motors are considerably more tame than their brushless counterparts—and at this size, they also run smoother since most micro brushless motors don’t have bearings. A new pilot will enjoy the mild mid-throttle response which makes it easier to keep a consistent hover altitude. Perhaps best of all, the quad makes very smooth transitions between movements. This helps even out jumpy stick movements of a beginner learning throttle control. Still, it’s best to put in some simulator time before diving straight into real flight—but this RTF kit helps you out with that, too.
As of this writing, you will have a hard time finding a better brushed quad. The performance does come at a cost: the Plaid motors run hotter than most. They’re likely to not last as long as other brushed motors, and it’s best to wait between flights until they cool off if you want to prolong their lifespan. Another unfortunate item for the beginner: the AcroBee Lite can’t flip itself over after crashing upside-down.[/vc_column_text][/vc_column][/vc_row][vc_row][vc_column][vc_single_image image=”4966″ img_size=”full” add_caption=”yes” alignment=”center” onclick=”link_image”][/vc_column][/vc_row][vc_row][vc_column][vc_column_text]
FPV Goggles
The included FPV goggles are a split-box style, made from two separate parts: a display screen with built-in video receiver, and a shell with a head strap and a Fresnel lens.
The screen is well made and easy to use. It provides a clear picture and navigating bands and channels is fast and easy, and it charges with the included MicroUSB cable. When you first get it, go into the settings and change the “zoom” to “4:3”. The Acrobee Lite camera outputs a 4:3 picture, so you can remove the default picture stretching by changing from the default 16:9. The screen remembers your band, channel, and zoom setting so you don’t have to change them again. On the side of the case is a small unlabeled jack which is likely an AV-in, but no cable is supplied. Ideally, the screen would have had a DVR built in—but you can’t win them all.
The screen is held onto the shell magnetically, which works better than I expected. The adjustable straps are comfortable and snug. A very wide Fresnel lens causes ghosting on either side of the picture which can be distracting for some people. Goggles are a more personal choice than other components in the FPV setup—your face shape and eyesight play a big role in what is comfortable to use. This shell didn’t work well for me. I am too farsighted for the display to be comfortable, and the padding near the nose uncomfortably pinched in. If you wear glasses, they may not fit at all. This is a problem for me with almost any single-screen “box” goggle, though. Many others enjoy and even prefer the box style, so you may have a very different experience from mine. Young eyes especially tend to cope better.
If you decide later to upgrade to a better pair of goggles, you’ll be able to make use of this screen for other purposes. Stand-alone screens are great for bench tests when building new quads. They are also ideal when you want to share your flight with someone—whether friend, family, or even a stranger you came upon while flying. Having a video feed available can really help others understand and enjoy your flight along with you.[/vc_column_text][/vc_column][/vc_row][vc_row][vc_column][vc_single_image image=”4967″ img_size=”full” add_caption=”yes” alignment=”center” onclick=”link_image”][/vc_column][/vc_row][vc_row][vc_column][vc_column_text]
Controller
The included controller is pretty basic. Everything on the controller functions well enough, but the sticks won’t give you the same precision and control of a full-size radio. Stick response is a bit soft and doesn’t really respond in a linear fashion, so it’s harder to find the exact position that you want. It’s set up in “Mode 2”, meaning the throttle stick (which doesn’t automatically recenter) is on the left side. The whole controller is small which is great for portability but less so for usability: your hands might run into each other when you push the sticks together. It sits reasonably comfortably in the hands but I wouldn’t want to use it for extended periods of time. The micro-USB charge port is at the bottom.
The controller has an added bonus you won’t find in most “toy” grade controllers: it will function as a USB game pad for your computer. It’s not at all useful for playing video games, but this is a great asset for using FPV simulators. Learning FPV flying for the first time can be difficult and you will crash a lot. Flying a sim lets you learn and experiment without risking any actual damage. A few simulators are even free to download.[/vc_column_text][/vc_column][/vc_row][vc_row][vc_column][vc_single_image image=”4965″ img_size=”full” add_caption=”yes” alignment=”center” onclick=”link_image”][/vc_column][/vc_row][vc_row][vc_column][vc_column_text]
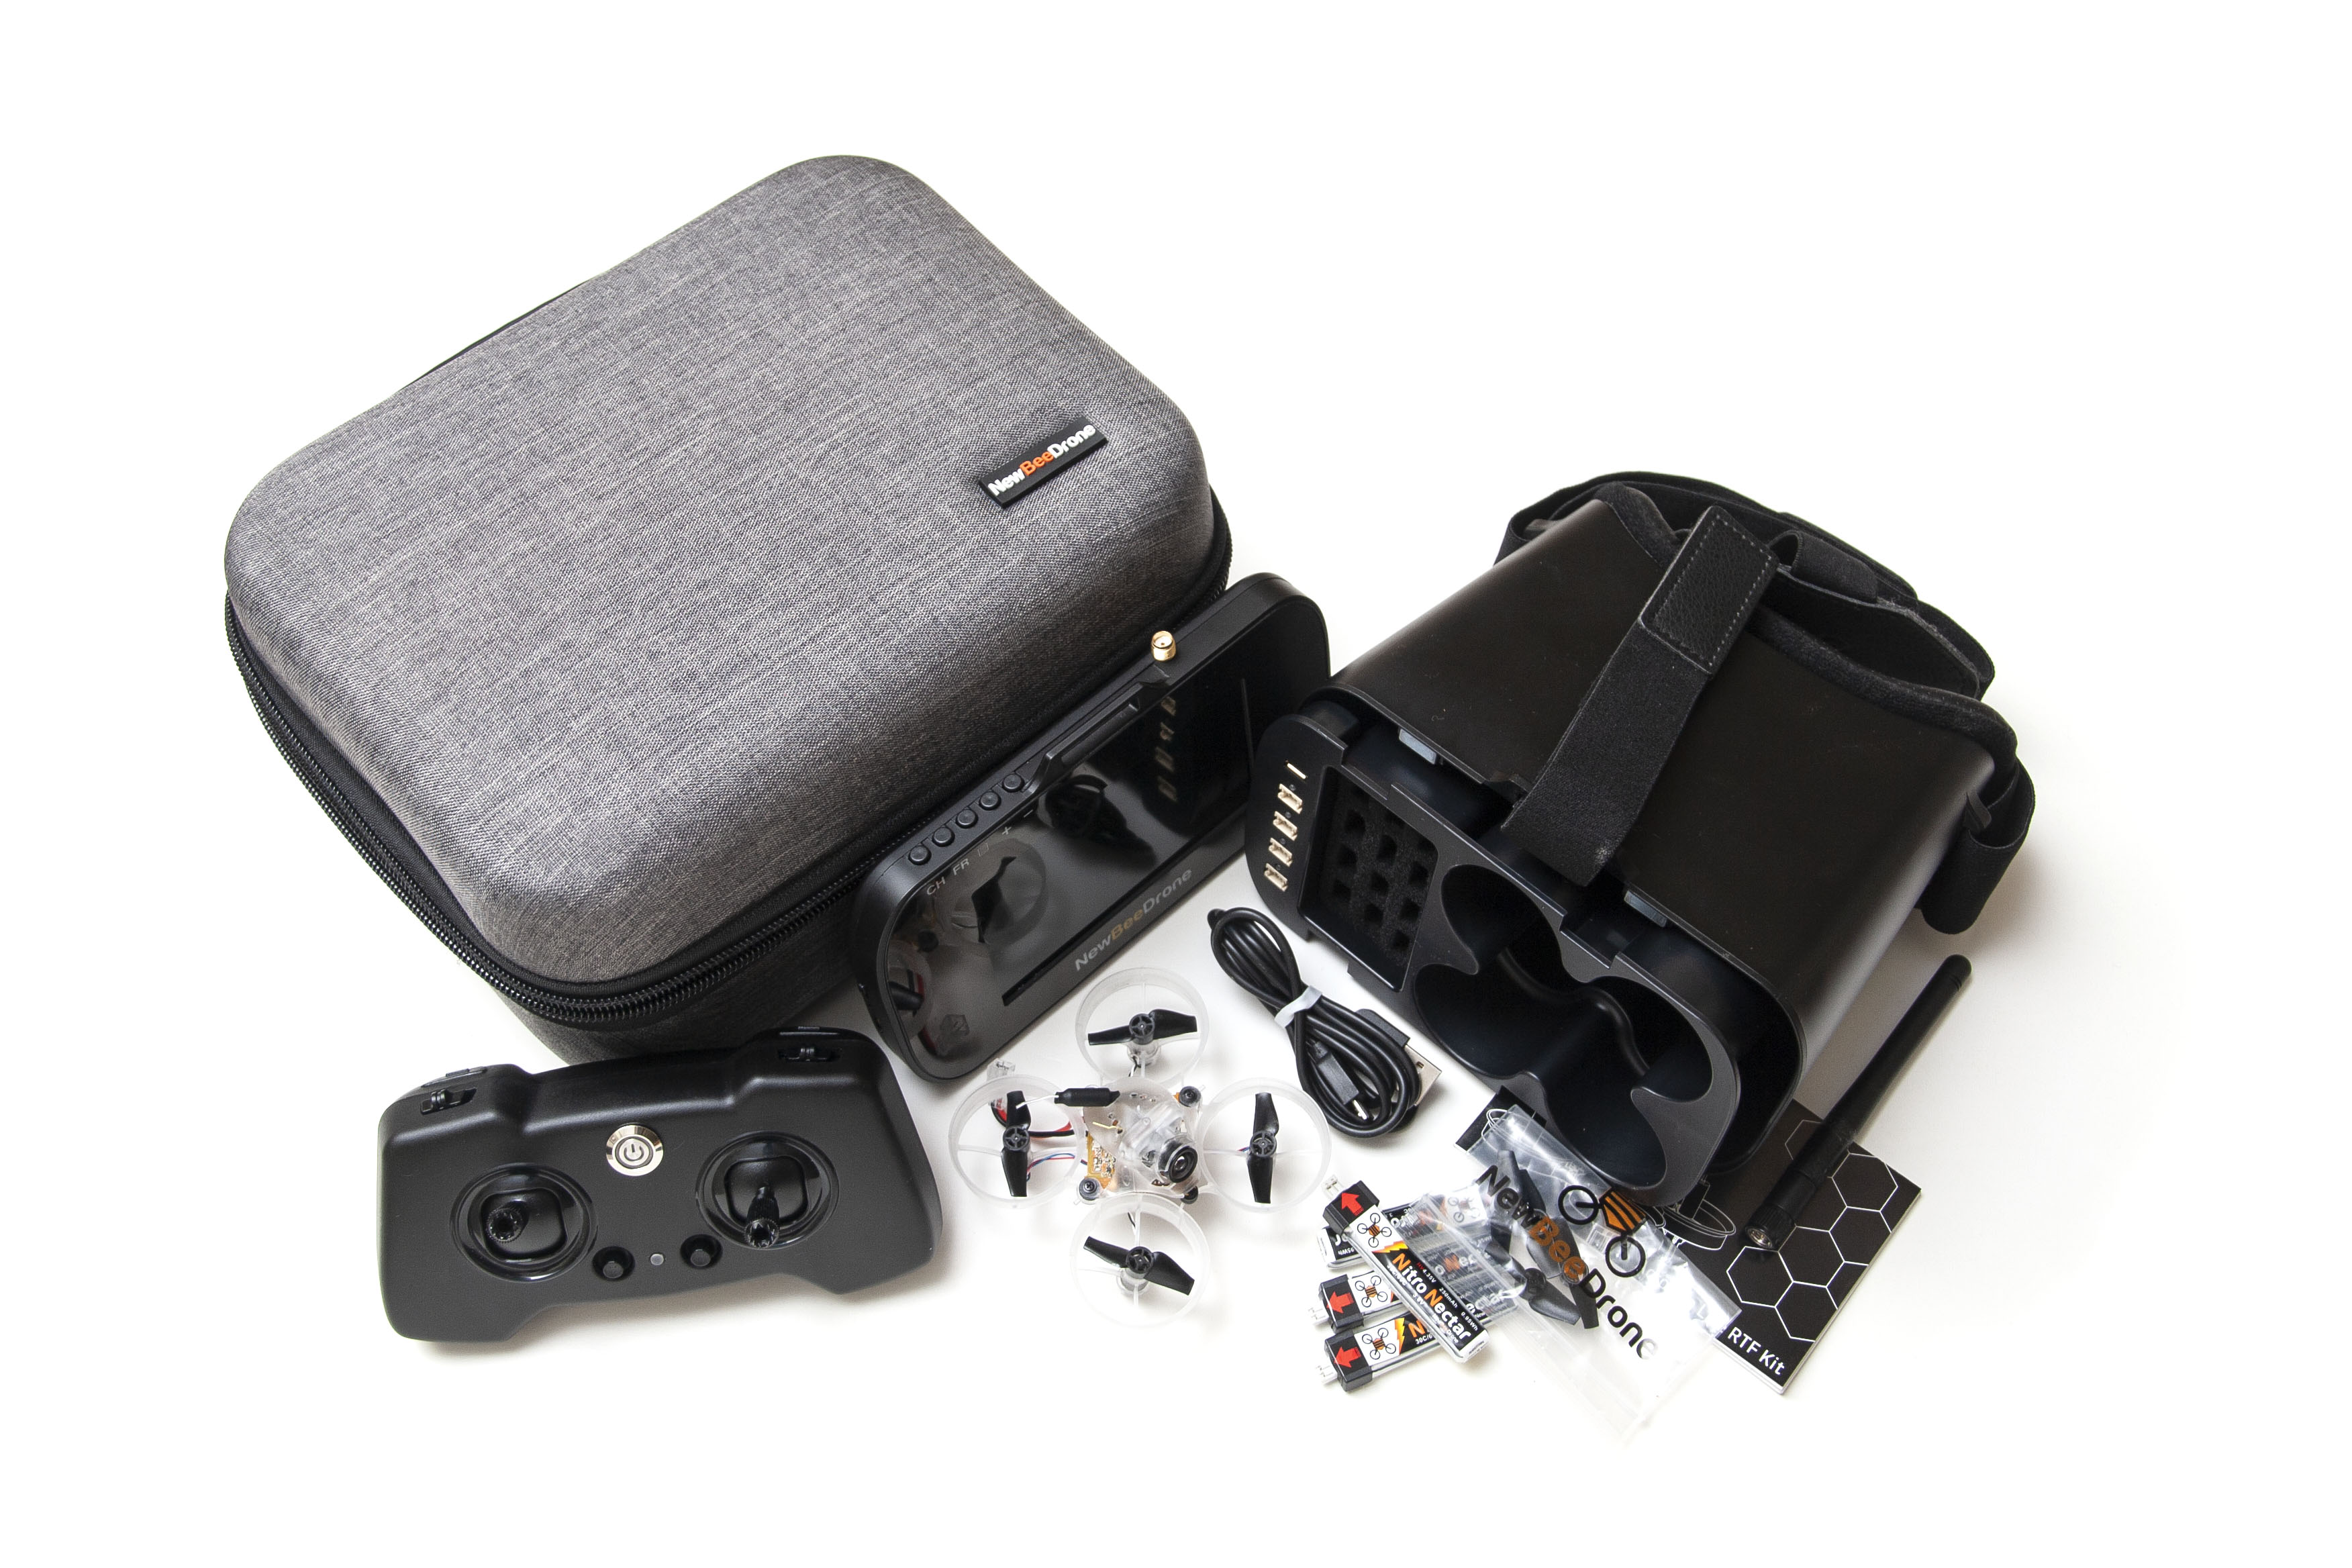
Batteries, Charger and Case
Packed inside the goggles is a plastic tray for the drone itself, a battery holder with capacity for a dozen batteries, and an integrated 4-port battery charger. It’s a clever way to store and protect the drone and other needed gear during transport. The charger also plugs in via micro-USB and has status LEDs to tell you when batteries are ready to use. NewBeeDrone generously provides four batteries—other RTF kits provide just one or two, and it’s never enough. The charger doesn’t have any settings, though, such as charge current. This is mostly fine for beginners, but you can’t buy “normal” LiPo batteries that should only be charged to 4.20V. The kit comes with higher voltage 4.35V batteries. These are more common now and work better for 1S micro quads anyway—but be sure not to get the 4.20V as the charger can’t tell the difference.
My charger had very stiff ports that were difficult to pull the batteries back out of. I asked NewBeeDrone about it and they said it’s rare, but they’re correcting an issue with the mold at the manufacturer. If you run into this, get in touch with support and they’ll set it right.
Everything packs inside a custom soft-shell case. Each piece has a place that fits snugly, so it should hold up very well in transport. That you can carry everything needed for a race day in something no bigger than a lunch box is impressive—and gives you little excuse not to do so. My only criticism on the case is the extra storage compartment in the lid doesn’t close, so items stored there tend to fall out.
If there were one accessory to add to this kit, it would be a few more USB cables. You only get one, so you have to pick only one of the four ways you might use it at a time (charging the controller, charging the video screen, charging batteries, or changing settings on the flight controller). Hopefully you have a few more of these cables available. Everything needs charged before your first flight, so it’ll take quite some time if you can’t do them together. Charge times on the controller and goggle screen are a few hours each if empty.[/vc_column_text][/vc_column][/vc_row][vc_row][vc_column][vc_single_image image=”4968″ img_size=”full” alignment=”center” onclick=”link_image”][/vc_column][/vc_row][vc_row][vc_column][vc_column_text]
Wrap Up
One of the things I like the most about the AcroBee Lite RTF kit is that it sets the owner up with a useful upgrade path. Many RTF quads use proprietary parts and connection protocols. With the NewBeeDrone kit, you’re getting parts that fit within popular ecosystems. If you want a higher quality transmitter for more precise control, you can use a FrSky-compatible radio like the Taranis Q X7 or even the Taranis X9D Plus 2019 Special Edition. If you want to swap out the display for goggles, almost any pair will work wonderfully, even the top-tier Fat Shark HDO with RapidFIRE. The same Betaflight software that runs the BeeBrain Lite flight controller also runs most flight controllers on the market—learning how it works is directly transferable to full-size race and freestyle drones.
Documentation in general could be improved. The manual is very terse and doesn’t cover a lot of common questions, such as the different switches on the radio, flight modes, or even how to arm. A frequency card would have been a great addition to the box. If you’re not familiar with FPV video, take a look at our guide to FPV receivers to get started. A first-time pilot will probably need help from others, either locally or online.
The drone itself is of amazing quality. It is, quite honestly, one of the best available on the market for this size class. The charger, video goggles, and transmitter are adequate, and a step up from other “Everything in one box” RTF kits. It’s also more expensive than most, but as a whole you’re getting an incredible value.
There are a few challenges with some of the components, but I would be happy to recommend this kit to anyone getting started from scratch. The extra cost for this kit is made up in quality, longevity, and ability to upgrade. It’s all backed up by a US-based company with a solid support team.
If you’re thinking of getting into FPV, there’s never been a better time—and the NewBeeDrone AcroBee Lite RTF Kit is a wonderful way to get started.[/vc_column_text][/vc_column][/vc_row][vc_row][vc_column][ultimate_spacer height=”40″][vc_separator][ultimate_spacer height=”40″][/vc_column][/vc_row][vc_row][vc_column][vc_single_image image=”5026″ img_size=”medium” alignment=”center”][dt_default_button link=”url:https%3A%2F%2Fwww.getfpv.com%2Fnewbeedrone-acrobee-lite-rtf-kit.html||target:%20_blank|” size=”medium” button_alignment=”btn_center”]Get the NewBeeDrone AcroBee Lite RTF[/dt_default_button][/vc_column][/vc_row]
Hi which newbie drone fpv has ALTITUDE HOLD ?
Thanks
Great review
Rich C
As far as I’m aware, NewBeeDrone doesn’t currently manufacture any ready-to-fly aircraft with the necessary sensors or software for altitude hold.