

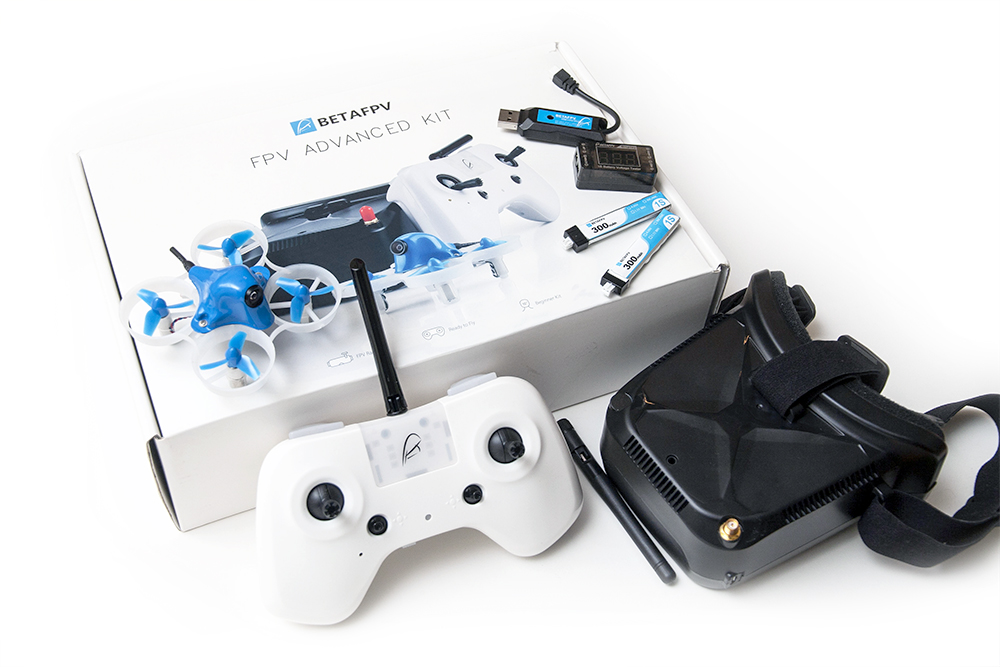
BetaFPV has developed a whole range of micro quads. Their product line caters to the informed enthusiast, with machines that emphasize power and handling. How does this experience translate when developing a kit for the FPV newbie? In this article, we’ll explore BetaFPV’s introductory offering, the BETAFPV Beta65S Whoop Racing Advanced Kit.
This kit is truly RTF, or “Ready to Fly”. It contains everything you need in one box to get started: a 65mm 1S FPV micro drone, a controller, a set of FPV goggles, a battery charger, two batteries, plus a few odds and ends. If you’ve never flown before, you can rest easy in knowing this is all you’ll need.[vc_row][vc_column][vc_single_image image=”5142″ img_size=”full” add_caption=”yes” alignment=”center” onclick=”link_image”][/vc_column][/vc_row][vc_row][vc_column][vc_column_text]
The Beta65S
The drone in this kit is BetaFPV’s Beta65S. It’s a 65mm frame (measured diagonally across the center of the motors) with 31mm propellers. All together the quad weighs only 26g.[/vc_column_text][/vc_column][/vc_row][vc_row][vc_column][vc_single_image image=”5143″ img_size=”full” add_caption=”yes” alignment=”center” onclick=”link_image”][/vc_column][/vc_row][vc_row][vc_column][vc_column_text]
Build Quality
One of the strengths of BetaFPV’s offering over other RTF kits is in the durability of the drone itself. The frame structure and the canopy are about as good as it gets for protection of the interior components. BetaFPV works on these designs to find a perfect match between strength and weight. This is no less than the fourth version of the frame. It’s braced on all sides to protect the electronics from crashes, and ducted so it protects walls and people from spinning propellers.
The flight controller is a modern F4 processor which runs Betaflight software—both the current standard. This allows you to plug it into a computer to change settings like how fast it responds to your stick inputs. A control receiver is built into the same board and functions in either D8 or D16 FrSky radio protocols. Full-size FrSky radios can easily be bound to the craft if you decide to make an upgrade.
There isn’t much to complain about here. It’s a combination proven to last many flight hours while taking a fair beating. The biggest issue might be that this model flight controller still appears to have a lockup bug—if you use D16 mode (the default) with telemetry, the flight controller can lock up. This causes the motors to continue spinning until the battery is removed, so it’s something you will want to avoid. If you set up a new radio on this quad, disable telemetry or switch to D8 mode before binding.
Each of the parts—frame, motors, flight controller, camera, video transmitter, propellers—are individually replaceable. If you do damage the drone, repairs can be made with generally inexpensive components. However, you may need experience working with small electronics to change out some of them.
Flight Characteristics
Each motor is 7mm wide and 16mm tall, spinning up at 19000Kv. This size and power makes it a mid-range motor among 1S micro quads, with performance to match. The quad easily outperforms many of its older siblings such as the original Inductrix (on which the 65mm formula is based). On the other hand, newer (and more expensive) offerings from NewBeeDrone, EMAX, and other manufacturers have better speed and handling.
The Beta65S is a great cruiser and a wonderful machine to get started with. There’s plenty of power to zip through the house or navigate race gates on a small course. New pilots will find it has plenty of zip and can handle many tight maneuvers well. It struggles in more difficult scenarios such as any kind of turbulent air, which makes it squarely an indoor machine. If you gain a lot of experience, (upwards of 30 flight hours or more,) the most discerning of pilots may consider moving on to a more power and responsive machine. At that point, you will have gotten more than your money’s worth.[/vc_column_text][/vc_column][/vc_row][vc_row][vc_column][vc_column_text]
FPV Goggles
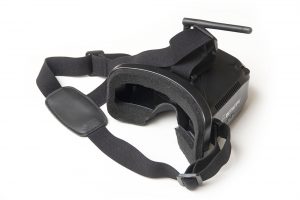
Not to beat around the bush—the goggles in this kit are small. They’re a single-screen “box” style. Goggles are a personal choice, as everyone’s face is a different shape and each person has different eyesight. Personally, I’m not able to use the goggles at all—but my farsighted vision and face shape make using nearly any box-style goggle uncomfortable or impossible to use for me. Others have no issues, though. Smaller faces and younger eyes are more likely to faire better than myself. Foam padding is included to help block light leak.Fit aside, the experience of using the goggle is also not the greatest. It takes a very long press of the power button to turn them on or off. The spectrum isn’t split into bands and channels as it typical, but you move through the frequencies using simple +/- buttons. This makes it difficult to jump large distances at once, especially since you have to wait between presses before moving again.While charging, the charge indicator LED is inside the goggle housing, making it difficult to see. All together the goggle is a pretty weak part of the package, but it does get the job done.
If you decide to get a different set, nearly any other analog goggle will work great with the Beta65S. The EV800D is a popular lower-cost choice, but you could even fly it with the insane ORQA FPV.One.[/vc_column_text][/vc_column][/vc_row][vc_row][vc_column][vc_column_text]
Controller
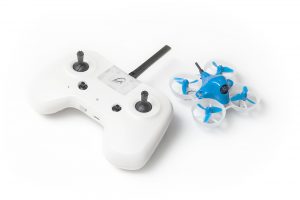
To pilot the drone, you get a two-stick controller that works the same way as most full-size RC radios. It’s a little larger than others, which helps it sit comfortably in your hands and provide more fine control of the sticks. Included in the box is a set of alternate stick ends—pop the pre-installed ends off and replace them to shorten the sticks for a different feel. Shoulder buttons like you would find on a game controller emulate two and three-position switches typical to radio control transmitters. Charge the internal battery via the Micro-USB port at the bottom.
This controller is another strong point for the Advanced kit as compared with other RTF offerings. It’s more generously sized than others and the sticks are fairly smooth. While this won’t replace more expensive radios with hall-effect gimbals and other fancy upgrades, it does talk the same protocol—many other FrSky radios could replace this one and use with the Beta65S drone such as the X-Lite or X9D Plus SE. This radio is actually part of an open-source project, so if you like to tinker you could write your own firmware to extend its capabilities. The manual for the TX is available online but doesn’t come printed in the box.[/vc_column_text][/vc_column][/vc_row][vc_row][vc_column][vc_column_text]
Batteries, Charger, and Accessories
In the box are 2 batteries, so you can charge one while you fly the other. They are 300mAh, which is pretty large for a brushed drone this size. This extends the flight time by a small amount, but it’s not doing the flight performance any favors. They are good quality batteries that will last a long time, but if you are serious about racing then sooner or later you’ll buy smaller packs. That said, if you enjoy flying as much as many of us do, you’ll be buying more packs soon anyway—two won’t be enough (and additional batteries can be bought for less than $4 each).[/vc_column_text][/vc_column][/vc_row][vc_row][vc_column width=”1/2″][vc_single_image image=”5150″ img_size=”medium” alignment=”right” onclick=”link_image”][/vc_column][vc_column width=”1/2″][vc_single_image image=”5151″ img_size=”medium” onclick=”link_image”][/vc_column][/vc_row][vc_row][vc_column][vc_column_text]The battery charger is simple. You connect your battery to one side, and plug the other into any USB port. A red LED blinks to indicate charge status. This charger is matched to the “HV” (4.35V) batteries that came with the kit. If you buy more, watch out that you aren’t getting “standard” (4.20V) batteries since this charger will overcharge them which could be dangerous and will definitely shorten their lifespan. Once you buy more batteries, you’ll outgrow the charger fairly quickly since it only does one at a time. Other good options are the NewBeeDrone Nectar Injector, or Happymodel 6-in-1 1S Lipo/LiHV Battery Charger which can both handle 4.20 and 4.35/HV battery types.
You also get a battery checker, which is a really nice addition. This tool immediately gives you the voltage level for your batteries so you know if they’re ready to fly. Just plug in the end that fits. Instead of a percentage, it tells you the battery voltage directly, so you’ll have to learn what the values mean. If it’s at 4.20 or more, it’s ready to fly! If it’s 3.70 or less, you definitely should charge up before taking off.[/vc_column_text][/vc_column][/vc_row][vc_row][vc_column][vc_single_image image=”5153″ img_size=”full” alignment=”center” onclick=”link_image”][/vc_column][/vc_row][vc_row][vc_column][vc_column_text]
Wrap Up
For new pilots, BetaFPV’s Advanced kit will likely be compared closely to NewBeeDrone’s AcroBee Lite RTF kit. NewBeeDrone offers a really compelling package where every piece is well thought out. The BetaFPV kit has some important advantages: a more durable drone, an ergonomically better radio, a battery checker… and perhaps the most important for some buyers: a price tag about $30 less. On the other hand, NewBeeDrone’s more expensive kit gets you a much faster and smoother drone, better goggles, two more batteries, a 4-port charger, a case, and a controller that can be used with a simulator. If you have the extra cash, the NewBeeDrone kit is definitely worth a look.
If you’re interested in getting into FPV but have a very strict budget, the BetaFPV Beta65S Whoop Racing Advanced Kit is still a solid choice. There aren’t many kits that can match this one for durability. This is a kit that will survive entry into the hobby at least as well as any other, which is a pretty important consideration—new pilots crash a lot. While you’re not getting anything top-of-the-line, each piece is functional and there’s an upgrade path available for almost every separate component when you’re ready. That may just be the sweet spot for a budding racer.[/vc_column_text][/vc_column][/vc_row][vc_row][vc_column][ultimate_spacer height=”40″][vc_separator][ultimate_spacer height=”40″][/vc_column][/vc_row][vc_row][vc_column][vc_single_image image=”5156″ img_size=”medium” alignment=”center”][dt_default_button link=”url:https%3A%2F%2Fwww.getfpv.com%2Fbetafpv-beta65s-whoop-racing-advanced-kit-frsky.html||target:%20_blank|” size=”medium” button_alignment=”btn_center”]Buy the BETAFPV Beta65S Advanced Whoop Racing Kit[/dt_default_button][/vc_column][/vc_row]