

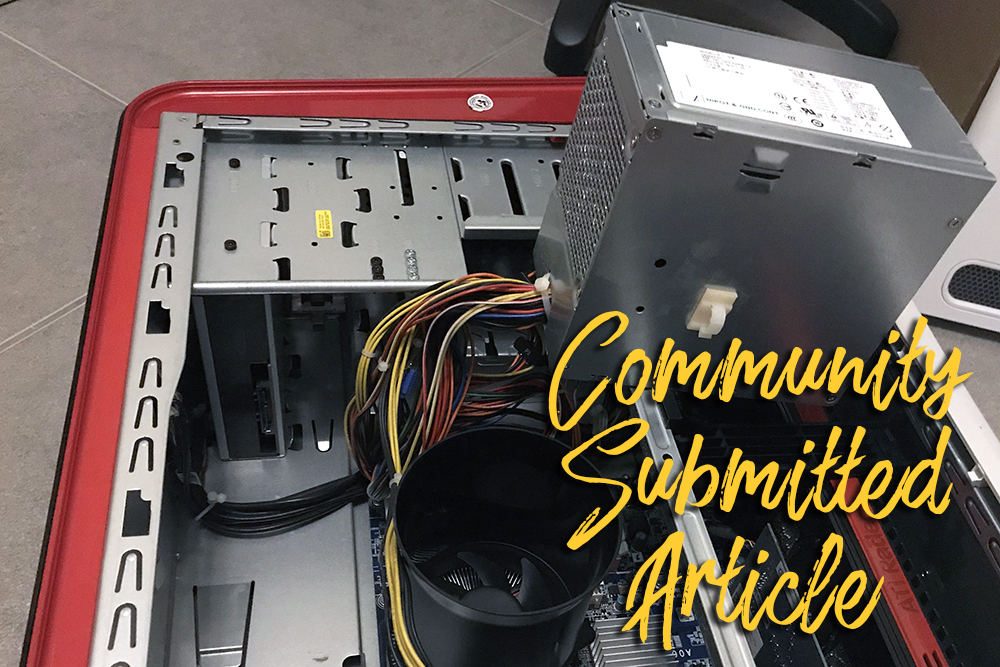
In this tutorial, we will modify an old computer power supply so that you can use it for a LiPo charger such as an ISDT. This project does not cost as much as pre-built power supply, and the materials for this are easy to find. By making this power supply, there is no need to use another $20-40 on a power supply, which can be used for FPV parts. Furthermore, as long as you can cut and strip wires, and have a basic understanding of soldering (where you can learn here), it is easy to build![vc_row][vc_column][vc_single_image image=”5125″ img_size=”full” alignment=”center” onclick=”link_image”][vc_column_text]
This article was submitted through the GetFPV Community Program by Ervin Liao. You can check out more of Ervin’s content at his YouTube, and Instagram.
Disclaimer: This article was written solely by a member of the FPV Community. Views and advice in this article are that of the author and does not necessarily reflect the opinion or views of GetFPV.
[/vc_column_text][/vc_column][/vc_row][vc_row][vc_column][vc_column_text]
Materials and Tools for the Build
Materials
- Old Computer Power Supply (can be found in old PC part stores or even at Goodwill sometimes)
- XT60 Female Connector or the connector to power the charger (Available Here)
- Heat Shrink or Electrical tape (Available Here)
- Solder (Available Here)
Tools Needed*
*Too lazy to buy all the tools separately? There is a kit on GetFPV boasting most of the needed tools for this build here. Also, if you are in a rush to get this done and have the materials, the tools can be found at a local hardware store, such as Home Depot or Lowe’s.
Modifying the Power Supply
Step 1
In the power supply, there should be one 2×2 pin connector resulting in four pins. On the connector, there should be two different colors (usually yellow and black). We will be using this for the power to the charger. Cut the connector off the four wires and strip them. After that, twist the same color wires together and solder the wires together. Then take a piece of heat shrink over the wires and slide it back all the way.
You should figure out which one of the wires is positive or negative. The positive wire is usually the color yellow, while the ground wire is usually the color black or brown.[/vc_column_text][/vc_column][/vc_row][vc_row][vc_column][vc_single_image image=”5126″ img_size=”full” alignment=”center” onclick=”link_image”][/vc_column][/vc_row][vc_row][vc_column][vc_column_text]Using a multimeter, you should figure out which of the wires is positive and negative. The positive wire is usually the color yellow, while the ground wire is usually the color black or brown.[/vc_column_text][/vc_column][/vc_row][vc_row][vc_column][vc_single_image image=”5127″ img_size=”full” alignment=”center” onclick=”link_image”][/vc_column][/vc_row][vc_row][vc_column][vc_column_text]
Step 2
Now prepare the XT60 connector. I will not show how to do this, but if you need help, you can follow this tutorial by Crash and Learn FPV. After prepping the XT60 connector, solder the positive wires (usually yellow) to the positive side of the XT60. Solder the negative to the other side. It should look something like the picture below, with the positive being brown, and the negative being black.
When done soldering, pull the heat shrink up and shrink it. If you do not have heat shrink, you could also use electrical tape. However, in my opinion, it is more messy with the electrical tape as depicted on the photo below.[/vc_column_text][/vc_column][/vc_row][vc_row][vc_column][vc_single_image image=”5128″ img_size=”full” alignment=”center” onclick=”link_image”][/vc_column][/vc_row][vc_row][vc_column][vc_column_text]
Step 3
If you plug the power supply in now, you would not receive any power and the fan of the power supply will not start spinning. This third step shows you how to fix that issue.
On the power supply, there should be one connector that has the most pins on it. With a normal computer power supply, there should be either 18 or 20 pins. On that connector, cut the wire that is green or labeled “PS_ON#” and a ground or COM wire. For the power supply to power on, you will have to bridge the green and COM wire. Any ground/COM on the connector will work.
The PS_ON# wire is a signal wire that needs to be connected to ground for the power supply to work. In a computer, it is connected to a ground internally.[/vc_column_text][/vc_column][/vc_row][vc_row][vc_column][vc_single_image image=”5131″ img_size=”full” alignment=”center” onclick=”link_image”][/vc_column][/vc_row][vc_row][vc_column][vc_column_text]After cutting the PS_ON# wire and a ground wire, strip them and tin them with a soldering iron. Put a heat shrink on one side and solder the two wires together. Now, when the power supply is plugged in the XT60 connector should be receiving power and will work when plugged into the charger. One way to test this is if the fan is spinning, the power supply is working. It should look something like the photo below.[/vc_column_text][/vc_column][/vc_row][vc_row][vc_column][vc_single_image image=”5132″ img_size=”full” alignment=”center” onclick=”link_image”][/vc_column][/vc_row][vc_row][vc_column][vc_column_text]
Caution!
The one biggest thing not to do is to cut off the rest of the unused wires on the connector. Although this may look cleaner and more aesthetically pleasing, but in the many times I have tried to do this, it has never worked. The power supply will just shutdown, and sometimes, while the fan is still on, the power supply will not supply enough power to power the XT60. You can just tuck the wires to the side with a zip tie.
Conclusion
This is a fairly easy build that can be done for cheap. Furthermore, this power supply allows you to use your money on more FPV parts. However, one downside of this power supply is it will only supplies 12 volts compared to the recommended 24 volts. I have used 12 volts for a long time, and it has not bothered me that much. Hopefully, this tutorial helped you guys in making a power supply for your battery charger.
Check out this pre-built power supply here.
Check out all the chargers and accessories GetFPV has to offer here
Want to watch a video instead? Check out this video by NewBeeDrone here[/vc_column_text][/vc_column][/vc_row]