

In this review, we will be looking at the new BetaFPV F4 12A AIO flight controller. When I first got this AIO flight controller, I knew that it would be rock-solid. BetaFPV makes some of the best tiny whoop products out there, and all their products are very reliable. This is their newest “tiny whoop” brushless flight controller, version 1.2. First off, here are some specs of this awesome flight controller:[vc_row][vc_column width=”1/2″][vc_single_image image=”5053″ img_size=”full” alignment=”center” onclick=”link_image”][/vc_column][vc_column width=”1/2″][vc_single_image image=”5054″ img_size=”full” alignment=”center” onclick=”link_image”][/vc_column][/vc_row][vc_row][vc_column][vc_column_text]
This article was submitted through the GetFPV Community Program by Lawrence Ro.
Disclaimer: This article was written solely by a member of the FPV Community. Views and advice in this article are that of the author and does not necessarily reflect the opinion or views of GetFPV.
[/vc_column_text][/vc_column][/vc_row][vc_row][vc_column][vc_column_text]
BetaFPV F4 12A AIO Specs
Flight Controller
- CPU: STM32F411CEU6 (100MHZ )
- Gyro: MPU6000 (SPI connection)
- Size: 26mm x 26mm, whoop mounting pattern
- Firmware version: Betaflight MATEKF411 (MK41)
- OSD: Built-in BetaFlight OSD (STM32 controls OSD chip over SPI in DMA mode)
- Receiver: Support Frsky XM/XM+ Receiver/ Futaba Receiver/ Flysky Receiver/ TBS Crossfire Receiver. Add Frsky R9M Receiver and DSMX receiver since V1.2.
- Supports programmable LED like WS2812 etc
- Built-in current sensor
- Weight: 6.2g
Electronic Speed Controller
- Supports BLHeli/BLHELI_S suite Pass-through ready
- Supports PWM, Oneshot125, Oneshot42, Multishot, Dshot150, Dshot300, Dshot600
- Input voltage: 2S-4S Lipo
- Continue current: 12A
- Peak current: 13A
- Firmware: BLHELI_S
- Processor: SILABS EFM8BB21F16G
- Motor Connectors: 1.25mm header pins connector
- Factory firmware: G-H-30-16.7
[/vc_column_text][/vc_column][/vc_row][vc_row][vc_column][vc_column_text]
BetaFPV recommends pairing the BetaFPV F4 12A AIO with 1103 11,000KV/0802 12,000KV motors on 2S, 1108 8,000KV/1105 6000KV motors on 3S, and 1105 5000KV motors on 4S. Of course, you can mix and match setups to your liking, based on whether you want to go for top speed and thrust, or are opting for efficiency and flight time. As you can see, it is a very versatile little board, capable of handling many different types of multirotors.
[/vc_column_text][/vc_column][/vc_row][vc_row][vc_column][vc_single_image image=”5057″ img_size=”full” alignment=”center” onclick=”link_image”][/vc_column][/vc_row][vc_row][vc_column][vc_column_text]
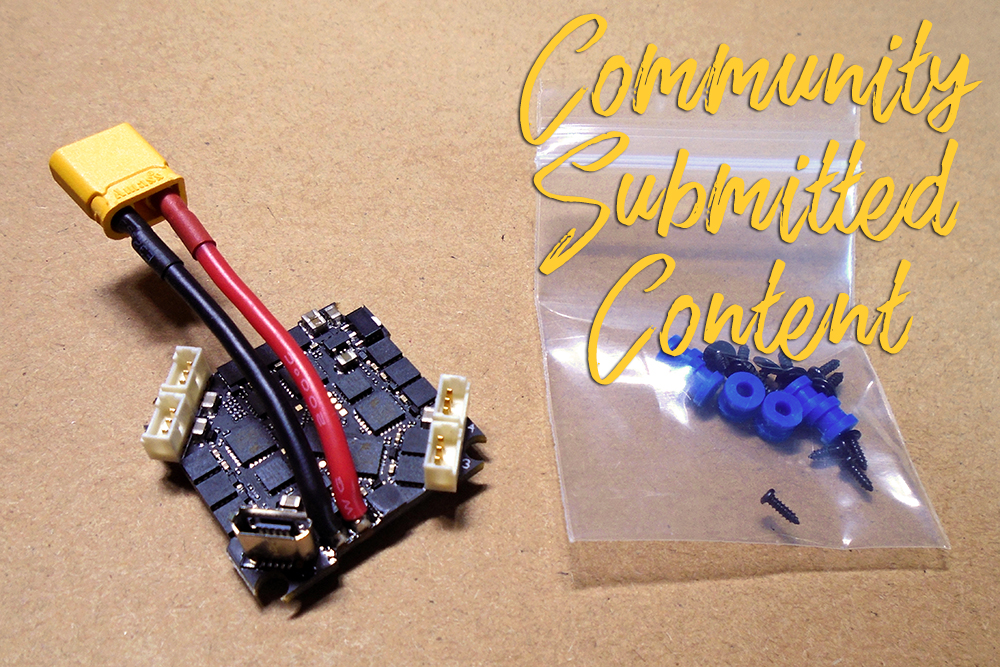
First Impressions
In the box, I got the BetaFPV F4 12A AIO flight controller, some mounting screws, and six small rubber grommets. The whole package came in a nice plastic case, encased in foam all around. This flight controller can be used in brushless whoops, as well as the new “toothpick” class quads. Its wide input voltage makes it versatile for many builds, from tiny 1s whoops, to 4s 2.5-inch monsters!
On first inspection out of the box, all the solder joints and connections looked well-made and the pads were all well placed. One thing that did annoy me slightly was the orientation of the XT-30 connector. I had to re-solder it to make it able to fit in my quad.
I do wish that they would provide at least a small, low ESR capacitor with the XT-30 connector. This really helps to control voltage spikes and can preserve the life of a flight controller from a burn out due to excessive current flow. Yes, these XT-30 connectors that everyone is switching to can and will burn out some control boards, such as the Crazybee F4 due to the board not being able to handle the current carried by the larger XT-30 connector.
[/vc_column_text][/vc_column][/vc_row][vc_row][vc_column][vc_single_image image=”5058″ img_size=”full” alignment=”center” onclick=”link_image”][/vc_column][/vc_row][vc_row][vc_column][vc_column_text]
Power-Up
The first thing I did when I got the BetaFPV F4 12A AIO powered up was to update the firmware. The target I selected was the target called “MATEKF411”. To flash firmware, simply hold down the “boot” button on the bottom side of the board, and then connect USB power to it.
However, simply powering from USB will NOT provide power to the receiver, UART, and OSD pads. Plugging in a LiPo is required alongside the USB connection. From power up to Betaflight connection, everything went perfectly. Dshot beacon worked well, OSD was perfect, and the on-board current meter was accurate.
[/vc_column_text][/vc_column][/vc_row][vc_row][vc_column][vc_single_image image=”5055″ img_size=”full” alignment=”center” onclick=”link_image”][/vc_column][/vc_row][vc_row][vc_column][vc_column_text]
Electronic Speed Controller
Next, I updated the ESC firmware via BLHeli Configurator. In the BLHeli Configurator, I updated the ESCs just as if I were doing it to my 5-inch quad. I could not believe how easy this flight controller was to use! Simply go here: BLHeli Configurator to download the Chrome installation.
The ESCs performed perfectly right out of the box. However, I did notice that they were a bit out of order. I had to manually go into the Betaflight CLI command line and remap some of the ESCs to their corresponding positions.
[/vc_column_text][/vc_column][/vc_row][vc_row][vc_column][vc_single_image image=”5060″ img_size=”full” alignment=”center” onclick=”link_image”][/vc_column][/vc_row][vc_row][vc_column][vc_column_text]
Outputs and FPV
At the middle and top parts of the BetaFPV F4 12A AIO, you may notice some other UARTs. These can be used for any other extra accessory you want to have on your quad.
To connect your camera, simply hook it up the 5V, Ground, and the pad labeled “I”. This stands for “in”, as in video in for your OSD. The video transmitter is wired up to 5V, Ground, and pad “O”, for OSD out. The pad named “T1” is your Smart Audio pin, which is used to change the video transmitter settings such as frequency and output power from the Betaflight OSD. If your video transmitter has a Smart Audio pin, then be absolutely sure to use this function. It is super easy to setup, and once you use it once, you will never go back to the old-fashioned button press channel change! Simply solder your “Smart Audio” pin from your transmitter to a free “TX” UART on your flight controller, and you are good to go! Just remember to enable this feature in the “Ports” tab in Betaflight.
I was even more excited when I was able to use the FrSky F-port protocol on this controller. This enabled me to get telemetry and SBUS in one wire! Not only does this simplify wiring, but it also reduces weight from having a few extra wires going to the flight controller
One thing that did disappoint me was the fact that BetaFPV has taken out their 5-pin FPV connector port on this flight controller that was previously used to plug in their Z02 camera + video transmitter via micro headers. It was so well thought out and convenient. I was sad to see it leave.
I believe that this was to provide greater flexibility for different FPV systems other than their own Z02 AIO camera, such as adding in a RunCam Racer Nano and a TBS Unify Pro Nano. This is a great thing to have, because for pilots who prefer the quality and WDR of higher end cameras, BetaFPV has made is much easier to implement pilot’s choice of FPV, and not their choice of FPV. It’s great for the market and our hobby in general.
[/vc_column_text][/vc_column][/vc_row][vc_row][vc_column][vc_single_image image=”5059″ img_size=”full” alignment=”center” onclick=”link_image”][/vc_column][/vc_row][vc_row][vc_column][vc_column_text]
Build Quality
The wiring and soldering of this controller were quite nice. The solder pads were so well thought out, especially for the FPV system connection. In the lower corner, there are seven pads. Two are for 5V, two are for Ground, and the rest are for your ODS and Smart Audio. These are perfectly designed with the user experience and soldering/wiring sanity in mind. The contacts of the motor connectors were spotless, and were bright, shiny, and clean, indicating a solid connection between the motors and flight controller.
Up above at the top and middle of the flight controller, are all the other solder pads. You have two 5V pads, two Ground pads, one LED pad, a 3.3V pad, three UART pads, and an SBUS pad. Even these are so well thought out!
The 5V, Ground, and SBUS pads are all adjacent to each other, which makes wiring up your FrSky receiver relatively simple. If you are using F-port and an R-XSR, then you only need to use the first three wires from the receiver’s pins!
The LED strip is paired with the other 5V and Ground pad, aiding in the installation of an LED strip, if you desire to bling out your aircraft. The LEDs can be configured via Betaflight.
If you are direct soldering the motor wires, then the removal of the 1.25mm header pins may be necessary. This is not too difficult, as it involves just a bit of solder wick, and maybe a solder sucker tool. Removing the pins also can save precious weight. This is especially important in all “whoop” class quads because every gram is important in the all up weight. Even a few grams can make a difference in flight time and handling.
When mounting the BetaFPV F4 12A AIO to a standard toothpick frame, I found that I had to flip the whole flight controller upside down to fit the motor connectors. This was not much of an issue, but I still did need to go into Betaflight and change the board orientation.[/vc_column_text][/vc_column][/vc_row][vc_row][vc_column][vc_column_text]
Final Thoughts
Overall, I was very impressed by the BetaFPV F4 12A AIO flight controller. It was extremely well thought out and has rock solid build quality. I could not have asked for anything more in a micro flight controller. It’s got the tried and true Betaflight OSD, Smart Audio, LED support, plenty of UARTS, and well-placed solder pads. I will most definitely be using this board in a toothpick class quad soon!
[/vc_column_text][/vc_column][/vc_row][vc_row][vc_column][ultimate_spacer height=”40″][vc_separator][ultimate_spacer height=”40″][/vc_column][/vc_row][vc_row][vc_column][vc_single_image image=”5053″ img_size=”medium” alignment=”center”][dt_default_button link=”url:https%3A%2F%2Fwww.getfpv.com%2Fbetafpv-f4-2-4s-12a-blheli-s-aio-brushless-flight-controller.html||target:%20_blank|” size=”medium” button_alignment=”btn_center”]Get the BETAFPV F4 2-4S 12A BLHeli_S AIO Brushless Flight Controller[/dt_default_button][/vc_column][/vc_row]