

FPV drone canopies can be a useful addition or modification to your drone. Canopies are a piece of material fitted over the central pod of a racing drone. They are relatively cheap to manufacture and serve a variety of functions depending on their design and material. In this article, I will discuss a few variations of FPV drone canopies and go through the process of designing and manufacturing one.
Canopies have significant advantages compared to running a carbon top plate. You can choose to run a canopy instead of a top plate; however, I prefer to use both. This slightly increases weight however it provides optimal protection to the core electronics. Canopies are usually made of materials with a degree of elasticity allowing them to absorb most impact forces. This increases durability as less crash energy is transferred to the frame.
For this reason, canopies can act as a sacrificial component which is significantly cheaper and easier to replace than electronics. Hollow canopies also offer further protection to antennas or cameras which can be mounted inside the canopy. I haven’t had to replace a single video antenna this year thanks to my protective hollow canopies. Hollow canopy designs also allow for LEDs to be housed inside which produces a glowing effect as pictured below. Canopies also provide a raised section on the top of the drone to speed up crash flip recovery. When designing FPV drone canopies, I like to include as many of these features as I can in an aerodynamic and smooth package.[vc_row_inner][vc_column_inner width=”1/6″][/vc_column_inner][vc_column_inner width=”2/3″][vc_single_image image=”3083″ img_size=”full” alignment=”center” onclick=”link_image”][/vc_column_inner][vc_column_inner width=”1/6″][/vc_column_inner][/vc_row_inner][vc_column_text]
Materials
Canopies are made from thermoplastics with the most common materials being TPU, nylon, and polycarbonate. A thermoplastic is a material which can be continuously re-heated and formed into shape. TPU and polycarbonate are both semi-elastic materials which can be worked back and forth quite a few times before breaking. TPU is the most elastic with polycarbonate and nylon being the more rigid materials. The mechanical properties of these materials also allow them to withstand a high quantity of impacts before failing. Nylon and TPU canopies are 3D printed whereas polycarbonate FPV drone canopies are vacuum formed.[/vc_column_text][vc_row_inner][vc_column_inner width=”1/6″][/vc_column_inner][vc_column_inner width=”2/3″][vc_single_image image=”3096″ img_size=”full” alignment=”center” onclick=”link_image”][/vc_column_inner][vc_column_inner width=”1/6″][/vc_column_inner][/vc_row_inner][vc_column_text]
Manufacturing Methods
When building FPV drone canopies, you can choose to manufacture them using either 3D printing or vacuum forming. Most drones have 3D printed canopies already designed for them which can be found free on Thingiverse. 3D printed canopies are the easiest to produce, and although prints take time, you can just let it print while you sit back and relax/fly. I would strongly recommend purchasing a 3D printer as it is an invaluable tool. There will usually also be nearby drone community members or makerspaces with printers who are willing to print your FPV drone canopies for you.
Vacuum formed canopies are my personal favorite production method as they are quick to produce and their hollow bulge has many possible functions. They require the most physical labor to produce, however, 10 minutes of work for a lighter canopy isn’t a bad trade-off. 3D printed canopies take up to three hours to produce however the flexibility of TPU allows them to withstand more impacts before failure. More to come on these manufacturing methods.[/vc_column_text][vc_column_text]
Building Your Own FPV Drone Canopies
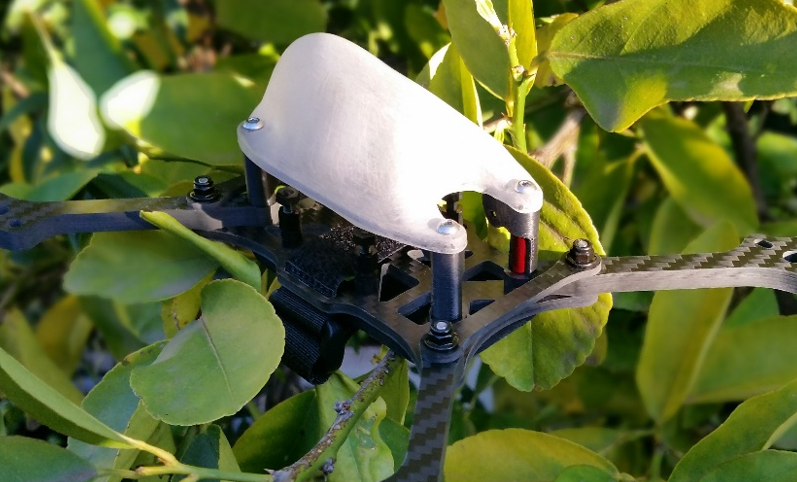
Now, I will show you how to make your own FPV drone canopies using both vacuum forming and 3D printing. 3d printed and vacuum formed canopies are quite similar in CAD but have a few differences. The canopy I will be designing will be optimized to fit over the top plate of my OSprey Racing Fletch frame.[/vc_column_text][vc_row_inner][vc_column_inner width=”1/6″][/vc_column_inner][vc_column_inner width=”2/3″][vc_single_image image=”3080″ img_size=”full” alignment=”center” onclick=”link_image”][/vc_column_inner][vc_column_inner width=”1/6″][/vc_column_inner][/vc_row_inner][vc_column_text]
Considerations
Vacuum formed and printed canopies require different considerations due to manufacturing limitations. It is ideal to decide on 3D printing or vacuum forming before designing the canopy. A vacuum formed canopy will use a 3D printed mold which the hot plastic will conform around.
Both canopies must factor in 3D printing limitations such as large overhangs or thin sections. Vacuum formed canopies also cannot taper outwards meaning that all sides should be visible from the top (except for vertical side walls). Vacuum formed parts also tend to crease if the mold forces the material to stretch and form back over a smaller surface. I found that I had to iterate the design of my canopy several times to get it to form without creases. My final 3D printed mold for vacuum forming was quite smooth and rounded. 3D printed canopies have very little limitations in comparison to vacuum forming and can essentially look however you want them to.[/vc_column_text][vc_column_text]
Designing a Canopy
Design Considerations
First, list out what functionality you want the canopy to have and your chosen manufacturing method. For this canopy I want it to house LED lights, protect my video antenna and absorb impacts. Vacuum forming will be my preferred manufacturing method as a hollow canopy has more space internally.
Modeling Software
Next, you want to open your computer-assisted design (CAD) software. I recommend using Fusion 360 by Autodesk as it is free for hobbyists and has a multitude of design tools. Lars Christensen has a whole playlist of video tutorials for Fusion 360.
Design Process
Step 1:
To start the 3D modeling process, we will need an outline of your frames’ top plate. If you already have the 3D model of your frame, you can simply import the top plate into a new part and project its geometry onto a new sketch. If you want to 3D model your own frame, you can read Callum’s article on that here. The alternative is to place your top plate onto a scanner alongside a ruler for scale. This image can then be imported into Fusion using the attached canvas tool and traced out as a sketch. As well as using the ruler in the image for scale, you can also measure the top plate dimensions and apply them to your image in CAD. Using constraints, make sure that the center of your top plate sketch is aligned with the origin. In the image below, I have also added the blue highlighted lines to my top plate sketch to round off the canopies outline.[/vc_column_text][vc_row_inner][vc_column_inner width=”1/6″][/vc_column_inner][vc_column_inner width=”2/3″][vc_single_image image=”3097″ img_size=”full” alignment=”center” onclick=”link_image”][/vc_column_inner][vc_column_inner width=”1/6″][/vc_column_inner][/vc_row_inner][vc_column_text]
Step 2:
After creating a top plate outline, extrude it upwards by 2-3mm. The next step is to create the overall shape of the canopy using the freeform tool. This takes a bit of practice to use, but free formed canopies are much sleeker than ones created using the other design tools such as lofts. Man and Machine has an excellent tutorial on creating freeforms.[/vc_column_text][vc_row_inner][vc_column_inner width=”1/6″][/vc_column_inner][vc_column_inner width=”2/3″][vc_single_image image=”3098″ img_size=”full” alignment=”center” onclick=”link_image”][/vc_column_inner][vc_column_inner width=”1/6″][/vc_column_inner][/vc_row_inner][vc_column_text]
Step 3:
For the canopy, you first start by creating a work plane 1mm above the extruded top plate. Select the freeform tool and create a plane. Click the work plane and the origin to align the freeform. Change the length and width of the free-form until the edges of it slightly overlap the top plate extrusion. Set each of the width and length faces to 6 and set the symmetry to mirror. You also want to select length symmetry so that both sides of the canopy are mirrored. The next step is to click ‘modify’ and to start forming the canopy to your liking. I would recommend putting a fin on top of your canopy as it will make it easier to turtle mode your drone. Below is the freeform for my canopy.[/vc_column_text][vc_row_inner][vc_column_inner width=”1/6″][/vc_column_inner][vc_column_inner width=”2/3″][vc_single_image image=”3099″ img_size=”full” alignment=”center” onclick=”link_image”][/vc_column_inner][vc_column_inner width=”1/6″][/vc_column_inner][/vc_row_inner][vc_column_text]
Step 4:
Once the freeform is completed, select the extrusion tool and select the outline of your top plate. Change the distance of the extrusion to ‘to’ mode and select the freeform plane. This creates an extrusion between your top plate extrusion and your freeform. You can then go about adding in features such as screw holes to the canopy. If you are 3D printing your canopy, you can also elect to use the shell tool to hollow out the canopy to a width of 1-3mm.[/vc_column_text][vc_row_inner][vc_column_inner width=”1/6″][/vc_column_inner][vc_column_inner width=”2/3″][vc_single_image image=”3100″ img_size=”full” alignment=”center” onclick=”link_image”][/vc_column_inner][vc_column_inner width=”1/6″][/vc_column_inner][/vc_row_inner][vc_column_text]
Manufacturing
Vacuum Forming
To vacuum form, you will need:
- A vacuum former
- A vacuum cleaner
- Your 3D printed canopy mold
- Polycarbonate sheets. I recommend using 1mm-1.5mm (0.04″-0.06″) thickness sheets.
- An oven. I recommend purchasing a cheap camping oven second hand as melting plastics in a food oven isn’t safe. A heat gun will also work however the results are worse as the material cannot be evenly heated.
For the vacuum former, I made a wooden box with a perforated wood sheet on the top as pictured below. I then drilled a hole in the side and glued a pipe to the side for the vacuum cleaner to attach to. Punished Props Academy published an excellent video on building and using a homemade vacuum former.
As well as the tips outlined in the video, I would recommend that the 3D printed mold for vacuum forming is printed in hard ABS or PLA plastic. A flexible mold will not yield ideal results. Another tip that I would add would be to cover the 3D printed mold in a thin layer of grease before vacuum forming the canopy. This makes it significantly easier to remove. You can also sand the 3D printed mold smooth for a smooth canopy; however, I keep the print lines as they help the canopy to glow when LEDs are installed.[/vc_column_text][vc_row_inner][vc_column_inner width=”1/6″][/vc_column_inner][vc_column_inner width=”2/3″][vc_single_image image=”3095″ img_size=”full” alignment=”center” onclick=”link_image”][/vc_column_inner][vc_column_inner width=”1/6″][/vc_column_inner][/vc_row_inner][vc_column_text]
3D Printing
If you aren’t familiar with 3D printing, I would recommend reading Callum’s article on 3D Printing for FPV. As discussed, the ideal 3D printed canopy will be printed in either nylon or TPU plastic. Material color is your choice; however, I would recommend using white nylon filament as it can be dyed. Jon E demonstrates nylon dying in his video.
The main advantage of 3D printed canopies is that you can modify the infill and number of shells to change the flexibility. A squishy canopy with low infill (~10%) and low shells (~2) will flex on impact absorbing little force and transfer the rest onto the frame. A hard canopy will absorb less of an impact and as a result, will transfer more shock onto the rest of the frame. I would recommend using 30% infill and 3 shells however you should test out different temperatures and print setting to see which suits you best.[/vc_column_text][vc_row_inner][vc_column_inner width=”1/6″][/vc_column_inner][vc_column_inner width=”2/3″][vc_single_image image=”3094″ img_size=”full” alignment=”center” onclick=”link_image”][/vc_column_inner][vc_column_inner width=”1/6″][/vc_column_inner][/vc_row_inner][vc_column_text]
FPV Drone Canopy Testing
There are a series of methods for testing FPV drone canopies. My personal testing method is to perform virtual stress testing in Fusion as demonstrated in this video by Hodgepodge. Simulations are what Formula 1 teams use as it is cheap and moderately representative of real-world performance. The alternative to simulations is to do real-world testing. This involves manufacturing a series of canopies, flying, observing how they break, and improving the design. To obtain the best results, I recommend completing both methods although real-world testing is the easiest to complete. Testing canopies you design is essential. It took me about twenty revisions to finalize my own canopy design to a point where I was satisfied. Some of my canopy revisions are pictured below.[/vc_column_text][vc_row_inner][vc_column_inner width=”1/6″][/vc_column_inner][vc_column_inner width=”2/3″][vc_single_image image=”3093″ img_size=”full” alignment=”center” onclick=”link_image”][/vc_column_inner][vc_column_inner width=”1/6″][/vc_column_inner][/vc_row_inner][vc_column_text]
Final Word
Congratulations, you have now learned how to make your own set of FPV drone canopies. Not only will your fleet of drones look the part, but they will also provide significantly more protection to antennas, cameras, and your frame. Whether you choose to design your own or print out someone else’s canopy, you can be sure that it is improving your drone.
I am leaving this comment to enter into the GoPro giveaway!!
Osprey! Thank you so much! I’ve been looking for an article like this!!
Thanks for sharing. Going to try free formmodeling in Fusion360.