

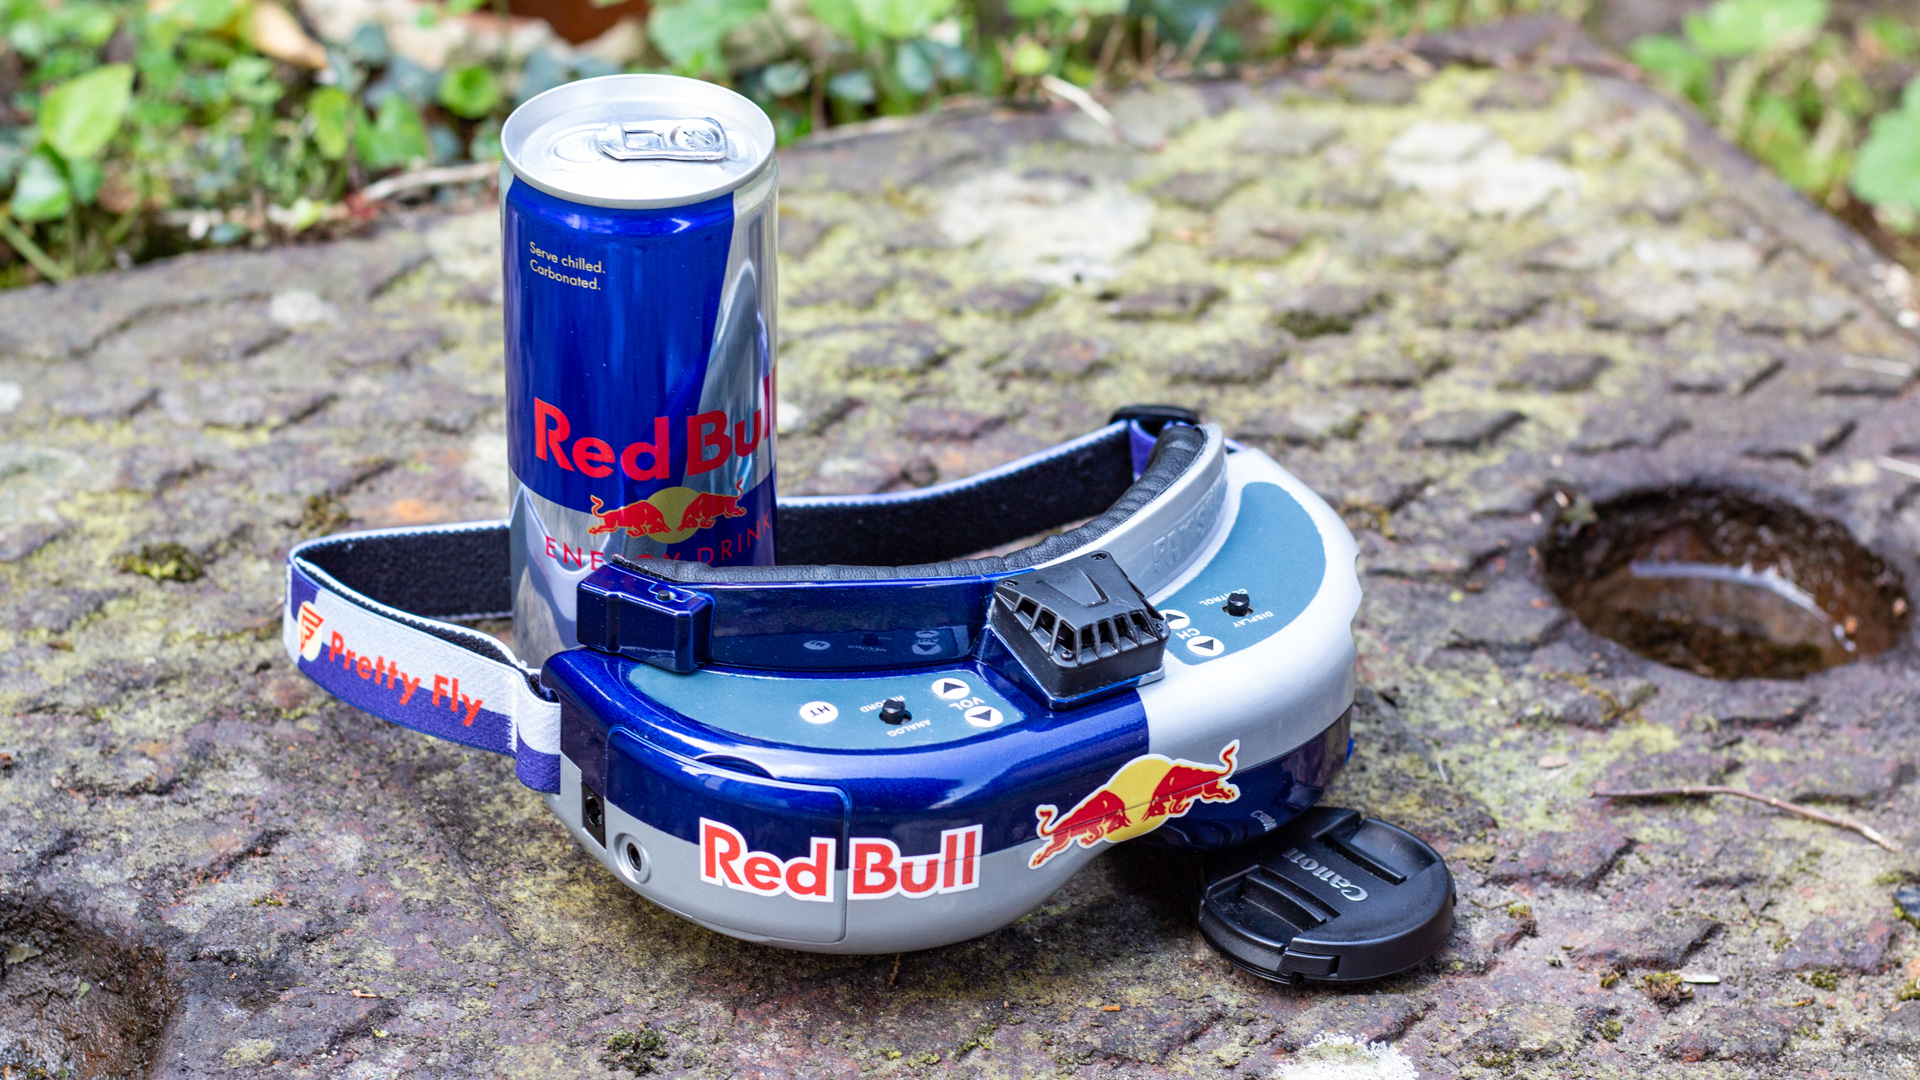
If you have been involved in FPV for a while, then there is a good chance that some of your gear is starting to look a bit rough. Some of the higher value items like goggles are too expensive for most people to replace, simply because they look a bit old, certainly if they still work well and there are no newer/better replacements on the market. This article with walk you through how to pimp your goggles and make them look both fresh and customised to your own style![vc_single_image image=”2822″ img_size=”full” alignment=”center” onclick=”link_image”][vc_column_text]My goggles were definitely showing their age, I purchased my Fatshark HD2’s nearly 2 years ago and I still love them despite the debatably blurry peripheral view, I’m attached to the huge FOV and am not prepared wear a massive box goggle or sacrifice the immersive experience. There’s nothing else on the market that can provide the same specs, so when the guys at GetFPV pointed out the options they carry for replacing parts on the goggles and asked if I would be keen to write an article on how to pimp my aging goggles with some of the parts they sell, I jumped on the opportunity![/vc_column_text][vc_single_image image=”2824″ img_size=”full” alignment=”center” onclick=”link_image”][vc_column_text]They offer a range of replacement goggle straps in a wide selection of styles, so there should be something to suit everyone’s taste. This is great because my OEM Fatshark strap is stretching out and seems to need tightening every time I fly, it has certainly seen better days. They also sell replacement faceplates equipped with the new leatherette foam pads and updated air channels, so since the velour was peeling off the second foam pad on my goggles and the fan has seen a fair few hours of use, I grabbed a strap and a faceplate and started coming up with a plan to both freshen up, and really make my goggles my own.[/vc_column_text][vc_column_text]Out of the strap selection I decided to go with the ‘gives you props’ option/colour scheme, which is based on the well known Red Bull colours. I’m not usually a fan of pseudo sponsored looking gear, but I respect Red Bull for getting in behind some of the most awesome sports on the planet (FPV being no exception) and having consumed enough of their product in the past, I don’t mind ‘repping’ their brand while out flying. The dual tone colour scheme is relatively simple but also a good challenge to try replicate well with basic rattle cans.[/vc_column_text][vc_single_image image=”2827″ img_size=”full” alignment=”center” onclick=”link_image”][vc_column_text]
Pimping your goggles
First step is to plan what you want to do, you’ve got plenty of options. You could grab a strap and a faceplate and simply paint up the faceplate leaving the goggles alone and you will have a unique customised set of goggles that will be instantly recognisable in the field and significantly quicker and easier than a full respray. This is a great option if you want to make a new set of goggles your own, and not mess with the warranty. Or, you can go all out, and opt for the full respray like I did. As I mentioned my goggles are a couple of years old and any factory warranty has long since expired, so there was nothing to lose by opening them up provided I was careful.[/vc_column_text][vc_single_image image=”2826″ img_size=”full” alignment=”center” onclick=”link_image”][vc_column_text]
Prep
First step is to prep the parts, one the best things I was ever told is that “The results can only ever be as good as the prep” this applies to nearly everything, and painting is no exception. Luckily Fatshark parts are painted out of the factory and that layer of paint makes a perfect primer layer for your new colour scheme to adhere to. All that is needed is to make sure the parts are completely clean from any grease and oils and to scuff the surface so that the new paint layer has something to adhere to.[/vc_column_text][vc_single_image image=”2829″ img_size=”full” alignment=”center” onclick=”link_image”][vc_column_text]I like to kill two birds with one stone at this point, I use warm water with a splash of dish detergent with some wet and dry paper to rub back the surface. 600 grit paper is perfect for prepping the surface, it’s not so coarse that it will rub through the existing paint layer or leave visible scratches when the parts are painted. The soapy water cleans the parts and lubricates the paper so that it does not clog and creates a nice even finish. Try not to rub through the existing paint layer, as doing so can create visible feathering in the finished spray coats.
Once you have all the parts nicely rubbed down and have a good matte finish all over the existing paint surface, you are ready to mask up any areas that you want to keep free from spray. For me this was the fan, button, and balance plug port on the faceplate. On the goggle body itself I simply needed to mask off the existing sticker decals as I didn’t want to replace them. Everything else would not be affected if it got sprayed.[/vc_column_text][vc_single_image image=”2830″ img_size=”full” alignment=”center” onclick=”link_image”][vc_column_text]Take your time with the masking, I actually ran into some problems with the tape I bought specifically for this project, and this caused me a bit of a headache later in the project.
Another thing to take care of now is how you will hold the parts while spraying so that you don’t mark the fresh paint, consider how you will hang/place the parts while they are drying! Set up any stands/hanging setups that you need before you break out the paint.
I used some bamboo skewers that I use when making burgers, the ends fit snugly into some voids in the goggle halves and provided a sturdy handle and something to hang them from. This worked great as I could rotate the parts and get into all the spots and didn’t get too much paint on my hands.[/vc_column_text][vc_single_image image=”2831″ img_size=”full” alignment=”center” onclick=”link_image”][vc_column_text]
Painting
I chose to use Tamiya TS spray paints, these certainly aren’t the cheapest way to buy spraypaint, due to their small size. They are very good quality and lacquer based, so they dry quickly and provide a very nice looking finish right out of the can. They are also specifically made for use on plastics.[/vc_column_text][vc_single_image image=”2832″ img_size=”full” alignment=”center” onclick=”link_image”][vc_column_text]Make sure you shake the cans for the recommended amount of time and a quick pro tip is to run the can under warm water while shaking till the contents are nice and warm. Hold the can at the top and shake while keeping the base of the can under the hot water, you will start to feel the top get warm as the paint inside heats up. The time it takes to warm up the paint inside the can ensures that you shake the can for long enough, this both reduces the paint viscosity, and increases the can pressure. Both of which lead to better atomisation of the paint and smoother more even coverage. WARNING: Don’t get fresh cans too hot as they can burst if the pressure gets too high, on partially used cans it’s okay to get the paint quite warm.[/vc_column_text][vc_single_image image=”2833″ img_size=”full” alignment=”center” onclick=”link_image”][vc_column_text]Now that the parts are fully prepped, and your can is mixed and ready to go, you want to find a suitable place to spray. Ideally no wind and room temperature is perfect. Try not to paint on rainy days as the moisture in the air can affect the paint job. I chose to hold my parts and spray ‘freehand’ as there was very little wind on the day that I did my goggles. I simply stood in the back yard and sprayed the parts while standing up and holding them. This allows the over spray to mostly ‘flash-off’ as it drifts away and does not stick to or discolour anything around me.
Biggest rule of rattle can painting, or any type of spray painting for that matter, is don’t go for full coverage on the first coat. You want to lay down a ‘tack coat’, just a light coat that will adhere to the part well and provide a good base for subsequent coats to stick to, this will make ‘runs’ and ‘sags’ less likely. It’s hard not to go for that nice full coat right away but trust me it will look better and have great coverage if you do the painting in multiple lighter coats rather than one heavy one.[/vc_column_text][vc_single_image image=”2834″ img_size=”full” alignment=”center” onclick=”link_image”][vc_column_text]For the Red Bull livery, the blue used is a pearl colour meaning that it’s actually transparent and requires the silver underneath it to give it that metallic sheen. So first up, I sprayed two coats of silver over the entire parts and left it to dry in the sun for about 10 minutes in between coats. On the second coat I left it overnight to dry properly so that when I applied the masking tape it would not damage the paint underneath.[/vc_column_text][vc_single_image image=”2835″ img_size=”full” alignment=”center” onclick=”link_image”][vc_column_text]Masking up the livery for the Red Bull colours is pretty easy. The complex contours of the goggles does make getting the lines to look visually straight a bit of a challenge. Some measuring and eyeballing got my masking tape in the right places. I bought special modelling masking tape in the hope of getting nice crisp lines and no damage to the paint during removal, turns out the thin paper tape was almost impossible to get to lay down properly to form a clean edge, and on removal there were lots of tiny bleeds that made the lines look fuzzy, careful scraping with a scalpel blade cleaned up the lines to the point I was happy with. From that point on I just used the clear electrical tape I had on my desk. The electrical tape gave super clean lines and peeled off very well, I wish I had used it from the start![/vc_column_text][vc_single_image image=”2836″ img_size=”full” alignment=”center” onclick=”link_image”][vc_column_text]Once you have your accent colours painted give the paint 10-15min to tack off, then remove the masking, I find it’s better to do this when the paint is still slightly ‘green’ (partially cured) as it’s less likely to chip or lift as you remove the tape since it is still slightly soft.[/vc_column_text][vc_single_image image=”2837″ img_size=”full” alignment=”center” onclick=”link_image”][vc_single_image image=”2838″ img_size=”full” alignment=”center” onclick=”link_image”][vc_column_text]
Decals
I like to add the decals/stickers before the clearcoat as I find this makes the stickers less likely to lift or peel, so I worked out my placement and added them to the goggles before clearing the parts. Because the stickers straddle the split line I re-assembled the goggle halves to apply the stickers then used a razor blade to cut them along the split line so the parts could be separated for the clearcoating.[/vc_column_text][vc_single_image image=”2839″ img_size=”full” alignment=”center” onclick=”link_image”][vc_column_text]
Clearcoat
I unfortunately didn’t have the clear to spray right away as I would have preferred. you get a better bond between paint layers if the paint does not completely cure between each coat. A couple days later my clear lacquer arrived, and I was able to lay up the final gloss coat. Metallic spray colours will need a clearcoat to seal them and give the colour that reflective depth that looks soo good. I really wanted a ‘deep’ shine so layered up two decent coats of clear. This is where I almost messed up. By definition, it’s pretty hard to see how much clear you are putting on and after putting the parts up to dry I noticed a sag in the paint!!! I was a little angry but quickly got to fixing it. It may seem counter intuitive, but I added some more clear to the area to re-soften the paint then used a hot air gun and movement of the part to make the clear relax and settle to a smooth finish again, and it worked![/vc_column_text][vc_single_image image=”2840″ img_size=”full” alignment=”center” onclick=”link_image”][vc_column_text]Repairing sags/runs in this way is risky as the hot air gun can cause the paint to bubble and if you don’t get the amount of paint added right, it can make the whole issue much worse. A safer but equally scary way to fix it, is to let the part completely cure then use a razorblade at 90° to the surface to shave down the excess paint then polish it manually. I’m glad the added paint trick worked!
Once it’s all done give the parts a good 3-4 days somewhere nice and warm/dry for the paint to completely cure before you put them through any abuse.
If you have gotten through all these steps, then you should have a totally custom set of goggles that will stand out any time you hang out with other FPV pilots.
I hope this article has helped to show how to pimp your goggles and inspires you to give customising your equipment a go. Use these tips to make it a less scary experience and definitely check out the range of accessories and replacement parts available on GetFPV.com to make your gear really match your style!
Keep those props spinning![/vc_column_text][vc_single_image image=”2841″ img_size=”full” alignment=”center” onclick=”link_image”][vc_single_image image=”2842″ img_size=”full” alignment=”center” onclick=”link_image”][vc_single_image image=”2822″ img_size=”full” alignment=”center” onclick=”link_image”]
That’s a great article Blair! You have inspired me to customize my HD3’s!
Quick question: which color is the blue that you used?
Thanks Kye! The blue is Tamiya TS89 Pearl Blue, make sure to get the coats as even as possible for a smooth colour since it’s translucent. Good luck with the spray job!
Absolutely terrific. I’m trying this for sure. Thank you for sharing. Pinned!
Wow, they look great!
Hey what colours did you use to spray paint your goggles?
Thanks for the great article!
Great Article, the goggles look good.
I hydrodipped my goggles and they look great.