

Drone CNC machining is a useful tool for this hobby and an excellent way to apply three-dimensional (3D) modelling skills. A CNC or computer numerical control is an automated milling machine with the ability to manufacture parts. In this article, I’ll go over drone CNC machining and how you can do it too.
How Does a CNC Machine Work
A CNC machine uses precise stepper motors to move its head around in 3D space. The head of a CNC machine contains a fast spinning milling bit. The CNC autonomously navigates this milling bit to cut or carve away sections of material. 3D printers create parts by adding material, however drone CNC machining removes material. The CNC machine is fed instructions called G-code which tells the machine where to move. The G-code file is generated by importing your 3D model into computer assisted machining (CAM) software. Drone CNC machining usually involves cutting flat carbon fibre however the machines can also cut 3D objects.
Exporting CAD Files
The first step of drone CNC machining is to export your CAD files. This is a required step if you are sending off your CAD to be machined or are generating the CNC G-code in another piece of software. Fusion 360 can generate G-code itself however this will be later discussed.
If you are new to CAD, you can read Callum’s guide on designing your first FPV drone frame.
CAD files for drone CNC machining are commonly exported as DWG or DXF file formats. These formats both save the two-dimensional outline of the part. For 3D printing and CNC jobs, an STL file format is used which exports the model in three dimensions. For this guide I will use a DXF file. An important consideration is to create the surface you wish to export parallel to the X-Y plane.
To export a Fusion 360 model as a DXF file, rotate the model using the view cube so its top face is facing upwards. Right click the view cube and set the current view as top.[vc_row_inner][vc_column_inner width=”1/6″][/vc_column_inner][vc_column_inner width=”2/3″][vc_single_image image=”3782″ img_size=”full” alignment=”center” onclick=”link_image”][/vc_column_inner][vc_column_inner width=”1/6″][/vc_column_inner][/vc_row_inner][vc_column_text]Next start a sketch on the visible top face and project (by pressing ‘p’) the part’s outline onto that sketch.[/vc_column_text][vc_row_inner][vc_column_inner width=”1/6″][/vc_column_inner][vc_column_inner width=”2/3″][vc_single_image image=”3783″ img_size=”full” alignment=”center” onclick=”link_image”][/vc_column_inner][vc_column_inner width=”1/6″][/vc_column_inner][/vc_row_inner][vc_column_text]Finish the sketch and export it as a DXF by right clicking the corresponding sketch in the feature tree on the left.[/vc_column_text][vc_row_inner][vc_column_inner width=”1/6″][/vc_column_inner][vc_column_inner width=”2/3″][vc_single_image image=”3784″ img_size=”full” alignment=”center” onclick=”link_image”][/vc_column_inner][vc_column_inner width=”1/6″][/vc_column_inner][/vc_row_inner][vc_column_text]
Machining Services
Armattan productions is the machining service I would recommend as it is specifically designed for drone users. Compared to commercial CNC companies, it is also a much easier option. Most commercial CNC companies are looking for larger machining jobs whereas Armattan completes drone CNC machining in any volume. Armattan is also renowned for using high quality carbon removing the need to source your own.
Getting into Drone CNC Machining Yourself
Buying a CNC Machine
CNC machines can be purchased for a wide variety of prices and are essentially ‘what you pay is what you get’. You will want to spend a minimum of $500 on a CNC however hobbyist machines in the $2000-$5000 range are typically more accurate, reliable and of a higher quality. That said, CNC machines can go upwards in price to over a million dollars![/vc_column_text][vc_column_text]
CAM Software – Mach 3 & Fusion 360 Inbuilt CAM
There are three pieces of software required for drone CNC machining. They are the 3D modelling package (CAD), G-code generation software (CAM) and a CNC driver software (used to control the CNC). Fusion 360 is ideal for hobbyists as it is free to use and has both CAD & CAM capabilities. 3rd party CAM software is available however it can be quite expensive. Cut 2D and cut 3D would be my recommended 3rd party CAM software choices.[/vc_column_text][vc_column_text]Expensive CNCs will typically run their own driving software however Mach 3 is the driver software I recommend. Mach 3 is a cheap yet useful CNC driver software with a lot of functionality and customisability. I’ve even used it to run a custom made chocolate 3D printer.[/vc_column_text][vc_column_text]
CNC Milling Bits for Carbon Fibre
Milling bits for CNC machines are designed to cut downwards and sideways unlike a conventional drill bit used for holes. I recommend buying a few high-quality milling bits as carbon fibre can be quite corrosive. Carbide corn teeth end mill bits are what I recommend in a 2.5-3mm diameter. A larger diameter bit will not be able to cut out M3, 3mm screw holes.[/vc_column_text][vc_row_inner][vc_column_inner width=”1/6″][/vc_column_inner][vc_column_inner width=”2/3″][vc_single_image image=”3786″ img_size=”full” alignment=”center” onclick=”link_image”][/vc_column_inner][vc_column_inner width=”1/6″][/vc_column_inner][/vc_row_inner][vc_column_text]
Where to Buy Carbon Fibre
The choice of carbon fibre is quite important. It is cheaply available from various sources however the quality and durability are as low as the price. GetFPV sells Lumeneir carbon fibre which is what I would recommend. The cost is reasonable however the quality justifies it.[/vc_column_text][vc_row_inner][vc_column_inner width=”1/6″][/vc_column_inner][vc_column_inner width=”2/3″][vc_single_image image=”3787″ img_size=”full” alignment=”center” onclick=”link_image”][/vc_column_inner][vc_column_inner width=”1/6″][/vc_column_inner][/vc_row_inner][vc_column_text]
Water Beds
Carbon fibre releases fine dust particles when machined. These particles can be carcinogenic so I recommend using a water bed when drone CNC machining. I do not recommend CNC machining without a water bed as it prevents carbon dust from circulating around the surrounding environment and settling on clothing, tools, furniture or other objects. A water bed is a tray of water/cutting compound in which the carbon is machined. This is the most effective dust removal method and cools the milling bit. A water bed, being just a watertight container can be constructed using any materials. A simple water bed consists of a wood base and aluminium angle bracket side walls made watertight using silicone. Joop Brokking demonstrates this in his video here.[/vc_column_text][vc_column_text]
Safety
Microscopic carbon fibre dust particles are quite sharp and can become stuck in your lungs. For this reason, I recommend purchasing a good quality respirator. Never cheap out on safety equipment, I can guarantee that there will be at least one situation in your life that makes you thankful you didn’t. Wearing gloves whilst handling carbon is also recommended until the parts have been cleaned from dust and lightly sanded on the edges to remove potential carbon splinters. To reduce the spread of carbon dust, I also recommend drone CNC machining in an enclosed box. Drone CNC machining should also be completed away from living spaces such as kitchens, bathrooms, bedrooms etc. Ideally, machining should be completed in a ventilated shed, garage or outdoors. It is also good practice to decontaminate yourself and your parts from carbon dust using an air compressor outdoors after a machining job. [/vc_column_text][vc_row_inner][vc_column_inner width=”1/6″][/vc_column_inner][vc_column_inner width=”2/3″][vc_single_image image=”3785″ img_size=”full” alignment=”center” onclick=”link_image”][/vc_column_inner][vc_column_inner width=”1/6″][/vc_column_inner][/vc_row_inner][vc_column_text]
Machining it Yourself
Now that I have covered the general aspects of drone CNC machining, I will go through the process of machining a part.
Material Mounting
There are several ways to mount the material to the CNC bed. In all cases, it is important to mount the material such that it is flat and flush with the CNC bed. I recommend methods 1 and 2 as they do not require holding tabs which are tedious to remove.[/vc_column_text][vc_column_text]
Method 1 – Double Sided Tape
Using double sided tape, stick the base of the carbon to a thin plywood sheet of equal dimensions. Screw or clamp this down to the CNC bed. The purpose of the plywood is to prevent the drill bit from going into the metal CNC bed when the carbon fibre has been cut through. If using a water bed with an already wooden base (or vinyl coated wood base) you can directly stick the carbon to the bed.[/vc_column_text][vc_column_text]
Method 2 – Screw Holes
Clamp or screw the carbon to the bed (with a piece of plywood underneath if not using a water bed). CNC machine all holes, slots or cut-outs but not the outer profile of your parts. Screw the carbon to the CNC bed through the milled holes and proceed to machine the outer profiles for the parts. When screwing the carbon down, ensure that is does not move otherwise the parts will be compromised. Also ensure that the CNC will not cut into any protruding screw heads when machining the outer profiles. Although being more tedious, this is the ideal method as double-sided tape can become stuck in the drill bits causing wear. This method is commonly used in industry.[/vc_column_text][vc_row_inner][vc_column_inner width=”1/6″][/vc_column_inner][vc_column_inner width=”2/3″][vc_single_image image=”3792″ img_size=”full” alignment=”center” onclick=”link_image”][/vc_column_inner][vc_column_inner width=”1/6″][/vc_column_inner][/vc_row_inner][vc_column_text]
Method 3 – Holding Tabs
Clamp or screw the carbon to the bed (with a piece of plywood underneath if not using a water bed). In the CAM software, you have the option to add holding tabs. Holding tabs are small tabs which keep the parts attached to the main carbon fibre sheet during machining. The use of holding tabs reduces the time to set up the material however their removal through cutting and sanding can be tedious, especially when machining a large quantity of drone parts.[/vc_column_text][vc_row_inner][vc_column_inner width=”1/6″][/vc_column_inner][vc_column_inner width=”2/3″][vc_single_image image=”3793″ img_size=”full” alignment=”center” onclick=”link_image”][/vc_column_inner][vc_column_inner width=”1/6″][/vc_column_inner][/vc_row_inner][vc_column_text]
Fusion 360 CAM
Fusion 360 allows you to prepare your own G-code to CNC machine your parts. ‘EvanAndKatelyn’ on YouTube have an excellent tutorial on this which can be found here.[/vc_column_text][vc_column_text]
Machine Setup
The next step is to import the G-code file into a CNC control program. Most CNC machines will include this software. My software of choice is Mach 3 however any control software serves the same function. After importing the G-code into Mach 3, I move the CNC head to the origin of the piece (usually the corner of the material). I then lower the head down so that the milling bit just touches the material and set this point as the origin (X=0,Y=0,Z=0). After raising the head and arming the spindle, the program can be started. The drone CNC machining has now begun.[/vc_column_text][vc_column_text]
Parts Clean Up
After the drone CNC machining has completed, the parts require some clean up. As I elected to use adhesive tape to secure the carbon, my clean up consists of peeling this off. I would also recommend lightly sanding the edges of the part with some 1500 grit sandpaper to remove sharp edges or splinters. If you elected to use holding tabs, cut these off using a Dremel and carefully grind them back before sanding. I recommend sanding in a tub of water to reduce carbon dust.[/vc_column_text][vc_column_text]
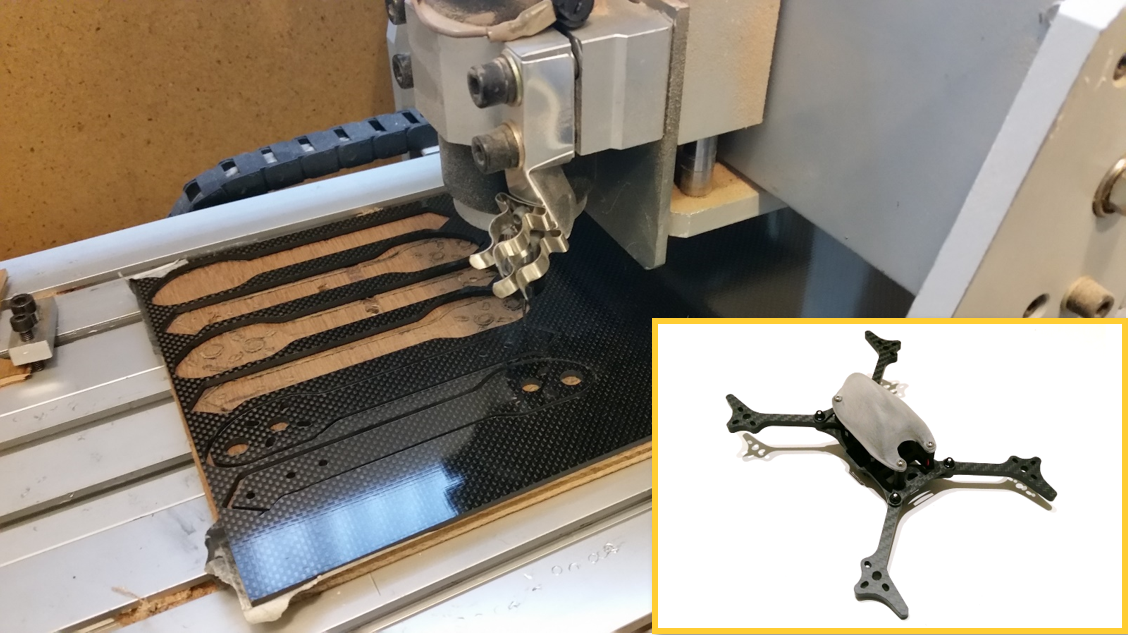
Results
If the drone CNC machining was done precisely, the results should reflect this. In my case, the final product was the OSprey Racing Fletch 210 frame.[/vc_column_text][vc_row_inner][vc_column_inner width=”1/6″][/vc_column_inner][vc_column_inner width=”2/3″][vc_single_image image=”3788″ img_size=”full” alignment=”center” onclick=”link_image”][/vc_column_inner][vc_column_inner width=”1/6″][/vc_column_inner][/vc_row_inner][vc_column_text]
Final Word
I hope this article has provided you with some decent foundational knowledge of Drone CNC machining. I highly encourage you to give it a go as CNC machining can be used for a variety of other industries and applications.
Hello, This blog is very useful !
Thanks for giving this amazing information. if you want to any query visit my site.