

Goggle’s down, thumbs up for video, on the tone in less than 5…….. LAUNCH! In this article, I’ll show you the process of building your own low-cost DIY FPV launch stand. A launch stand helps a quad to take off from a high angle (sometimes nearly vertical) by providing an soft, elevated surface for the front arms to grip whilst the pilot pitches the quad forwards. The advantage of a launch stand is in allowing pilots to quickly accelerate up to speed when a race begins. Now, let the build commence![vc_column_text]
Step 1
To build your very own DIY FPV launch stand, you will need:
- At least 80cm or 31 inches of timber. The piece I used was 5cm by 7cm or about 2 inches by 3 inches. Using wooden pieces with these dimensions ensures that the stand will be suitable for 5” quads with slightly varying dimensions.
- A tape measure.
- A saw.
- An electric drill.
- A pencil.
- Four 7cm/3 inch screws (ideally any screw longer than 5cm or 2 inches will do).
- An adhesive-backed foam sheet. I used a 6mm or quarter inch thick foam sheet.
[/vc_column_text][vc_row_inner][vc_column_inner width=”1/6″][/vc_column_inner][vc_column_inner width=”2/3″][vc_single_image image=”2854″ img_size=”full” alignment=”center” onclick=”link_image”][/vc_column_inner][vc_column_inner width=”1/6″][/vc_column_inner][/vc_row_inner][vc_column_text]
Step 2
Measure the length of your quad on the piece of wood. Add about 5 centimetres or 2 inches onto that length and mark it on the wood. I chose to use a length of 25cm or about 10 inches. Using the saw, cut two pieces of wood to your preferred length.[/vc_column_text][vc_row_inner][vc_column_inner width=”1/6″][/vc_column_inner][vc_column_inner width=”2/3″][vc_single_image image=”2855″ img_size=”full” alignment=”center” onclick=”link_image”][/vc_column_inner][vc_column_inner width=”1/6″][/vc_column_inner][/vc_row_inner][vc_column_text]
Step 3
Set your two lengths of wood parallel to each other with the wider section of the wood placed vertically. Place your quad onto the two pieces of wood and adjust the spacing between the pieces until all motors sit within the top surface of the wooden pieces. Check again that the pieces are parallel and measure the distance between them. For my quad, I measured 9cm or about 3.5 inches between the long wooden pieces. [/vc_column_text][vc_row_inner][vc_column_inner width=”1/6″][/vc_column_inner][vc_column_inner width=”2/3″][vc_single_image image=”2856″ img_size=”full” alignment=”center” onclick=”link_image”][/vc_column_inner][vc_column_inner width=”1/6″][/vc_column_inner][/vc_row_inner][vc_column_text]Mark that length onto a section of unused wood and saw off the piece. It is important for this piece that your cuts are perpendicular to the long sides of the wooden plank otherwise the launch stand will not be square when screwed together.[/vc_column_text][vc_row_inner][vc_column_inner width=”1/6″][/vc_column_inner][vc_column_inner width=”2/3″][vc_single_image image=”2857″ img_size=”full” alignment=”center” onclick=”link_image”][/vc_column_inner][vc_column_inner width=”1/6″][/vc_column_inner][/vc_row_inner][vc_column_text]
Step 4
Take your wood blocks and arrange them as shown in the diagram below with the wider section of the wood vertical. Mark lines so that the inside vertical edges of the wood blocks meet.[/vc_column_text][vc_row_inner][vc_column_inner width=”1/6″][/vc_column_inner][vc_column_inner width=”2/3″][vc_single_image image=”2869″ img_size=”full” alignment=”center” onclick=”link_image”][/vc_column_inner][vc_column_inner width=”1/6″][/vc_column_inner][/vc_row_inner][vc_column_text]At the end of both long wooden pieces, mark 2 holes as shown in the diagrams below. These marks should be on the wider section of the wooden blocks and positioned 2.5cm or 1 inch from the edges of the wood.[/vc_column_text][vc_row_inner][vc_column_inner width=”1/6″][/vc_column_inner][vc_column_inner width=”2/3″][vc_single_image image=”2859″ img_size=”full” alignment=”center” onclick=”link_image”][/vc_column_inner][vc_column_inner width=”1/6″][/vc_column_inner][/vc_row_inner][vc_column_text]
Step 5
Drill out these holes using a drill bit half the diameter of your screws. Drilling pilot holes reduces the force required to screw the screws. Next screw the screws into the pilot holes such that each head is just poking out of the wood as shown in the diagram below.[/vc_column_text][vc_row_inner][vc_column_inner width=”1/6″][/vc_column_inner][vc_column_inner width=”2/3″][vc_single_image image=”2860″ img_size=”full” alignment=”center” onclick=”link_image”][/vc_column_inner][vc_column_inner width=”1/6″][/vc_column_inner][/vc_row_inner][vc_column_text]Reassemble the wooden blocks into the ‘n’ shape as shown in step 4. Press the protruding screw heads into the shorter wooden block. Drill four pilot holes into the shorter wooden block where the screw heads pressed into it.[/vc_column_text][vc_row_inner][vc_column_inner width=”1/6″][/vc_column_inner][vc_column_inner width=”2/3″][vc_single_image image=”2861″ img_size=”full” alignment=”center” onclick=”link_image”][/vc_column_inner][vc_column_inner width=”1/6″][/vc_column_inner][/vc_row_inner][vc_column_text]
Step 6
Reassemble the wooden blocks into the ‘n’ configuration and tightly screw them together. If you wish to paint or varnish the launch stand, now is the ideal time to do so before the adhesive-backed foam is added.[/vc_column_text][vc_column_text]
Step 7
Take your adhesive-backed foam sheet and mark two 25cm by 5cm or 10 inch by 2 inch strips. Cut these strips and stick to the top surface of your launch stand. The launch stand is now finished.[/vc_column_text][vc_row_inner][vc_column_inner width=”1/6″][/vc_column_inner][vc_column_inner width=”2/3″][vc_single_image image=”2862″ img_size=”full” alignment=”center” onclick=”link_image”][/vc_column_inner][vc_column_inner width=”1/6″][/vc_column_inner][/vc_row_inner][vc_column_text]
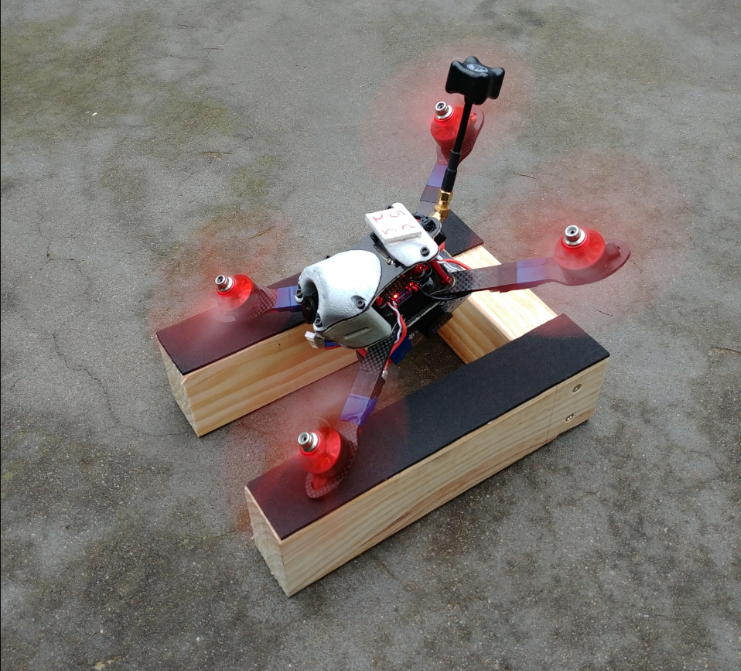
Practicing With Your DIY FPV Launch Stand
Now that your DIY FPV launch stand is completed, you should practice your launches. The tricky part of launching is knowing what throttle position to move to when launching. If the launch stand is positioned above the ground by about two feet or 60cm, you want the quad to launch horizontally. With the stand on the ground, you want to launch with a slight upwards angle from the horizon. Launch with the throttle too high and the quad will quickly rise upwards, too low and you will hit the ground, but get it just right and the quad will launch with high speed at the perfect angle. Speaking of practice, you can read more about honing your FPV racing skills by reading Aaron’s Drone Racing Practice Guide: 10 Maxims To Live By.
Another tricky part of launching is choosing the angle to pitch your quad to whilst positioned on the launch stand. The closer your quad is positioned to being vertical, the faster the launch will be however the harder it will be to control as your camera may be pointing towards the ground, depending on its angle. Finding a good balance between launch angle and ease of launching is the key. I personally like to launch at an angle of about 45 degrees as it allows me to launch quickly and with the first gate directly in sight.[/vc_column_text][vc_row_inner][vc_column_inner width=”1/6″][/vc_column_inner][vc_column_inner width=”2/3″][vc_single_image image=”2864″ img_size=”full” alignment=”center” onclick=”link_image”][/vc_column_inner][vc_column_inner width=”1/6″][/vc_column_inner][/vc_row_inner][vc_column_text]Congratulations, you have just completed your DIY FPV launch stand and are well on the way to becoming a faster racer. Take it to race events to show off, all the other pilots will want one too once they see you leaving them in the dust once the racing starts!
Also checkout thingiverse for lots of simple models if you have a 3D printer… 🙂
https://www.thingiverse.com/search?sort=relevant&q=launch+pad+fpv&type=things
Thanks- Modifying this for higher preload practice.
Looks good! We’ve always used those foam gym mat squares.