GetFPV recently released their new Lumenier digital LED system which includes a stack mountable tail light array and four secondary Lumenier digital LED strips which can connect to it. In this article I will examine and test the product to see how it fares.
Specifications
The digital LED tail light and LED strips can be purchased individually or as a complete set.
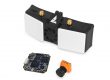
Lumeneir Digital LED Tail Light /PDB
[vc_row_inner][vc_column_inner width=”1/6″][/vc_column_inner][vc_column_inner width=”2/3″][vc_single_image image=”4768″ img_size=”full” alignment=”center” onclick=”link_image”][/vc_column_inner][vc_column_inner width=”1/6″][/vc_column_inner][/vc_row_inner][vc_column_text]
- Programs: 13 pre-programmed colors / patterns
- Dimensions: 35mm x 35mm x 5mm or 25mm x 25mm x 5mm after breaking off tabs
- Mounting holes: 30.5mm x 30.5mm or 20mm x 20mm after breaking off tabs
- Weight: 5g
- Power: Onboard 5V/3A regulator (5-26V direct input)
Lumenier Digital LED Strips Set
[/vc_column_text][vc_row_inner][vc_column_inner width=”1/6″][/vc_column_inner][vc_column_inner width=”2/3″][vc_single_image image=”4769″ img_size=”full” alignment=”center” onclick=”link_image”][/vc_column_inner][vc_column_inner width=”1/6″][/vc_column_inner][/vc_row_inner][vc_column_text]
- Dimensions: 30.5mm x 6mm x 3mm
- Weight: 0.8g
- Input Voltage: 5V (over 5V will burn the LEDs)
- Current Draw: 60mA to 160mA at 5V per LED strip (depending on LED color)
- Plug and play connector
Initial Thoughts
The first thing I noticed was the extreme amount of packaging which I thought was a bit of overkill but at least the electronics were protected. I also noticed that the Lumenier digital LED strips only come with a small piece of double-sided tape for mounting. I would have preferred inclusion of clear heat shrink to attach and protect the LEDs however it isn’t very expensive to buy this yourself. A feature which I was surprised about was the 6mm by 30.5mm profile of the Lumenier digital LED strips which could still accommodate six LEDs. Another feature which I liked was that the Lumenier digital LEDs used silicone coated wires. This makes the soldering much simpler than conventional wires as the heat from the soldering iron doesn’t burn back the insulation. The included wires were also quite thin which makes it easy to cleanly install the Lumenier digital LED system. The Lumenier digital LED boards were also not conformal coated however this is relatively cheap and easy to do yourself.
Wiring
Unfortunately, this product lacks documentation such as a wiring diagram but the labels on the solder pads made it relatively easy to wire up anyway. The Lumenier digital LEDs can be powered from 5V to 26V (up to a 6-cell LiPo). Once the wiring locations were determined, the wiring was relatively quick as the use of plugs on one end of the Lumenier digital LED board saved soldering time.[/vc_column_text][vc_row_inner][vc_column_inner width=”1/6″][/vc_column_inner][vc_column_inner width=”2/3″][vc_single_image image=”4773″ img_size=”full” alignment=”center” onclick=”link_image”][/vc_column_inner][vc_column_inner width=”1/6″][/vc_column_inner][/vc_row_inner][vc_column_text]
Installation / Mounting
The LED system has two conventional mounting methods with the included wire lengths. The first is using the main board on top of the drone stack and placing a single Lumenier digital LED board on each arm. The second method involves using the main Lumenier digital LED board as a taillight and placing two LED strips on each arm, one on each side. I chose the second mounting option as seen below.[/vc_column_text][vc_row_inner][vc_column_inner width=”1/6″][/vc_column_inner][vc_column_inner width=”2/3″][vc_single_image image=”4770″ img_size=”full” alignment=”center” onclick=”link_image”][/vc_column_inner][vc_column_inner width=”1/6″][/vc_column_inner][/vc_row_inner][vc_column_text]
Power Test
Using a multimeter and a 6s LiPo, I determined that the current draw varies from 190mA to 70mAh when all four Lumenier digital LED boards were wired to the main board. These current draws correspond to a maximum power draw of ~ 4.5 Watts (white color) and a minimum power of ~1.5 Watts (red, green or blue colors). Compared to the motors on a race quad which can draw up to 3000 Watts of power, the Lumenier digital LEDs have an insignificant power draw.
Programming
The product description lists that the Lumenier digital LED boards can be programmed using the USB connection on the taillight. I was able to get the computer to recognize the board on a COM port by holding the button on it down whilst plugging it in however, I was unable to work out which software to program the Lumenier digital LED main board with. Lumenier also doesn’t provide information as to which outputs the LEDs and button are connected to on the micro controller. I hope they release instructions to program the LEDs as it would be entertaining to customize.
Betaflight Setup
Although I could not determine the correct method to program the Lumenier digital LED main board, it can be controlled using Betaflight as you would with a standard programmable LED strip. To program it in Betaflight, ensure that the LEDs and flight controller have a common ground and connect the led pin on the flight controller to the input/output pin on the led strip as shown below. If you chose to wire up the boards this way for racing, I recommend assigning the LED colors to the VTX channels. That way you can easily tell what channel you’re on when you power up your drone.
Pre-programmed Features
The LED board ships with 13 pre-programmed color patterns if you don’t want to program it yourself or connect it to your flight controller. I quite liked this feature because I usually only put LEDs on my racing drone when the race regulations require it and take them off otherwise. This arrangement allows me to quickly add and remove the Lumenier digital LEDs if needed.[/vc_column_text][vc_row_inner][vc_column_inner width=”1/6″][/vc_column_inner][vc_column_inner width=”2/3″][vc_single_image image=”4771″ img_size=”full” alignment=”center” onclick=”link_image”][/vc_column_inner][vc_column_inner width=”1/6″][/vc_column_inner][/vc_row_inner][vc_column_text]
How it Stacks up to Comparable Products
There are quite a few manufacturers producing LED boards. Comparable products are currently sold by Matek and Diatone. The Matek LED driver serves a similar function however it doesn’t have the ability to mount to a 20×20 stack. It also cannot act as an LED taillight. Diatone produces a wide range of programmable LED arrays but doesn’t produce a driver board. From a price and functionality perspective the Lumenier digital LED system is on par with these.
Day and Night-time Testing
Testing the Lumenier digital LEDs in the daylight, they were bright enough to appear in the FPV feeds of other pilots which I was in front of. Once the sun started setting, the LEDs became highly visible in the shadows and greatly added to the racing experience.[/vc_column_text][vc_row_inner][vc_column_inner width=”1/6″][/vc_column_inner][vc_column_inner width=”2/3″][vc_single_image image=”4772″ img_size=”full” alignment=”center” onclick=”link_image”][/vc_column_inner][vc_column_inner width=”1/6″][/vc_column_inner][/vc_row_inner][vc_column_text]
Final Thoughts
For a drone pilot looking to add illumination to their quad, the Lumenier led system is an excellent product. It is well priced, feature packed and relatively easy to install. It is a product that I would certainly recommend.[/vc_column_text][vc_row][vc_column][ultimate_spacer height=”40″][vc_separator][ultimate_spacer height=”40″][/vc_column][/vc_row][vc_row][vc_column width=”1/2″][vc_single_image image=”4993″ img_size=”medium” alignment=”center”]
[/vc_column][vc_column width=”1/2″][vc_single_image image=”4992″ img_size=”medium” alignment=”center”]