

A flight controller or ‘FC’ is the main brain of a quad copter. Choosing the right FC for your application is an important decision when building a craft. The Fortini F4 OSD flight controller is a popular FC used for dedicated FPV race quad copters due to its features and unique design. In this article I will review the Fortini F4 OSD flight controller discussing its specifications, features, design and providing my opinions before and after I installed it into my primary race frame. I know that the Fortini F4 OSD will be remaining in my race craft but whether it has a place in your own quad copter is a decision that this review will assist you in making.[vc_row][vc_column][vc_row_inner][vc_column_inner width=”1/6″][/vc_column_inner][vc_column_inner width=”2/3″][vc_single_image image=”1473″ img_size=”full” alignment=”center” onclick=”link_image”][/vc_column_inner][vc_column_inner width=”1/6″][/vc_column_inner][/vc_row_inner][/vc_column][/vc_row][vc_row][vc_column][vc_column_text]
Product Specifications
- Price: $39.95 from GetFPV
- STM32 F4 flight controller (FC)
- Integrated on screen display (OSD)
- 32kHz ICM20602 Gyro
- Five UARTS
- Silicone vibration dampers
- Inrush voltage protection
- 5V 2A BEC with 2S – 6S voltage input range
- Built-In inverter for SBUS and Smart Port
- Separate power supply for gyro
- 3.3V – 5V selectable BEC output for Rx
[/vc_column_text][vc_row_inner][vc_column_inner width=”1/6″][/vc_column_inner][vc_column_inner width=”2/3″][vc_single_image image=”1470″ img_size=”full” alignment=”center” onclick=”link_image”][/vc_column_inner][vc_column_inner width=”1/6″][/vc_column_inner][/vc_row_inner][vc_column_text]
Pre-Testing Thoughts
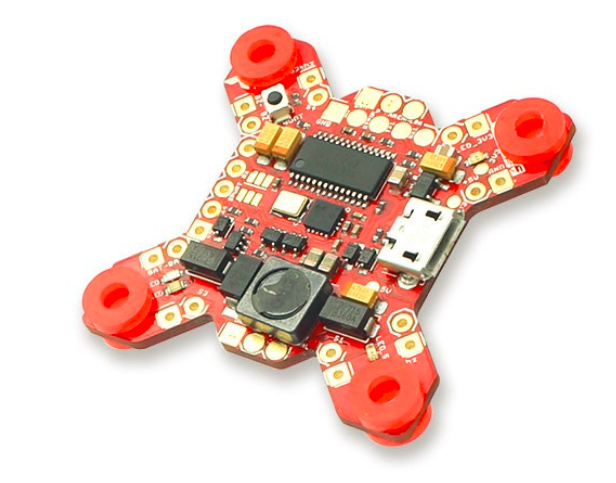
Initially inspecting the Fortini F4 OSD flight controller, it looks like a high-quality product with a multitude of functionality. The components all appear to be soldered on straight which is usually an indicator of high manufacturing tolerances. The quality control sticker is also an indicator that the Fortini F4 has undergone some testing although the depth of the testing is unknown. According to numerous resources, the first revision Fortini was quite issue plagued and a quantity would continuously re-initialize, rendering it unflyable. The Fortini F4 OSD flight controller has apparently been improved to remove these issues so I expect it to perform well in testing.[/vc_column_text][vc_column_text]
Feature Review
Now onto the main review. I will cover the main features and observations that stood out to me. The Fortini F4 OSD flight controller is quite distinguishable by its X profile which helps to reduce its weight down to only 5.8 grams. Despite this, the flight controller has five configurable UART pins, inbuilt OSD, a 2S-6S voltage input range, an on-board 5V 2A power supply, and a 32kHz gyro.
To support the 32kHz gyro, the FC also has rubber mounting dampers. These help to reduce the quantity of vibrations detected by the gyro which allows for more accurate gyro readings. The gyro is also powered from a separate circuit to the rest of the electronics in order to reduce further interference from electrical noise.
The Fortini F4 OSD flight controller is also conformal coated straight from the factory. This is a real advantage as it provides some level of water and dust protection to the electronics. I have lost a 4 in 1 from stray particles causing a short so conformal coating from the factory at least reduces the chances of this occurring.
The first disadvantage is that the FC doesn’t have an inbuilt power distribution board (PDB) unlike many similar specification boards. It also doesn’t have an inbuilt black-box. If black-box is more important to you than OSD, Furious FPV does offer the cheaper ‘Fortini F4’ found here however It would have been nice for them to make one FC with integrated black-box and OSD (although this would be challenging considering the board’s slim profile).
Camera control is also integrated and will, according to Furious, work on cameras such as the Runcam Swift 2 and Micro Swift 2 without the addition of a resistor inline with the camera’s OSD wire. To learn more about camera control, visit here.
Onto the, solder pads which aren’t completely ideal. To reduce the profile of the board, the solder pads have been shrunk in size and spaced closely together. Whilst this would be no problem to solder for those with experience, beginners may find it difficult to wire up. There is also an increased chance of creating a short circuit which can be an expensive mistake. The solder pads however are arranged quite neatly which will make it quite neat to solder.
Cost is also another disadvantage of this flight controller. From GetFPV, the similar specification Betaflight F4, Cl Racing F4S and the Bardwell F4 can all be purchased for around $34.99 compared to the $39.95 cost of the Fortini F4 OSD flight controller. They all also have inbuilt power distribution boards. I would however estimate that they weigh more due to their square profiles and extra PDB circuitry (5.8 grams for the Fortini versus an estimated ~10g for the other FC’s).
These discussed alternative F4 boards have the main disadvantage however that they are incapable of running at 32kHz (without adding overclocking the FC which increases instability). This is because they use the slower MPU6000 gyro sensor. This is the main selling point of the Fortini F4 OSD flight controller as it is the essentially cheapest and lightest 32kHz capable flight controller with little resulting loss of functionality. There are cheaper 32kHz FC’s on the marker however they either lack quality or the features of the Fortini.[/vc_column_text][/vc_column][/vc_row][vc_row][vc_column][vc_column_text]
Post Testing Thoughts
I really liked this flight controller. To test it, the Omnibus F4 V2 was removed from my 2018 prototype race frame and replaced with the much upgraded Fortini F4 OSD flight controller. On paper, both FC’s have similar features however the Fortini had two main advantages.
Firstly, it weighed 5.8 grams which is quite light for a 30 x 30 flight controller. Being a racer, any weight reduction where possible is a big positive and considering that there was absolutely no comparative functionality trade off for that weight loss, that is an even bigger positive.
Secondly, everything was ludicrously simplistic to wire up. Most of the pins are labelled and the extra few seconds it took Furious FPV to print out a wiring diagram & specification sheet was highly appreciated. The 4 in 1 ESC mounting pads on the base of the FC were the most notable feature when wiring it up. Placing them in a row made it quick and neat to wire in my 4 in 1 ESC.
The rest of the wiring was also neat and intuitive with the video input for the OSD on the front of the board and the output on the rear. The only thing I didn’t like when wiring the FC was that the solder pads, whilst intuitive to wire up, were moderately close together and quite small. This was no issue for me as I consider myself to be a good solderer (absolutely rubbish by NASA’s standards) but for a less competent solderer, this FC could prove to be quite difficult to wire up without causing short circuits. Either way, it is always a good, potentially money saving, practice to use a multi-meter to check for shorts before plugging in a battery.
Another positive about the wiring of the FC was that its X configuration made it quite easy to work on the motor pads of my 4 in 1 ESC. Usually, the FC would have to be removed to re-solder motor wires to the ESC however the Fortini F4 OSD flight controller was an exception due to its slim profile. The slim X profile also meant that the FC wiring was a lot more compact than an FC of a square profile.
Plugging in the flight controller to Betaflight, like most others, it worked. After enabling the 32kHz gyro feature the CPU load went up to %21 which is quite acceptable. I tried different PID loop frequencies to gather data for the corresponding CPU load. From the results, I would recommend using an 8kHz PID loop frequency to balance performance and CPU load. The testing results are shown below:[/vc_column_text][/vc_column][/vc_row][vc_row][vc_column][ultimate_info_table design_style=”design05″ color_scheme=”custom” color_bg_main=”#e0e0e0″ color_bg_highlight=”#ffcd32″ package_heading=”PID Loop Frequency Vs. CPU Load” heading_font_family=”font_family:Lato|font_call:Lato|variant:700″ heading_font_style=”font-weight:700;”]
| PID Loop frequency at 32kHz Gyro Frequency (accelerometer disabled) | CPU Load |
| 32kHz | %100 (Do not use!) |
| 16kHz | %42 |
| 8kHz | %27 |
| 4kHz | %23 |
| 2kHz | %21 |
[/ultimate_info_table][/vc_column][/vc_row][vc_row][vc_column][vc_column_text]After wiring up the flight controller to my racer and testing it for a few batteries, the craft felt quite smooth in the air. To be honest, most flight controllers will feel smooth in the air if tuned correctly and if using decent quality motors & propellers. Where the Fortini F4 stood out was dealing with vibrations after the propellers had endured a few impacts and were slightly bent. Vibration dampers, a 32kHz gyro, 8kHz PID loop and Betaflight 3.3 worked together in symphony to keep the craft quite stable in the air and mostly oscillation free (except when I nicked a tree branch but there is really not that much any FC can do to stabilize a quad when its front tribade becomes a dual blade.[/vc_column_text][/vc_column][/vc_row][vc_row][vc_column][vc_column_text]
Conclusion on the Fortini F4 OSD Flight Controller
In a nutshell, this is an excellent flight controller for weight conscious pilots or those who prefer to run a separate power distribution board. I would recommend this flight controller to any pilot who can confidently solder it up without worrying about short circuits. The FC performs well, has a multitude of functionality and is from a genuine FPV innovator.
Want to learn more about video transmitters? Check out our article: All About Multirotor Drone FPV Flight Controllers[/vc_column_text][/vc_column][/vc_row][vc_row][vc_column][ultimate_spacer height=”40″][vc_separator][ultimate_spacer height=”40″][/vc_column][/vc_row][vc_row][vc_column width=”1/6″][/vc_column][vc_column width=”2/3″][vc_single_image image=”1129″ img_size=”full” alignment=”center”][dt_default_button link=”url:https%3A%2F%2Fwww.getfpv.com%2Ffortini-f4-osd-32khz-flight-controller.html||target:%20_blank|” size=”medium” btn_width=”btn_full_width” button_alignment=”btn_center”]Purchase the Fortini F4 OSD[/dt_default_button][/vc_column][vc_column width=”1/6″][/vc_column][/vc_row]